MongoDB 是一个基于分布式文件存储的数据库。由 C++ 语言编写。旨在为 WEB 应用提供可扩展的高性能数据存储解决方案。MongoDB 是一个介于关系数据库和非关系数据库之间的产品,是非关系数据库当中功能最丰富,最像关系数据库的。Elasticsearch 是一个高效强大的大数据搜索引擎。它的 Speed, Scale 及 Relevance 是很多数据库不具有的。通过 Elasticsearch 的高效搜索引擎,我们可以快速地搜索相关的内容,我们也可以使用 Kibana 所提供的可视化为数据提供洞察。在今天的文章中,我将介绍如何把 MongoDB 里的数据同步到 Elasticsearch。我将展示如何使用 MongoDB connector 来实现这个功能。
在今天的练习中,我将使用如下的架构:

如上所示,我们把 MongoDB 里的数据集通过 MongoDB 连接器同步到 Elasticsearch 中。在今天的展示中,我将使用 Elastic Stack 8.13.2 来进行展示。
安装
MongoDB
我们可以按照链接来进行安装。我们在 Ubuntu OS 22.04 上进行安装。
在终端中,如果尚未安装,安装 gnupg 和 curl:
sudo apt-get install gnupg curl要导入 MongoDB 的公共 GPG 密钥,请运行以下命令:
curl -fsSL https://www.mongodb.org/static/pgp/server-7.0.asc | \
   sudo gpg -o /usr/share/keyrings/mongodb-server-7.0.gpg \
   --dearmor
创建一个 MongoDB 的列表文件。为你的 Ubuntu 版本创建列表文件 /etc/apt/sources.list.d/mongodb-org-7.0.list
echo "deb [ arch=amd64,arm64 signed-by=/usr/share/keyrings/mongodb-server-7.0.gpg ] https://repo.mongodb.org/apt/ubuntu jammy/mongodb-org/7.0 multiverse" | sudo tee /etc/apt/sources.list.d/mongodb-org-7.0.list发出以下命令以重新加载本地软件包数据库:
sudo apt-get update你可以安装 MongoDB 的最新稳定版本,也可以安装特定版本的 MongoDB。
sudo apt-get install -y mongodb-org我们需要针对 MongoDB 进行配置:
/etc/mongod.conf
我们可以使用如下的命令来启动 mongodb:
sudo service mongod start我们可以使用如下的命令来查看 mongodb 的状态:
service mongod status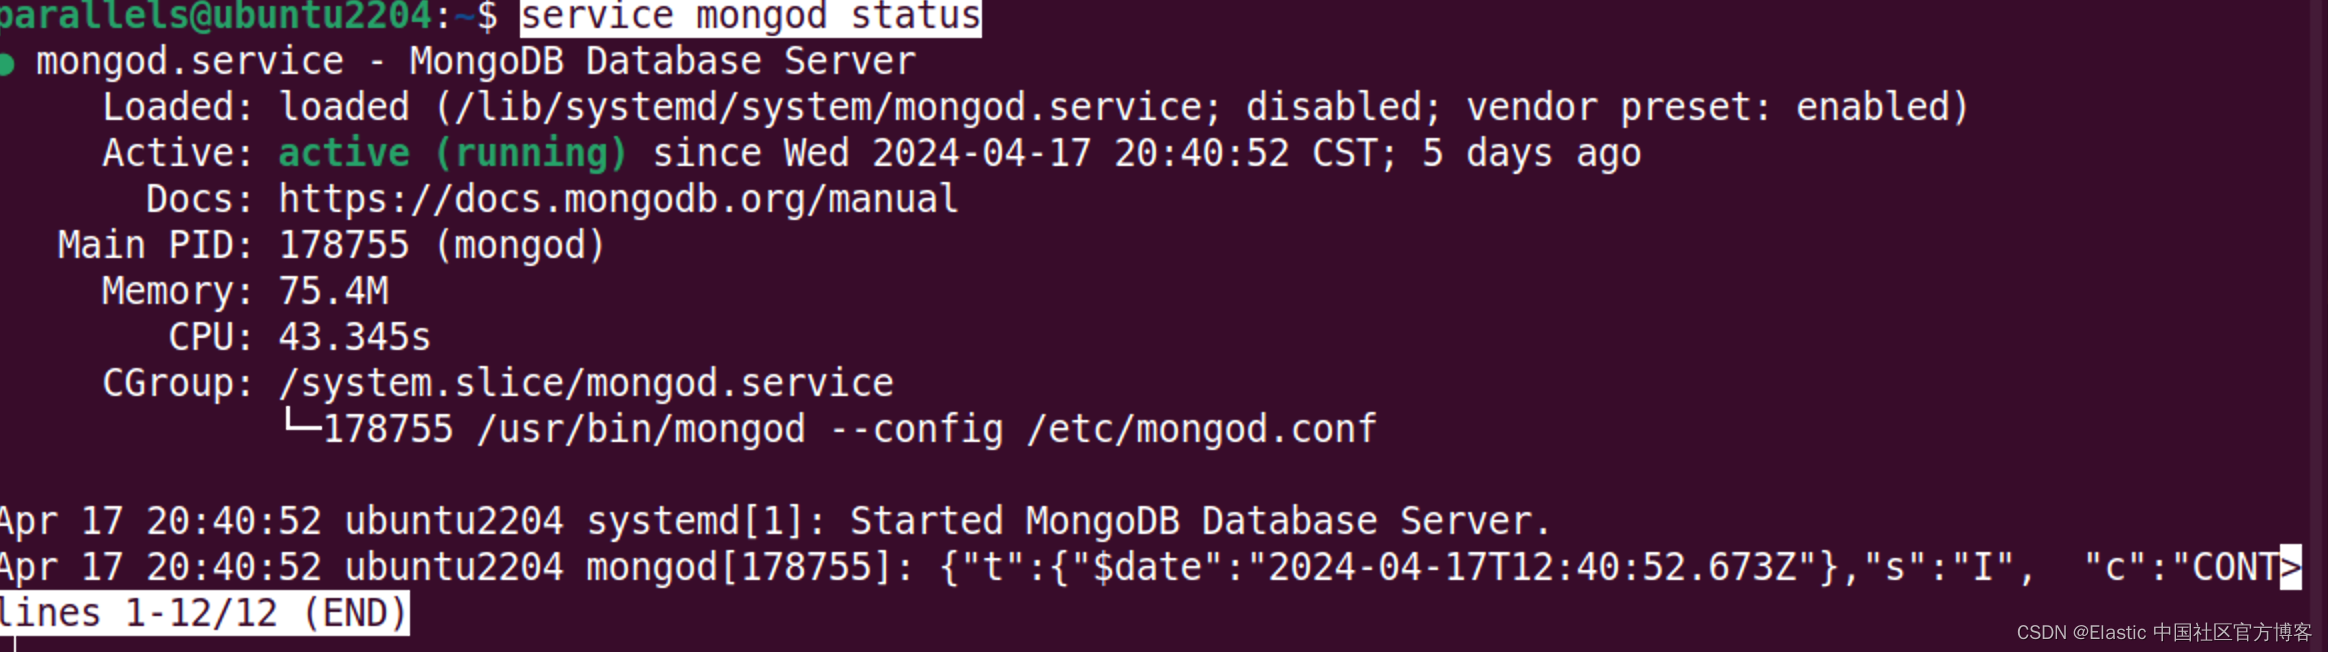
我们可以使用如下的命令来创建一个数据库:
mongosh 192.168.0.9parallels@ubuntu2204:~$ mongosh 192.168.0.9
Current Mongosh Log ID: 661fc4d5b790b167823b9273
Connecting to: mongodb://192.168.0.9:27017/?directConnection=true&appName=mongosh+2.2.4
Using MongoDB: 7.0.8
Using Mongosh: 2.2.4
For mongosh info see: https://docs.mongodb.com/mongodb-shell/
------
The server generated these startup warnings when booting
2024-04-17T20:40:52.680+08:00: Using the XFS filesystem is strongly recommended with the WiredTiger storage engine. See http://dochub.mongodb.org/core/prodnotes-filesystem
2024-04-17T20:40:53.345+08:00: Access control is not enabled for the database. Read and write access to data and configuration is unrestricted
2024-04-17T20:40:53.345+08:00: vm.max_map_count is too low
------
test> use mydatabase
switched to db mydatabase
mydatabase> show dbs
admin 40.00 KiB
config 12.00 KiB
local 40.00 KiB
mydatabase> db.mycol.insert({"name":"liuxg"})
DeprecationWarning: Collection.insert() is deprecated. Use insertOne, insertMany, or bulkWrite.
{
acknowledged: true,
insertedIds: { '0': ObjectId('661fc5a3b790b167823b9274') }
}
mydatabase> show dbs
admin 40.00 KiB
config 12.00 KiB
local 40.00 KiB
mydatabase 8.00 KiB
mydatabase>
mydatabase> db.posts.insertOne({
...   title: "Post Title 1",
... })
{
  acknowledged: true,
  insertedId: ObjectId('6627ac96b790b167823b9275')
}
mydatabase> show dbs
admin       40.00 KiB
config      72.00 KiB
local       40.00 KiB
mydatabase  48.00 KiB
mydatabase> show dbs
admin 40.00 KiB
config 72.00 KiB
local 40.00 KiB
mydatabase 48.00 KiB
mydatabase> show collections
mycol
posts
mydatabase> show tables
mycol
posts
mydatabase> db.posts.find()
[
{ _id: ObjectId('6627ac96b790b167823b9275'), title: 'Post Title 1' }
]在默认的情况下,MongoDB 的安装是没有任何安全的。我们可以参考链接来配置 MongoDB 的安全。我们必须使用如下的步骤来进行:
- 创建管理用户。这个需要针对 admin 数据库来操作
- 启动安全,并为自己的数据库创建用户
我们首先为 admin 数据库添加一个用户:liuxg/password:
use admin
db.createUser(
  {
    user: "liuxg",
    pwd: "password",
    roles: [ { role: "userAdminAnyDatabase", db: "admin" }, "readWriteAnyDatabase" ]
  }
)
如果你想在运行时设置密码,你可以使用如下的命令:
use admin
db.createUser(
  {
    user: "liuxg",
    pwd: passwordPrompt(),
    roles: [ { role: "userAdminAnyDatabase", db: "admin" }, "readWriteAnyDatabase" ]
  }
)
$ mongosh mongodb://192.168.0.9:27017
Current Mongosh Log ID: 6629cb4422076463783b9273
Connecting to: mongodb://192.168.0.9:27017/?directConnection=true&appName=mongosh+2.2.4
Using MongoDB: 7.0.8
Using Mongosh: 2.2.4
For mongosh info see: https://docs.mongodb.com/mongodb-shell/
------
The server generated these startup warnings when booting
2024-04-25T11:17:14.139+08:00: Using the XFS filesystem is strongly recommended with the WiredTiger storage engine. See http://dochub.mongodb.org/core/prodnotes-filesystem
2024-04-25T11:17:14.980+08:00: Access control is not enabled for the database. Read and write access to data and configuration is unrestricted
2024-04-25T11:17:14.980+08:00: vm.max_map_count is too low
------
test> use admin
switched to db admin
admin> db.createUser(
... {
... user: "liuxg",
... pwd: "password",
... roles: [ { role: "userAdminAnyDatabase", db: "admin" }, "readWriteAnyDatabase" ]
... }
... )
{ ok: 1 }
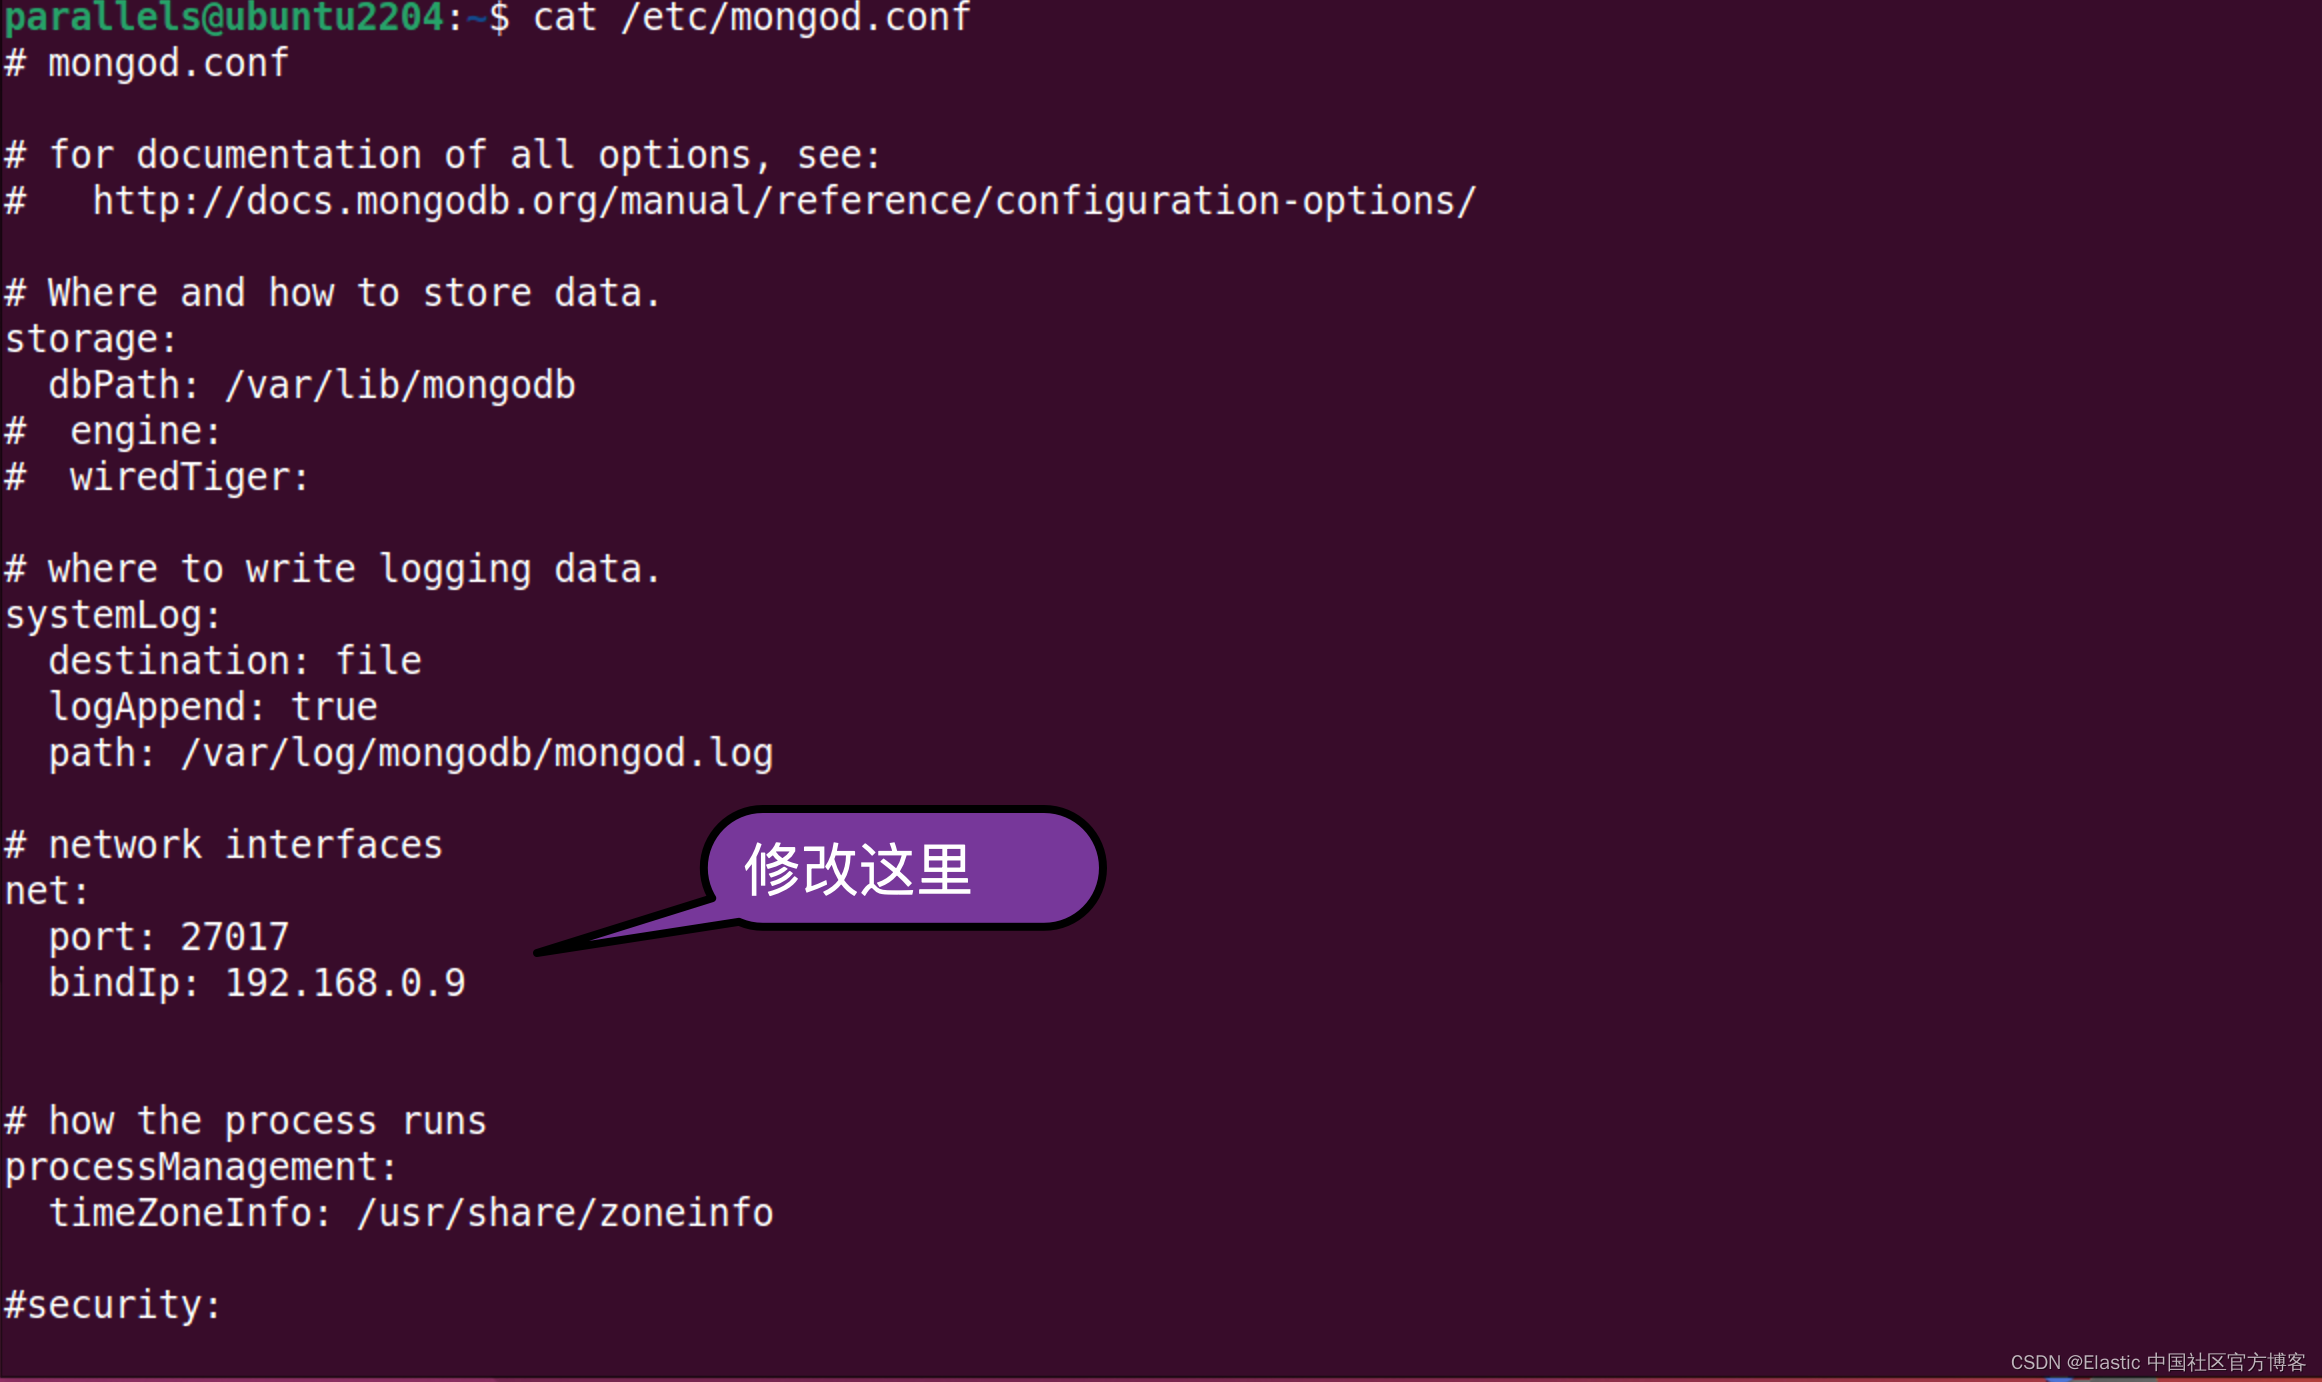
我们接下来退出来。我们需要配置 MongoDB。我们找到配置文件 /etc/mongodb.conf
/etc/mongodb.conf
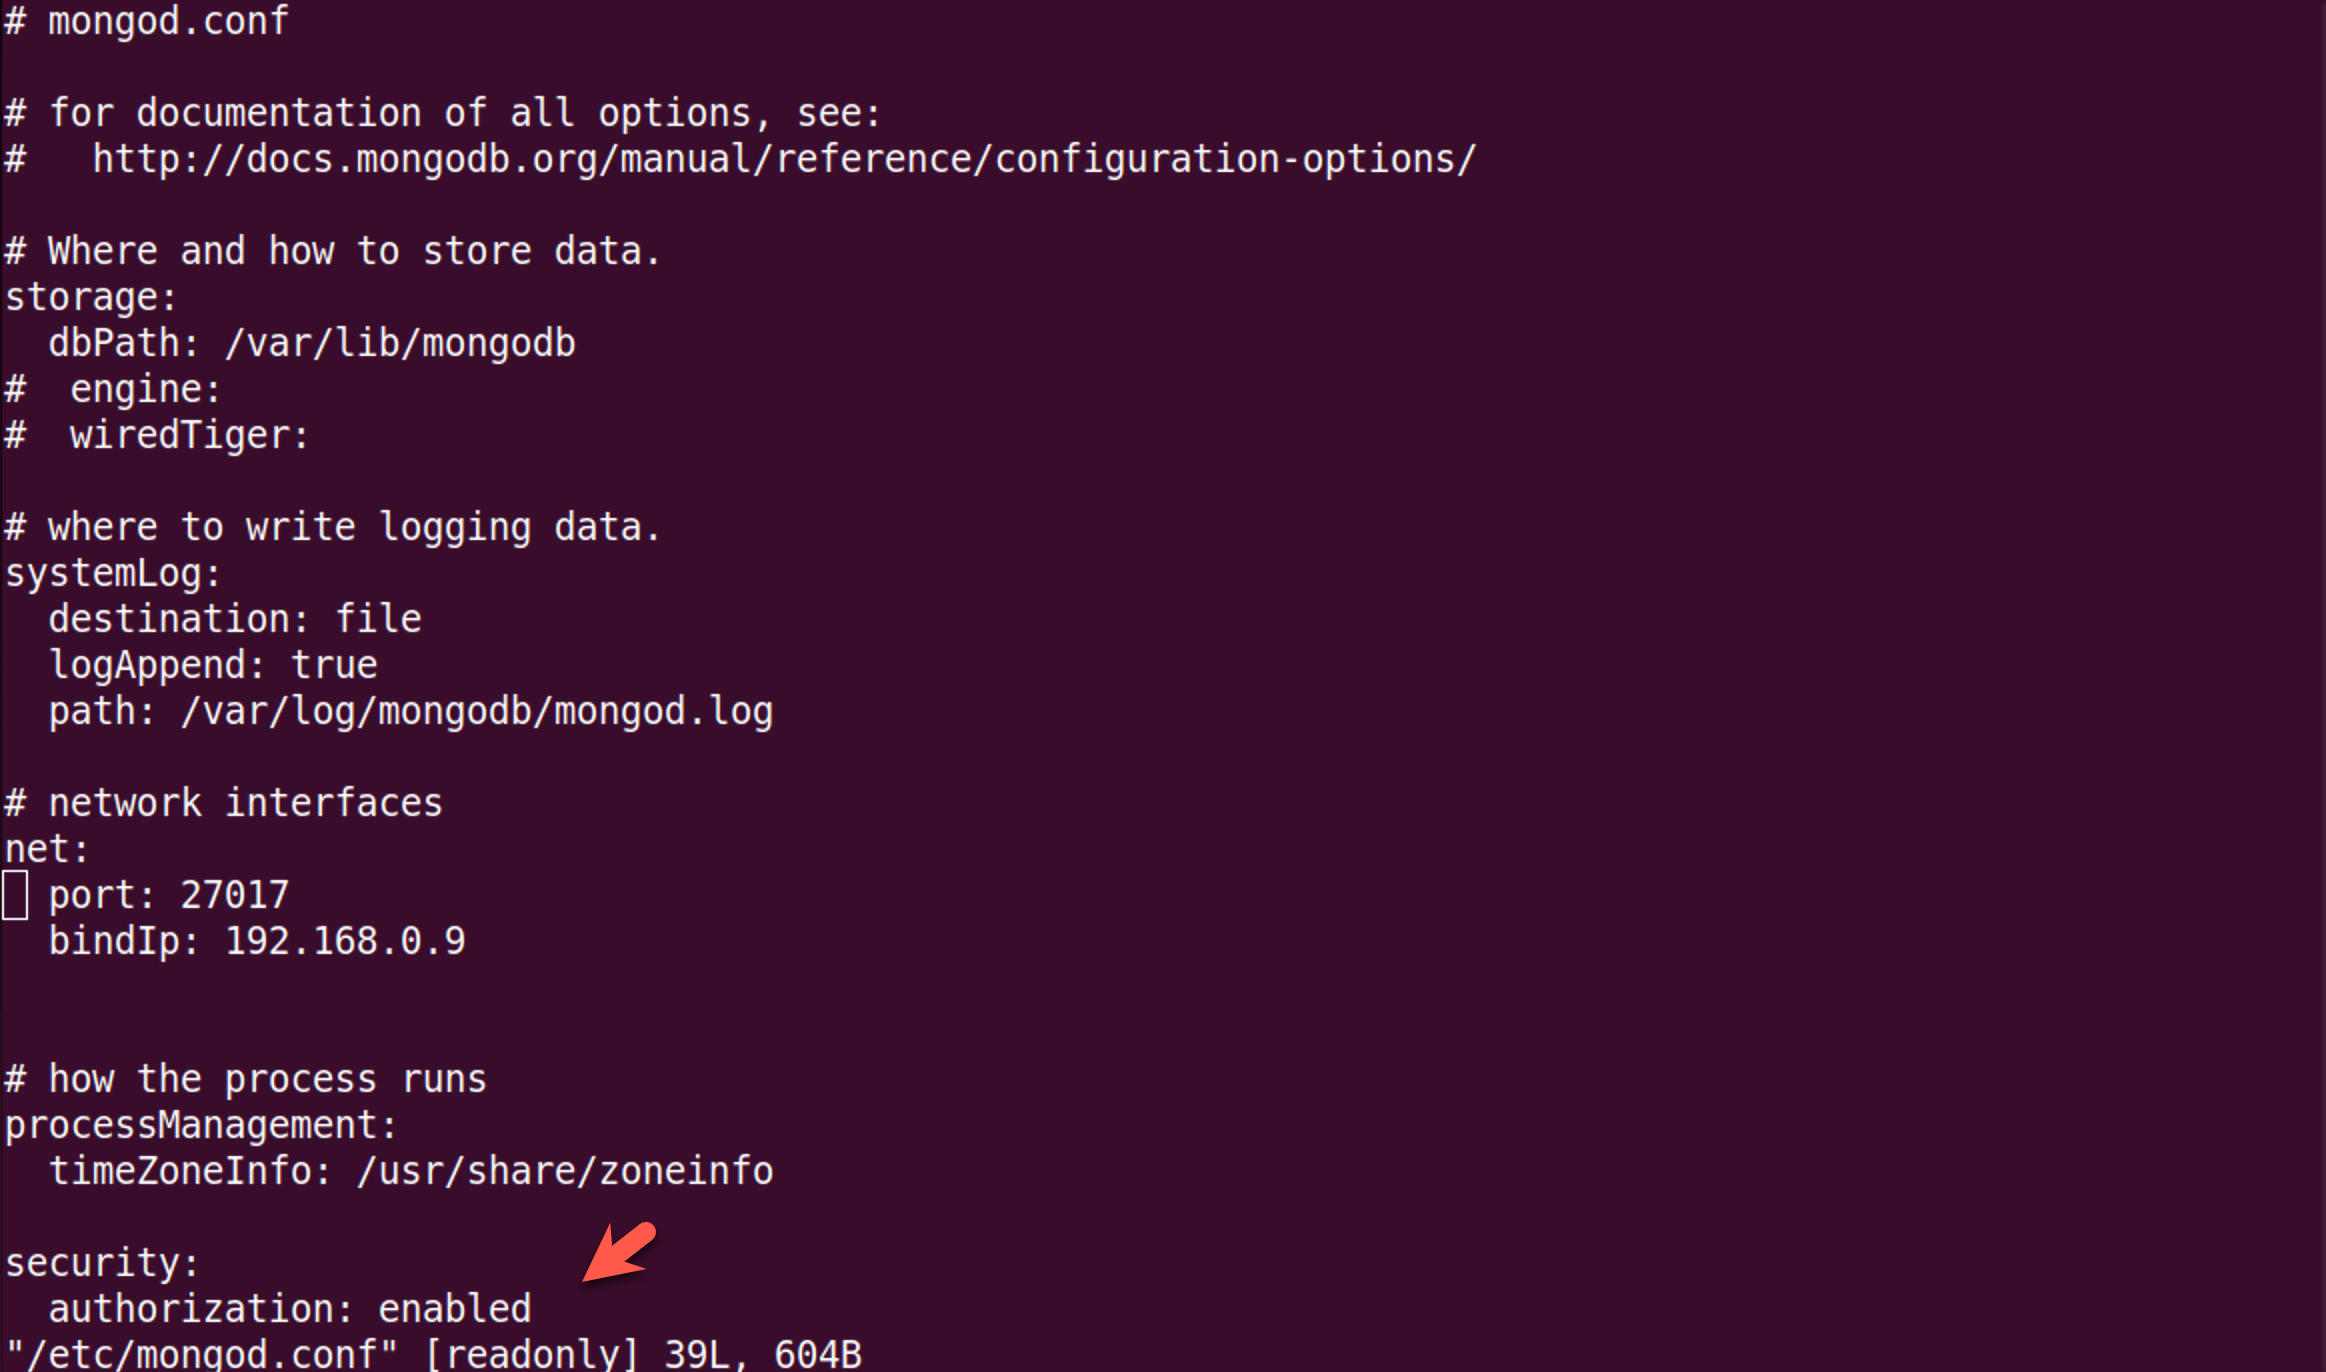
我们需要启动安全。修改完毕后,我们再次使用如下的命令来启动 MongodDB:
parallels@ubuntu2204:~$ sudo vi /etc/mongod.conf
parallels@ubuntu2204:~$ sudo service mongod restart
parallels@ubuntu2204:~$ service mongod status
● mongod.service - MongoDB Database Server
     Loaded: loaded (/lib/systemd/system/mongod.service; disabled; vendor preset: enabled)
     Active: active (running) since Thu 2024-04-25 11:21:10 CST; 2s ago
       Docs: https://docs.mongodb.org/manual
   Main PID: 58182 (mongod)
     Memory: 169.9M
        CPU: 897ms
     CGroup: /system.slice/mongod.service
             └─58182 /usr/bin/mongod --config /etc/mongod.conf
我们再次使用如下的命令来进行 CLI:
parallels@ubuntu2204:~$ mongosh mongodb://192.168.0.9:27017
Current Mongosh Log ID:	6629cc5699b3c8d57d3b9273
Connecting to:		mongodb://192.168.0.9:27017/?directConnection=true&appName=mongosh+2.2.4
Using MongoDB:		7.0.8
Using Mongosh:		2.2.4

For mongosh info see: https://docs.mongodb.com/mongodb-shell/

test> use mydatabase
switched to db mydatabase
mydatabase> db.posts.find({})
MongoServerError[Unauthorized]: Command find requires authentication
mydatabase> db.auth("liuxg", "password")
MongoServerError[AuthenticationFailed]: Authentication failed.
mydatabase> use admin
switched to db admin
admin> db.posts.find({})
MongoServerError[Unauthorized]: Command find requires authentication
admin> use admin
already on db admin
admin> db.auth("liuxg", "password")
{ ok: 1 }
admin> use mydatabase
switched to db mydatabase
mydatabase> db.createUser(
...   {
...     user: "elastic",
...     pwd: "123456",
...     roles: [ { role: "readWrite", db: "mydatabase" } ]
...   }
... )
如果我们没有使用 db.auth 来进行验证,那么我们不能针对 mydatabase 进行任何的操作。我们验证成功后,就可以为 mydatabase 进行创建用户。如上所示,我们创建了一个叫做 elastic/123456 的用户。
我们也可以通过 elastic/123456 来进行验证:
parallels@ubuntu2204:~$ mongosh mongodb://192.168.0.9:27017
Current Mongosh Log ID:	663a2db6f8be5e933f99ea71
Connecting to:		mongodb://192.168.0.9:27017/?directConnection=true&appName=mongosh+2.2.5
Using MongoDB:		7.0.8
Using Mongosh:		2.2.5

For mongosh info see: https://docs.mongodb.com/mongodb-shell/

test> use mydatabase
switched to db mydatabase
mydatabase> db.auth("elastic", "password")
MongoServerError[AuthenticationFailed]: Authentication failed.
mydatabase> db.auth("elastic", "123456")
{ ok: 1 }
mydatabase> show tables
mycol
posts
Java 安装
你需要安装 Java。版本在 Java 8 或者 Java 11。我们可以参考链接来查找需要的 Java 版本。
Elasticsearch
我们可参考我之前的文章 “如何在 Linux,MacOS 及 Windows 上进行安装 Elasticsearch” 来安装 Elasticsearch。特别地,我们需要按照 Elastic Stack 8.x 的安装指南来进行安装。
在 Elasticsearch 终端输出中,找到 elastic 用户的密码和 Kibana 的注册令牌。 这些是在 Elasticsearch 第一次启动时打印的。
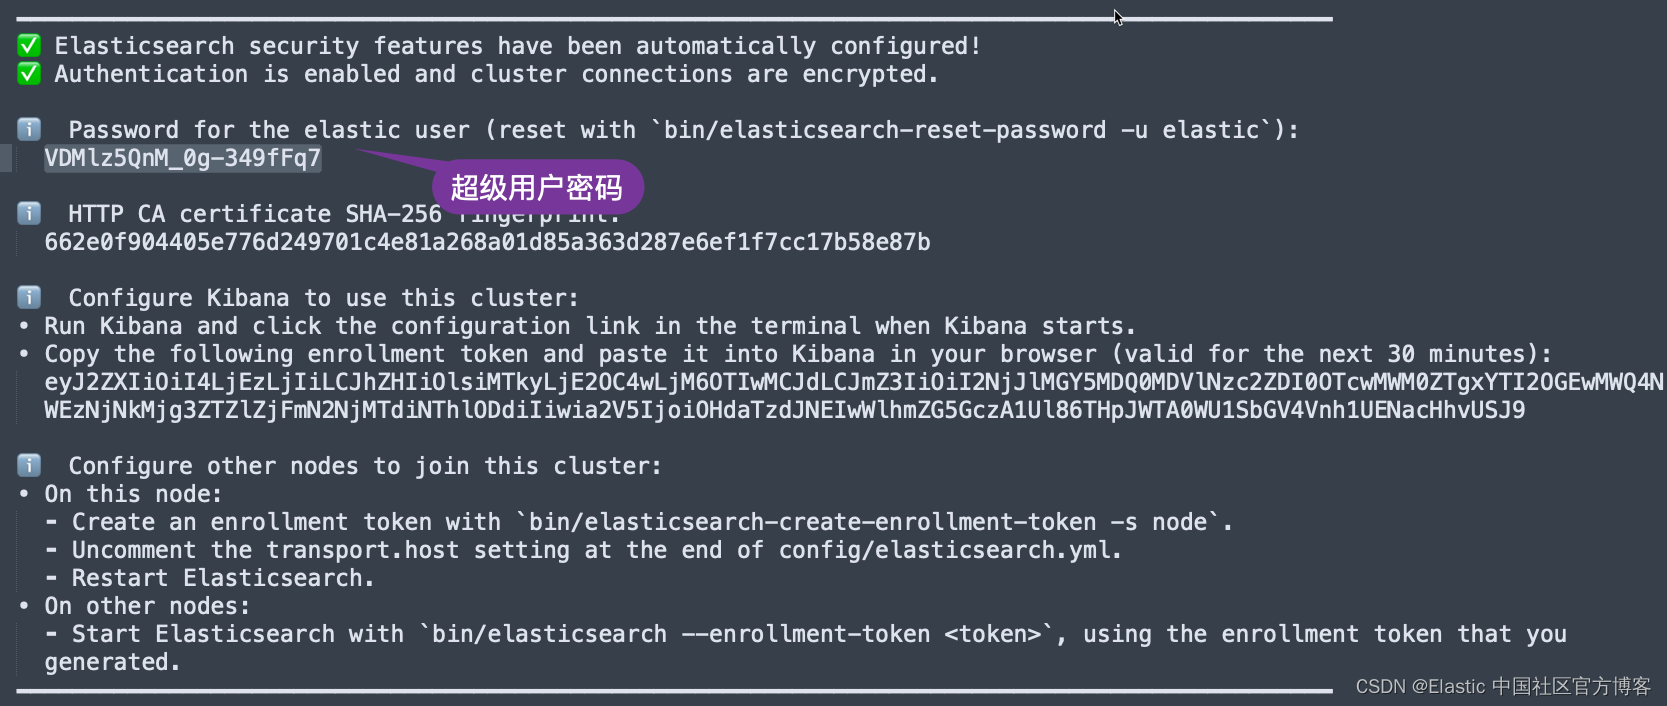
我们记下这个密码,并在下面的配置中进行使用。同时它也会生成相应的证书文件:
$ pwd
/Users/liuxg/elastic/elasticsearch-8.13.2/config/certs
$ ls
http.p12      http_ca.crt   transport.p12
保存密码、注册令牌和证书路径名。 你将在后面的步骤中需要它们。如果你对这些操作还不是很熟的话,请参考我之前的文章 “Elastic Stack 8.0 安装 - 保护你的 Elastic Stack 现在比以往任何时候都简单”。
安装 Kibana
我们接下来安装 Kibana。我们可以参考我之前的文章 “如何在 Linux,MacOS 及 Windows 上安装 Elastic 栈中的 Kibana” 来进行我们的安装。特别地,我们需要安装 Kibana 8.2 版本。如果你还不清楚如何安装 Kibana 8.2,那么请阅读我之前的文章 “Elastic Stack 8.0 安装 - 保护你的 Elastic Stack 现在比以往任何时候都简单”。在启动 Kibana 之前,我们可以修改 Kibana 的配置文件如下。添加如下的句子到 config/kibana.yml 中去:
config/kibana.yml
enterpriseSearch.host: http://localhost:3002Enterprise search 安装
我们在地址 Download Elastic Enterprise Search | Elastic 找到我们需要的版本进行下载。并按照页面上相应的指令来进行按照。如果你想针对你以前的版本进行安装的话,请参阅地址 https://www.elastic.co/downloads/past-releases#app-search。
等我们下载完 Enterprise Search 的安装包,我们可以使用如下的命令来进行解压缩:
$ pwd
/Users/liuxg/elastic
$ ls
elastic-agent-8.13.2-darwin-aarch64.tar.gz kibana-8.13.2
elasticsearch-8.13.2                       kibana-8.13.2-darwin-aarch64.tar.gz
elasticsearch-8.13.2-darwin-aarch64.tar.gz logstash-8.13.2-darwin-aarch64.tar.gz
enterprise-search-8.13.2.tar.gz            metricbeat-8.13.2-darwin-aarch64.tar.gz
filebeat-8.13.2-darwin-aarch64.tar.gz
$ tar xzf enterprise-search-8.13.2.tar.gz
$ cd enterprise-search-8.13.2
$ ls
LICENSE    NOTICE.txt README.md  bin        config     lib        metricbeat
如上所示,它含有一个叫做 config 的目录。我们在启动 Enterprise Search 之前,必须做一些相应的配置。我们需要修改 config/enterprise-search.yml 文件。在这个文件中添加如下的内容:
config/enterprise-search.yml
allow_es_settings_modification: true
# secret_management.encryption_keys: ['q3t6w9z$C&F)J@McQfTjWnZr4u7x!A%D']
elasticsearch.username: elastic
elasticsearch.password: "VDMlz5QnM_0g-349fFq7"
elasticsearch.host: https://127.0.0.1:9200
elasticsearch.ssl.enabled: true
elasticsearch.ssl.certificate_authority: /Users/liuxg/elastic/elasticsearch-8.13.2/config/certs/http_ca.crt
kibana.external_url: http://localhost:5601
在上面,请注意 elasticsearch.password 是我们在 Elasticsearch 安装过程中生成的密码。elasticsearch.ssl.certificate_authority 必须根据自己的 Elasticsearch 安装路径中生成的证书进行配置。在上面的配置中,如果我们还没有配置 secret_management.encryption_keys。我们可以使用上面的配置先运行,然后让系统帮我们生成。在配置上面的密码时,我们需要添加上引号。我发现在密码中含有 * 字符会有错误的信息。我们使用如下的命令来启动:
bin/enterprise-search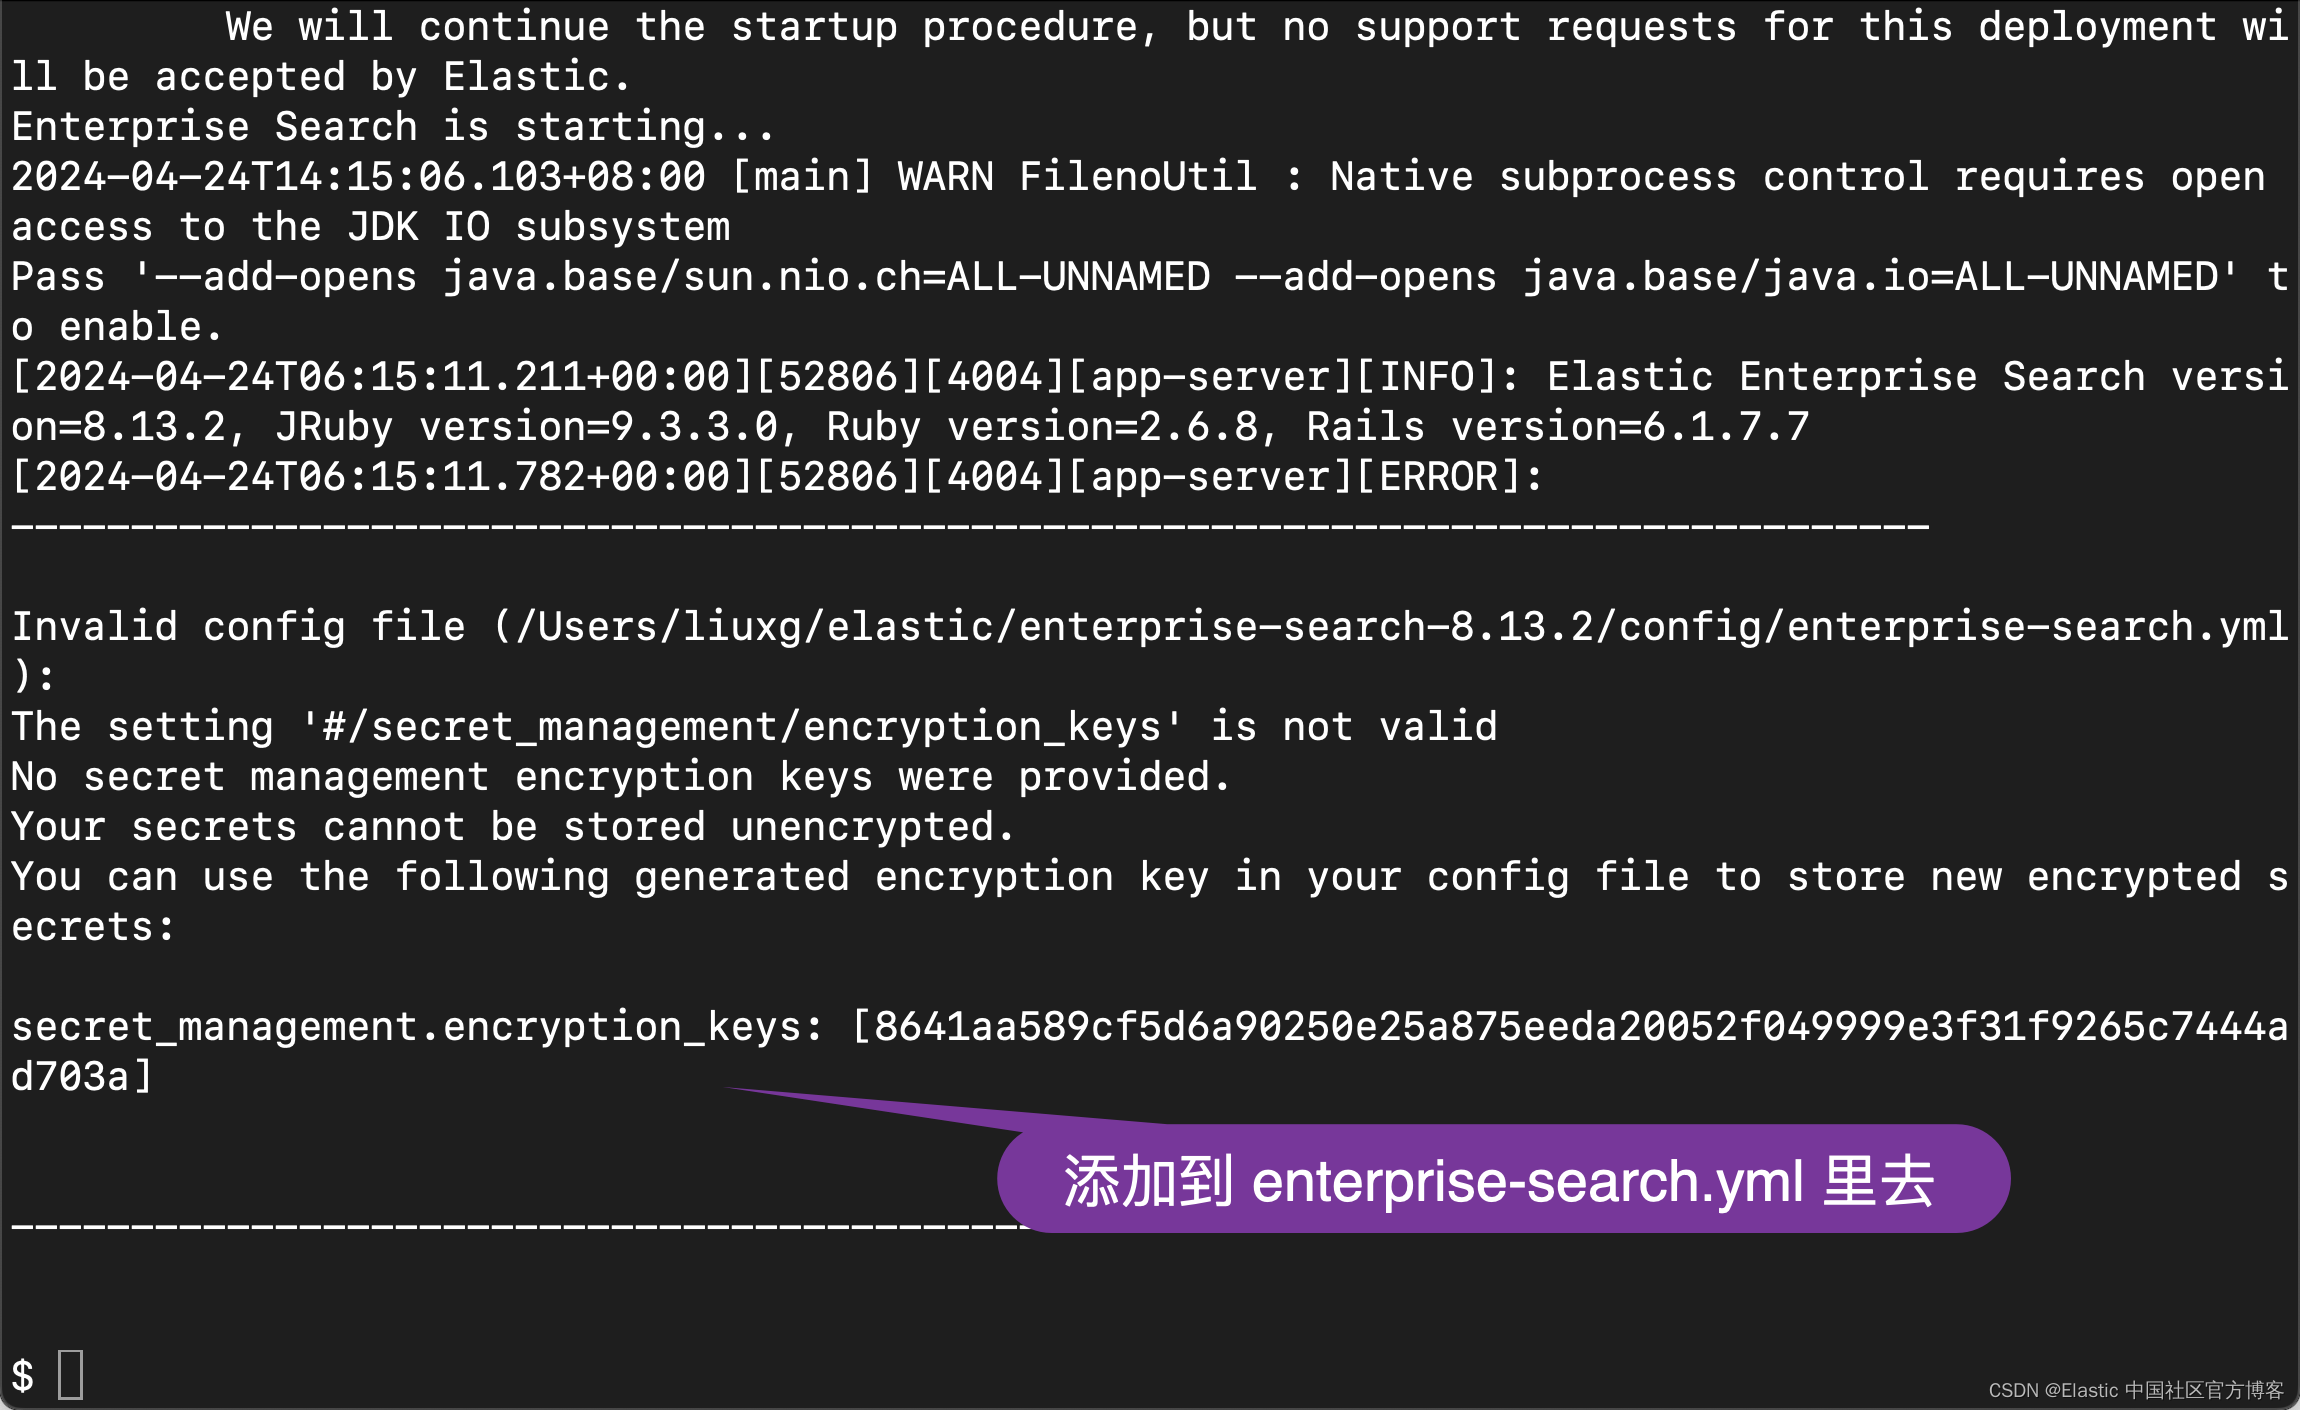
allow_es_settings_modification: true
# secret_management.encryption_keys: ['q3t6w9z$C&F)J@McQfTjWnZr4u7x!A%D']
secret_management.encryption_keys: [8641aa589cf5d6a90250e25a875eeda20052f049999e3f31f9265c7444ad703a]
elasticsearch.username: elastic
elasticsearch.password: "VDMlz5QnM_0g-349fFq7"
elasticsearch.host: https://127.0.0.1:9200
elasticsearch.ssl.enabled: true
elasticsearch.ssl.certificate_authority: /Users/liuxg/elastic/elasticsearch-8.13.2/config/certs/http_ca.crt
kibana.external_url: http://localhost:5601
我们再次运行:
bin/enterprise-search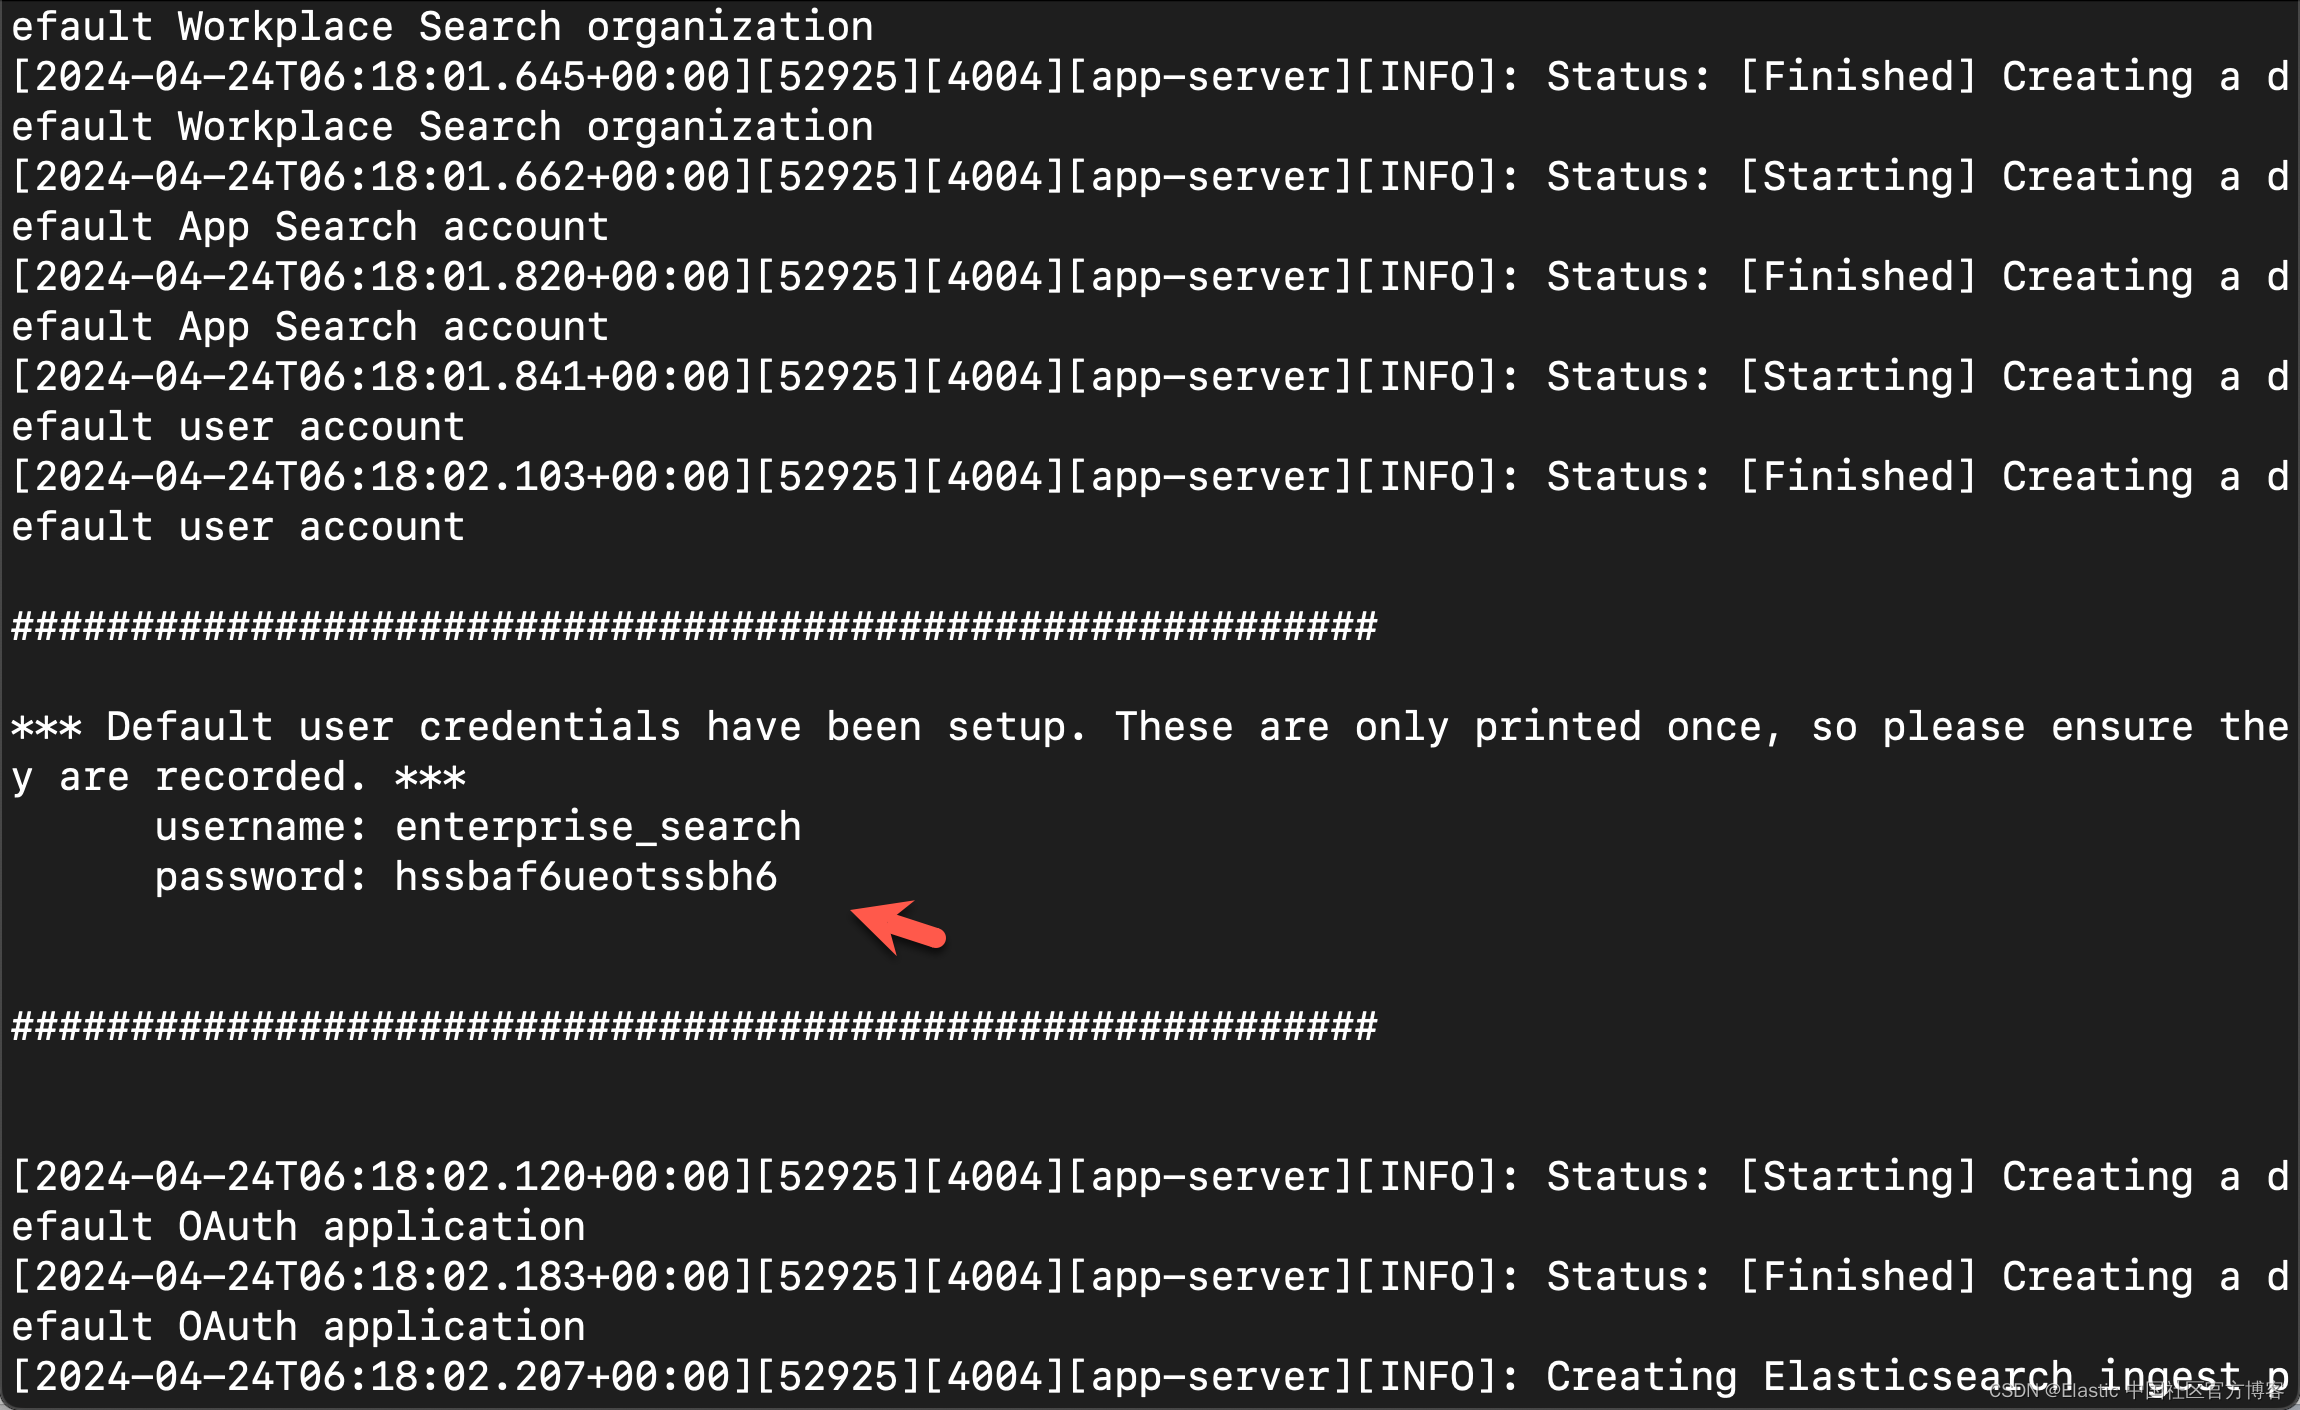
allow_es_settings_modification: true
# secret_management.encryption_keys: ['q3t6w9z$C&F)J@McQfTjWnZr4u7x!A%D']
secret_management.encryption_keys: [8641aa589cf5d6a90250e25a875eeda20052f049999e3f31f9265c7444ad703a]
elasticsearch.username: elastic
elasticsearch.password: "VDMlz5QnM_0g-349fFq7"
elasticsearch.host: https://127.0.0.1:9200
elasticsearch.ssl.enabled: true
elasticsearch.ssl.certificate_authority: /Users/liuxg/elastic/elasticsearch-8.13.2/config/certs/http_ca.crt
kibana.external_url: http://localhost:5601
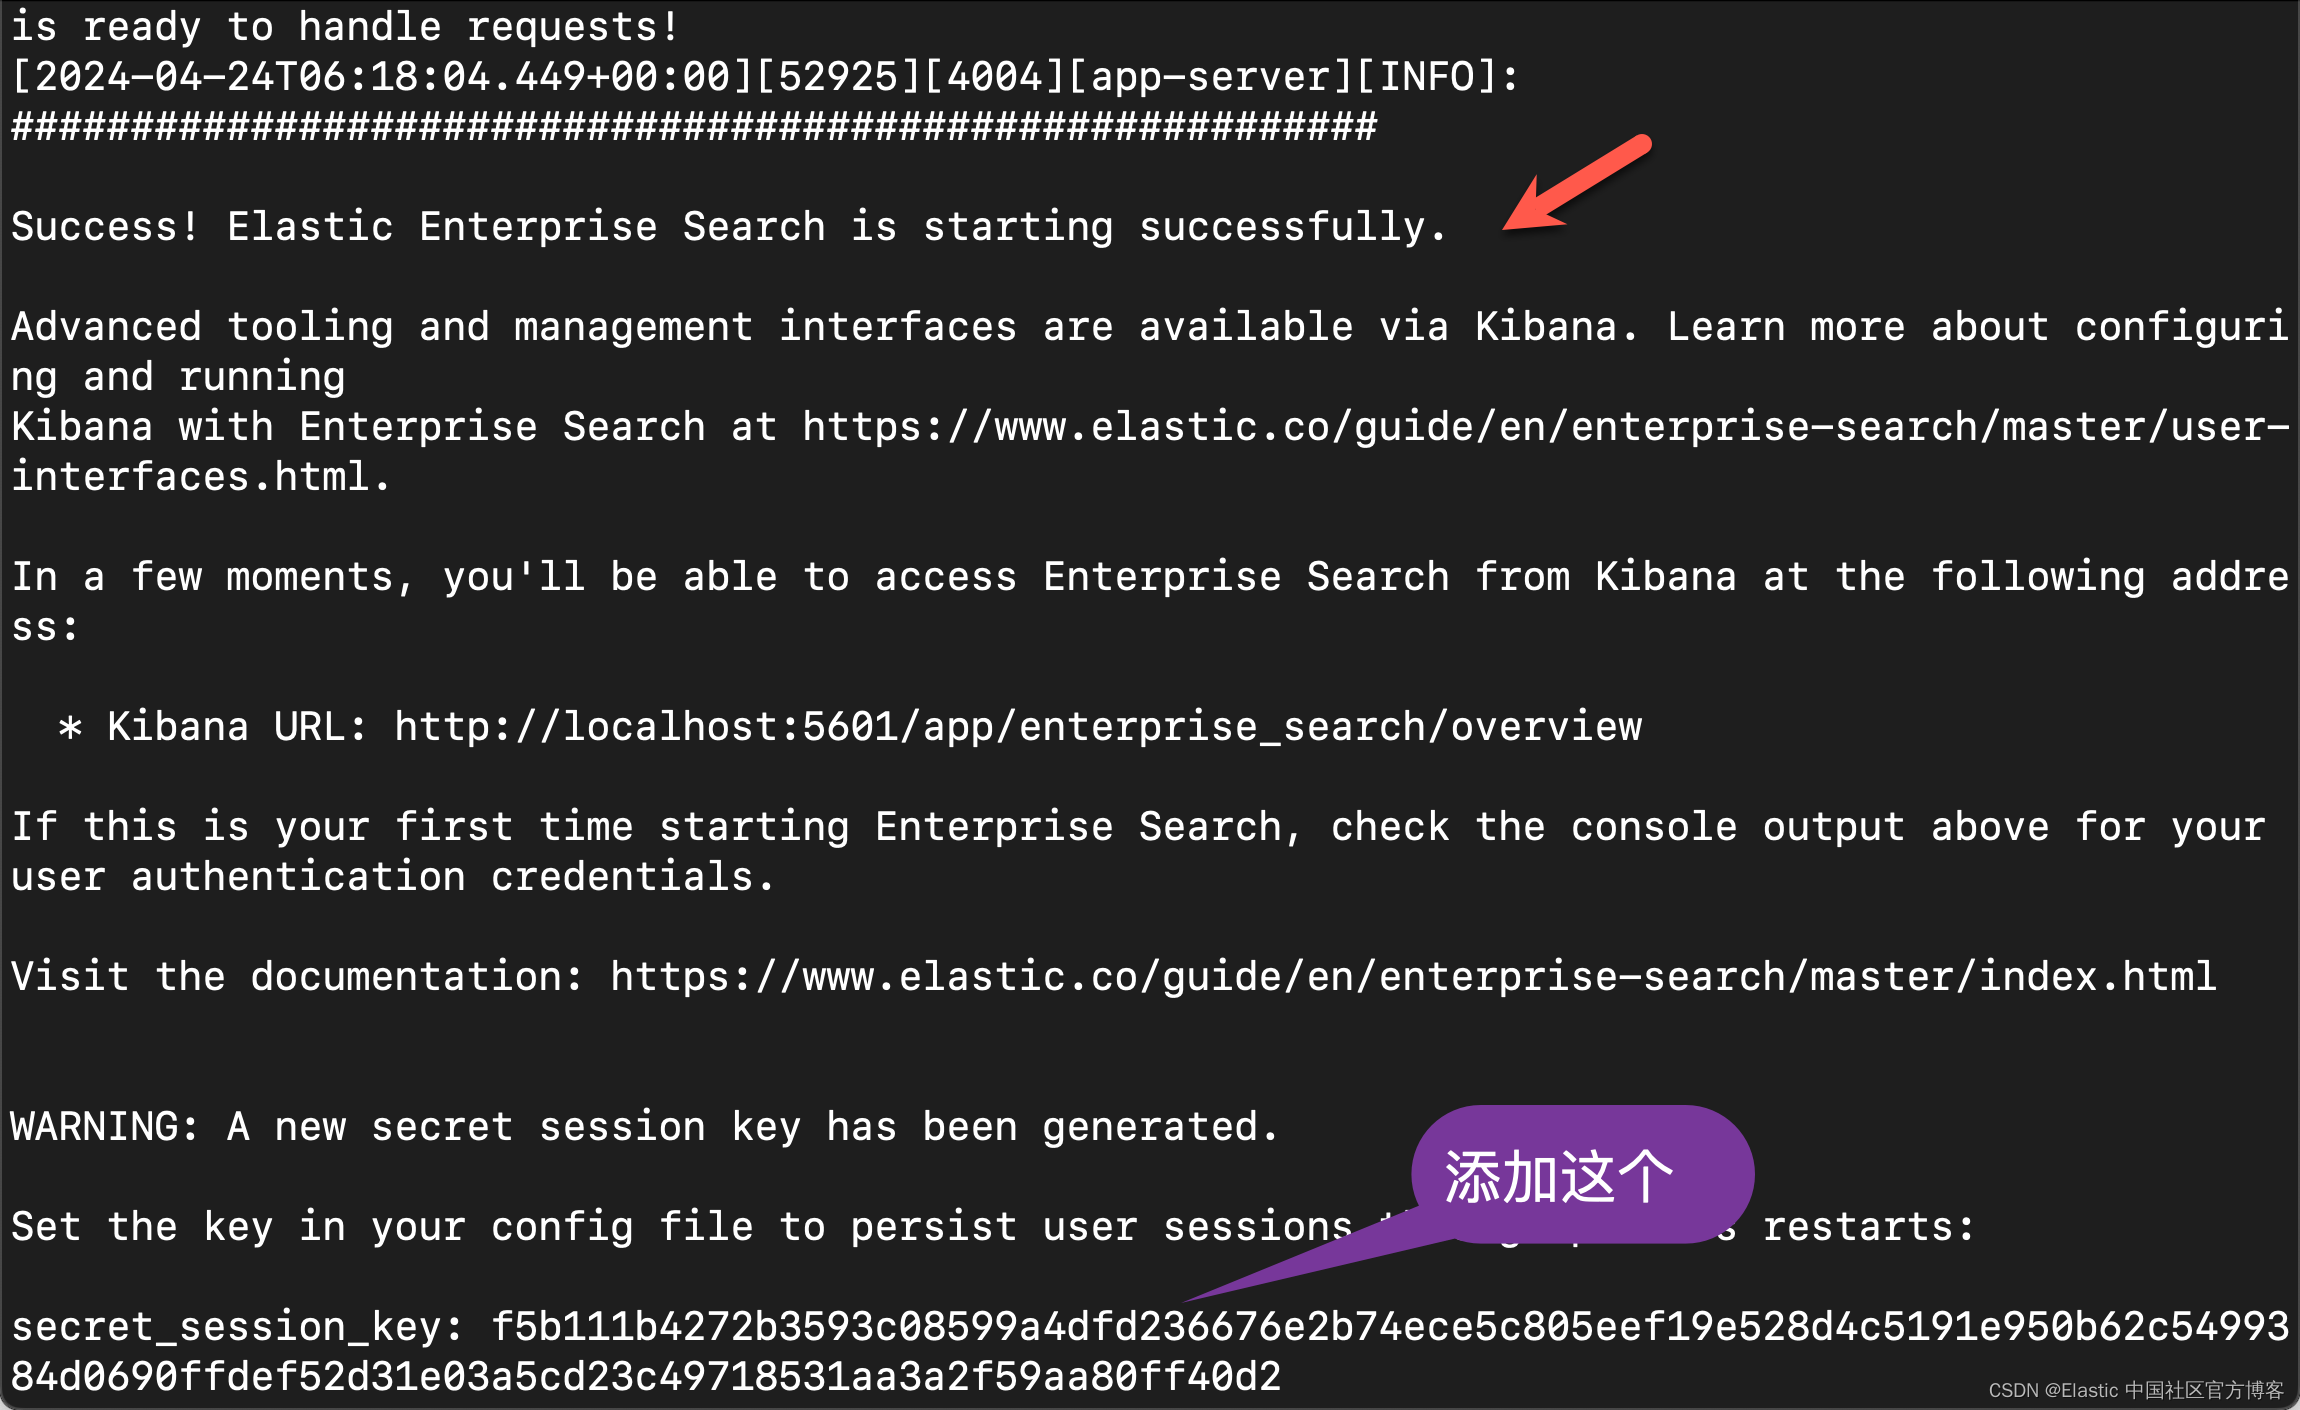
secret_session_key: f5b111b4272b3593c08599a4dfd236676e2b74ece5c805eef19e528d4c5191e950b62c5499384d0690ffdef52d31e03a5cd23c49718531aa3a2f59aa80ff40d2
feature_flag.elasticsearch_search_api: true为了能够使得我们能够在 App Search 中使用 Elasticsearch 搜索,我们必须设置
feature_flag.elasticsearch_search_api: true。 我们再次重新启动 enterprise search:
再次重新启动:
bin/enterprise-search这次启动后,我们再也不会看到任何的配置输出了。这样我们的 enterprise search 就配置好了。
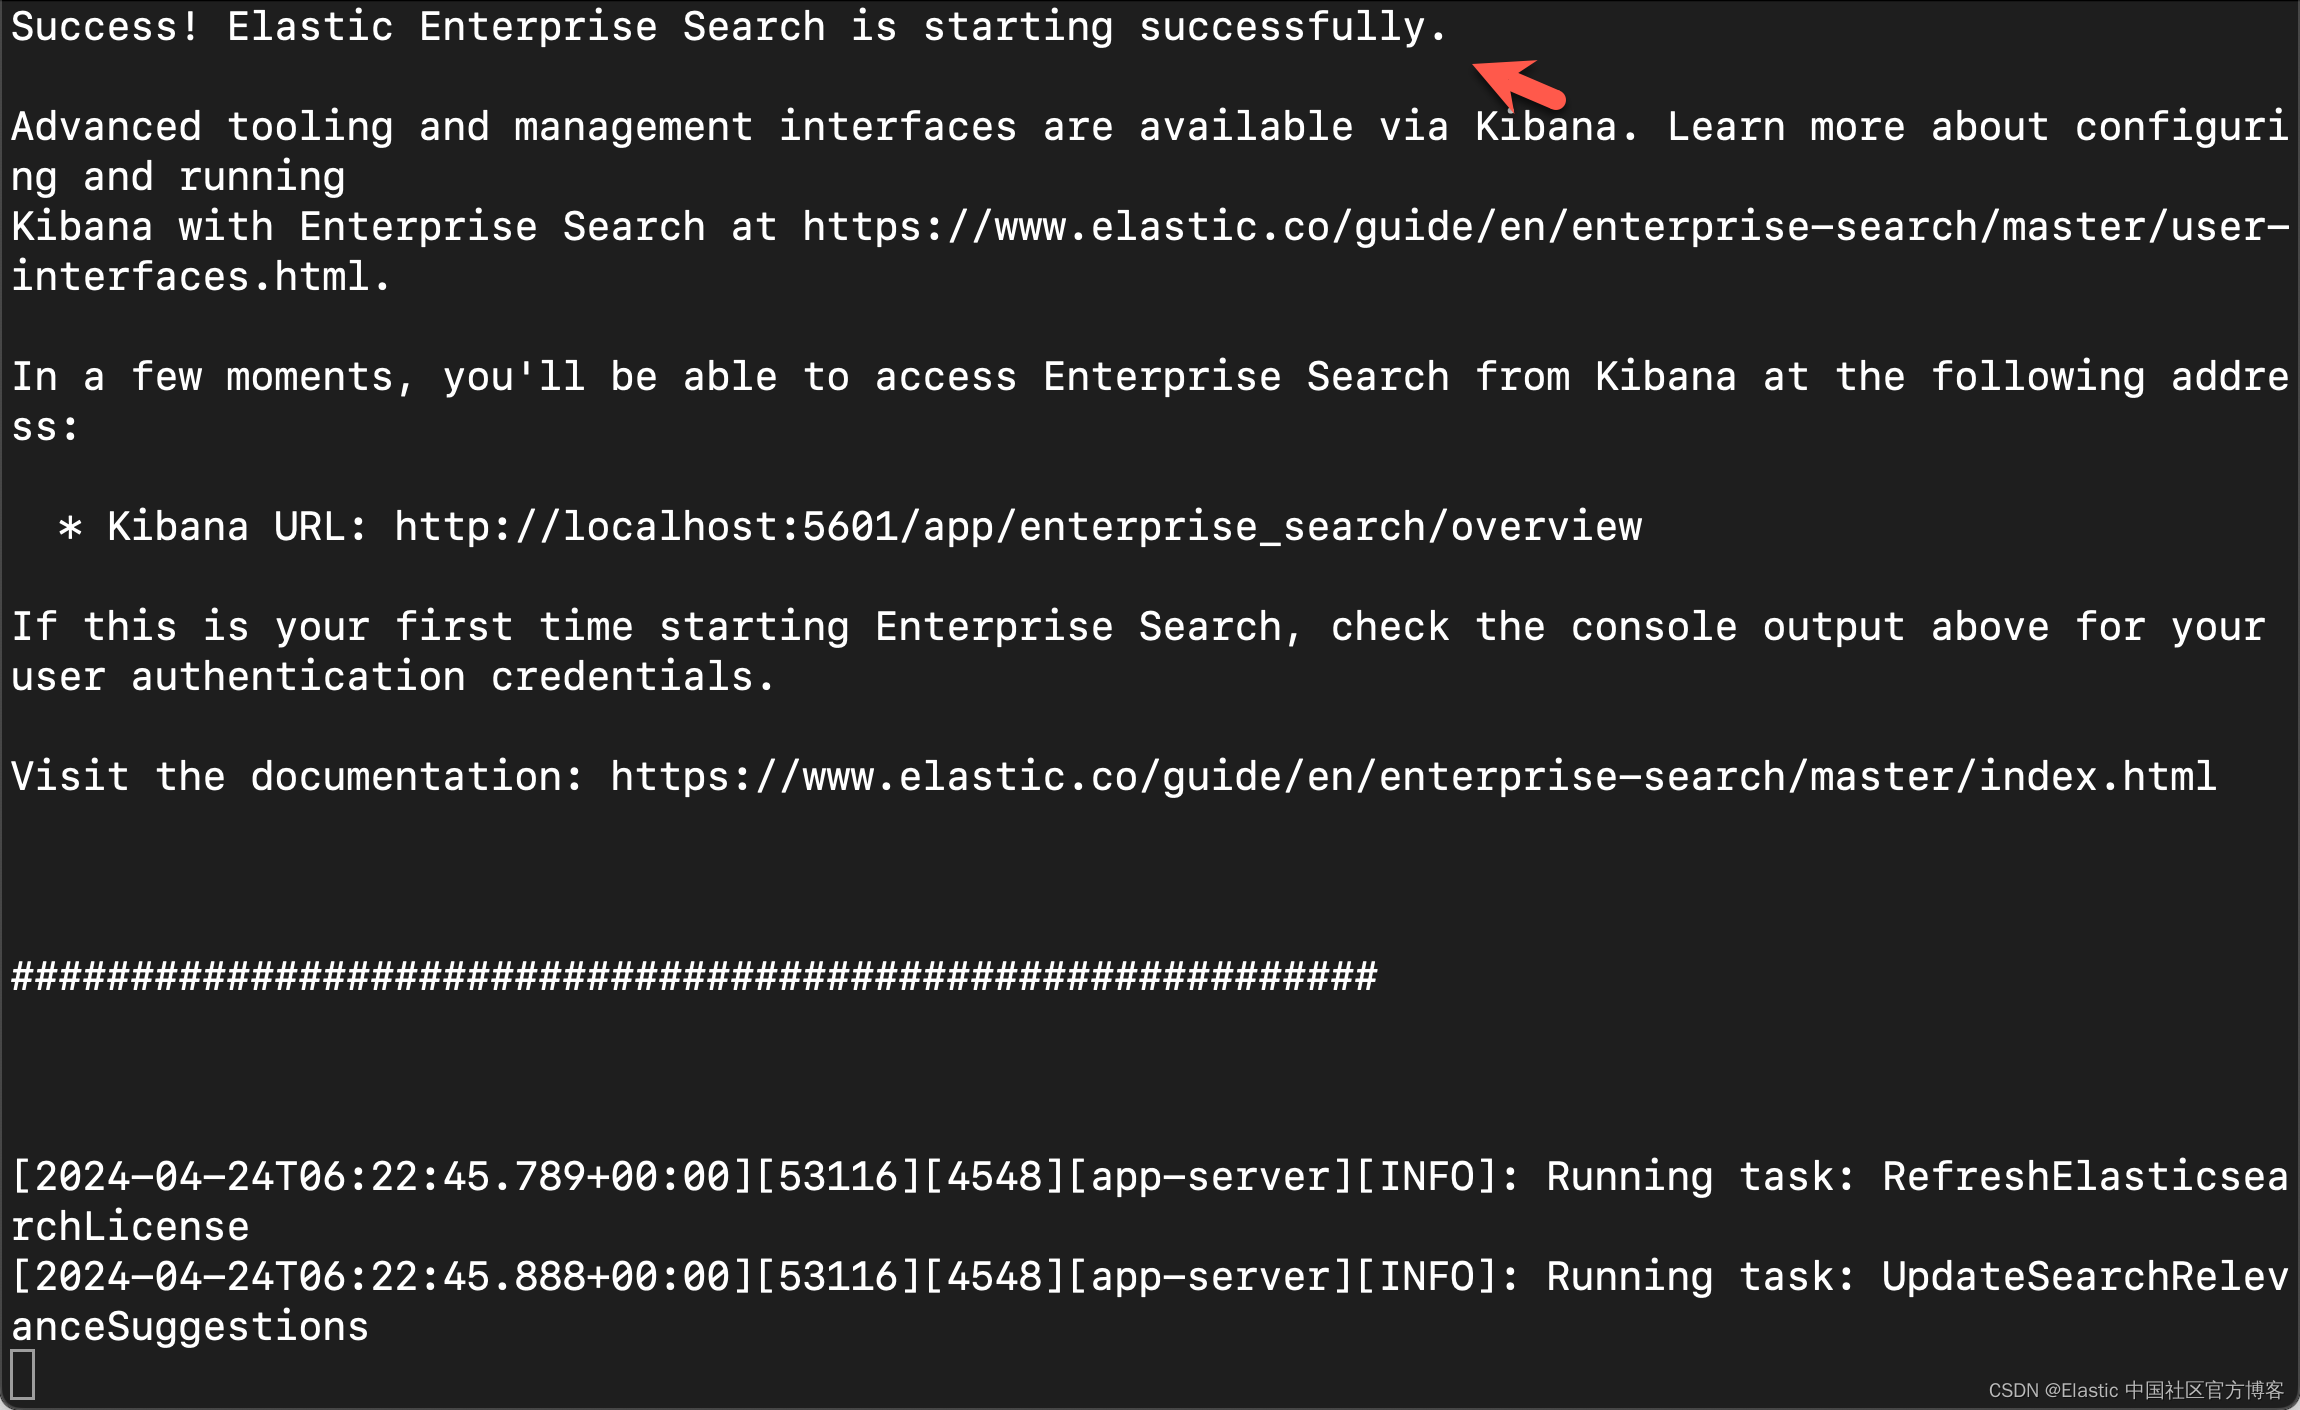
至此我们的安装已经完成了。
同步数据到 Elasticsearch
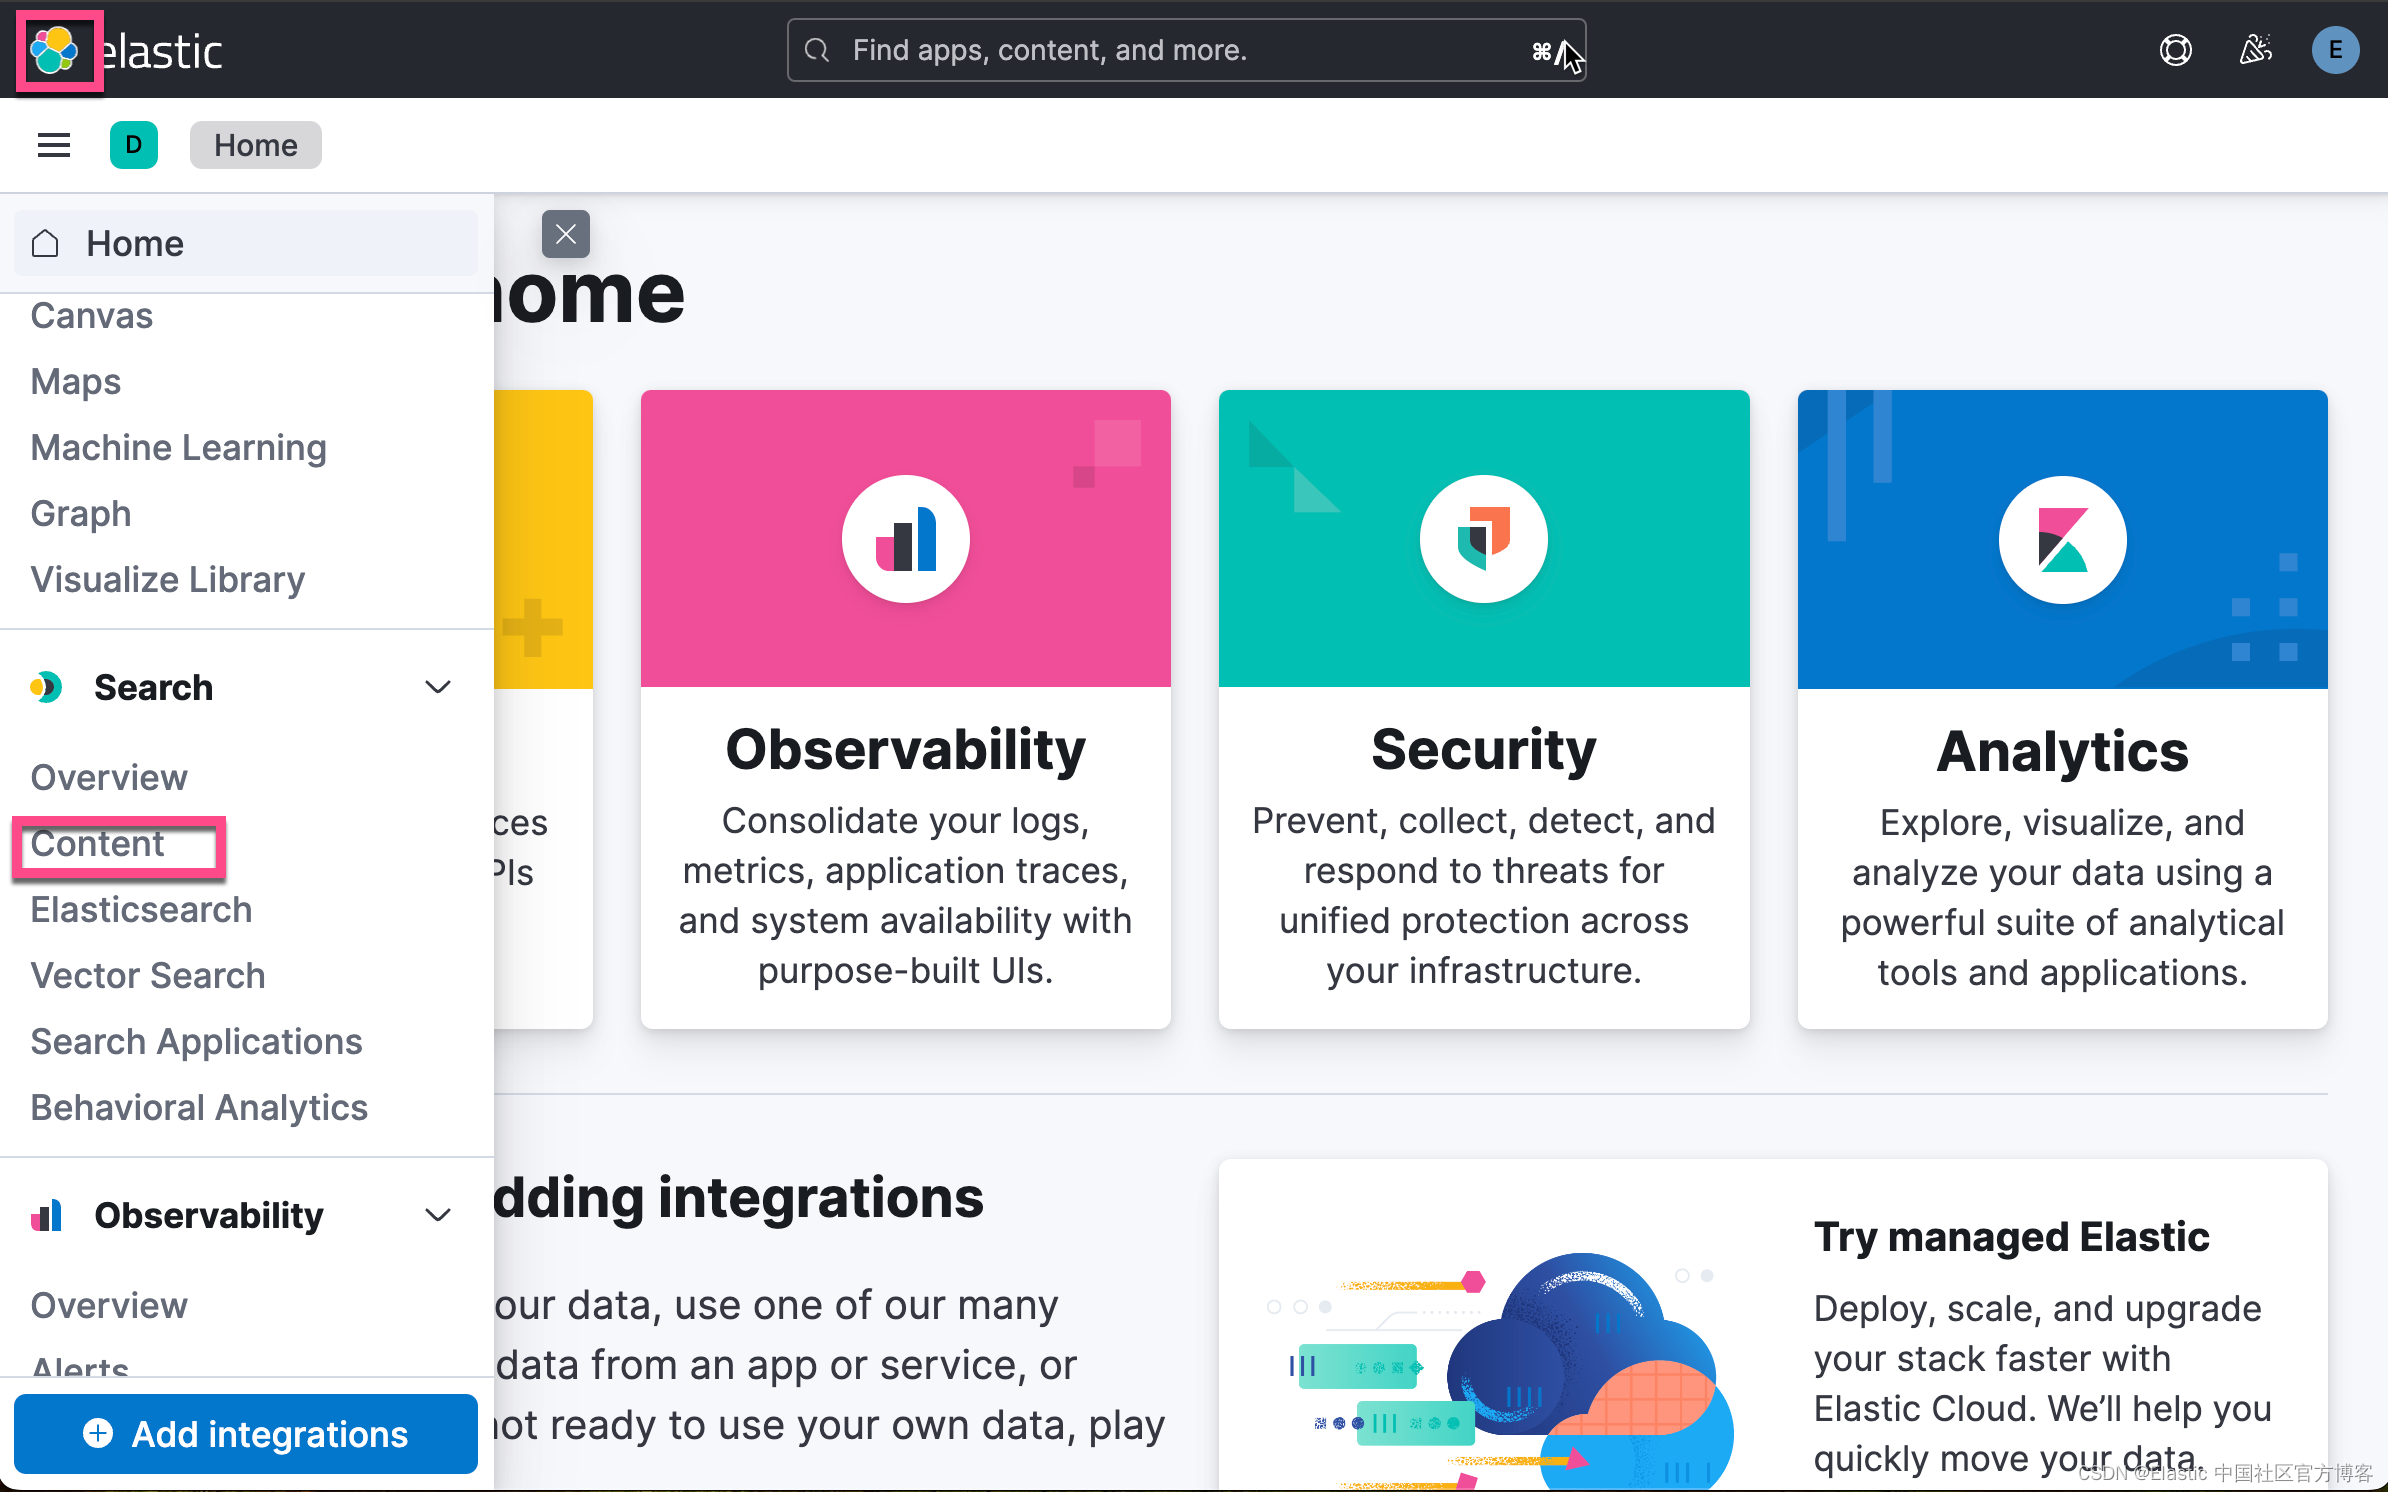
我们登录到 Kibana,然后转到 Search -> Content -> Indices -> Create a new index

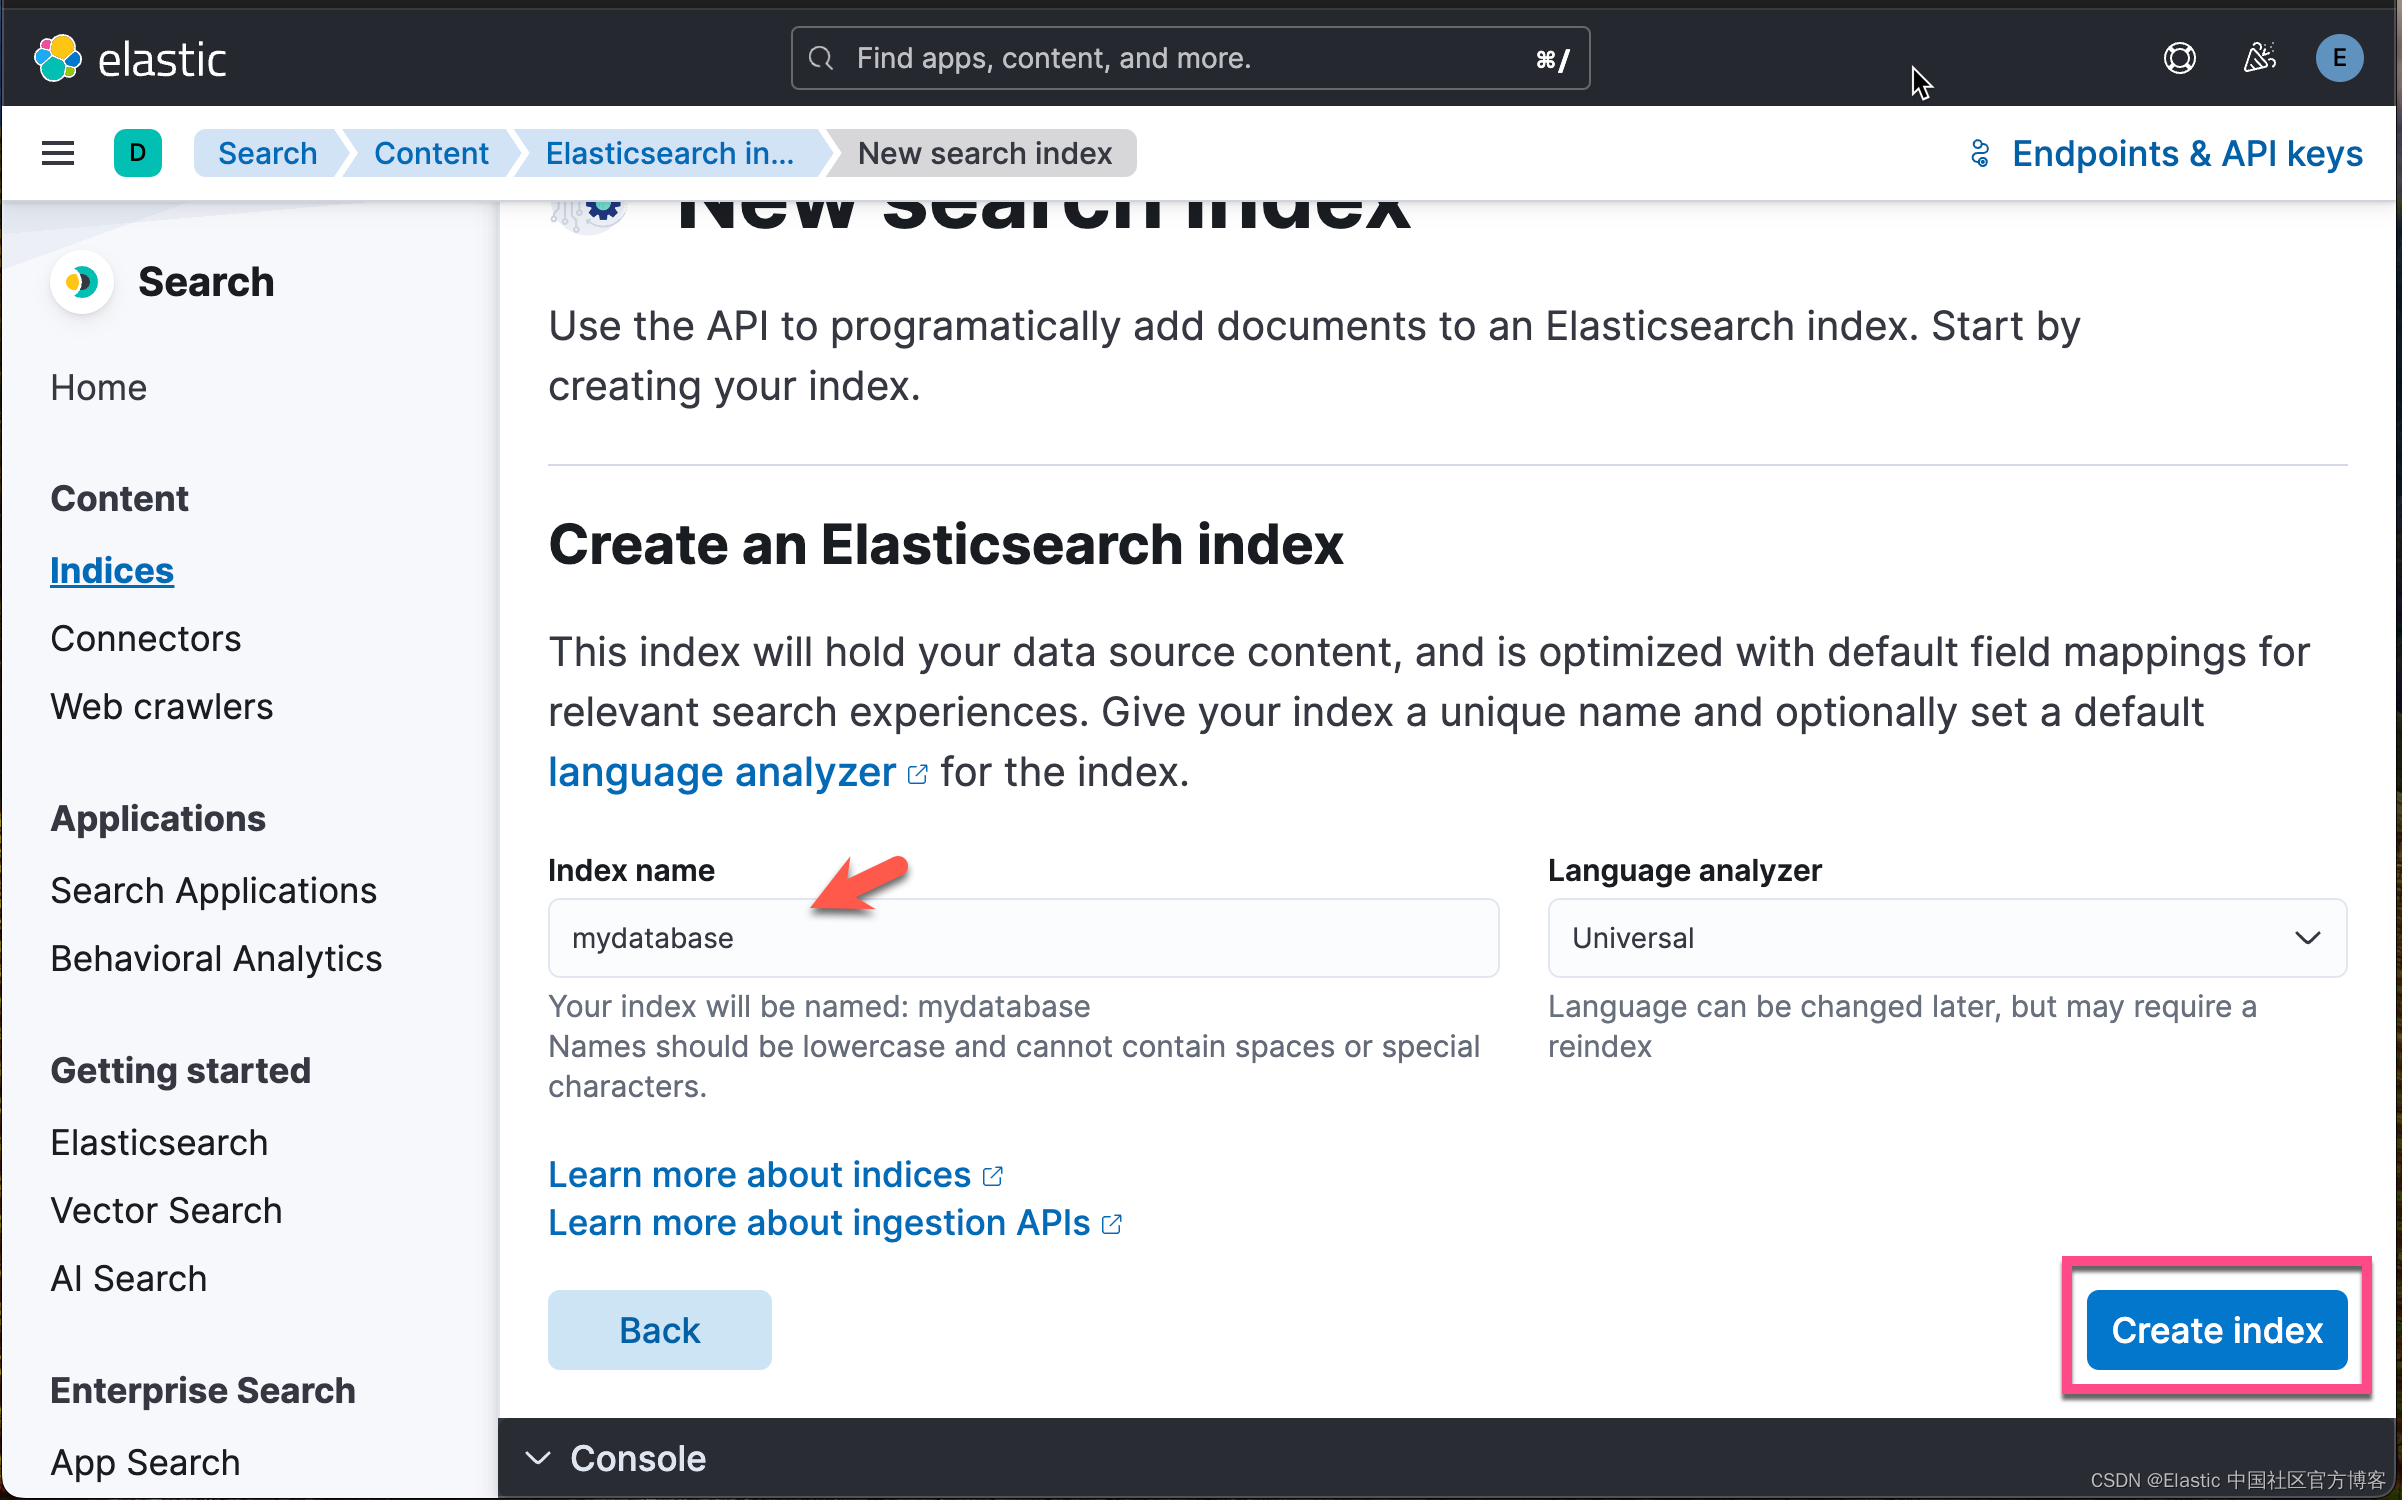

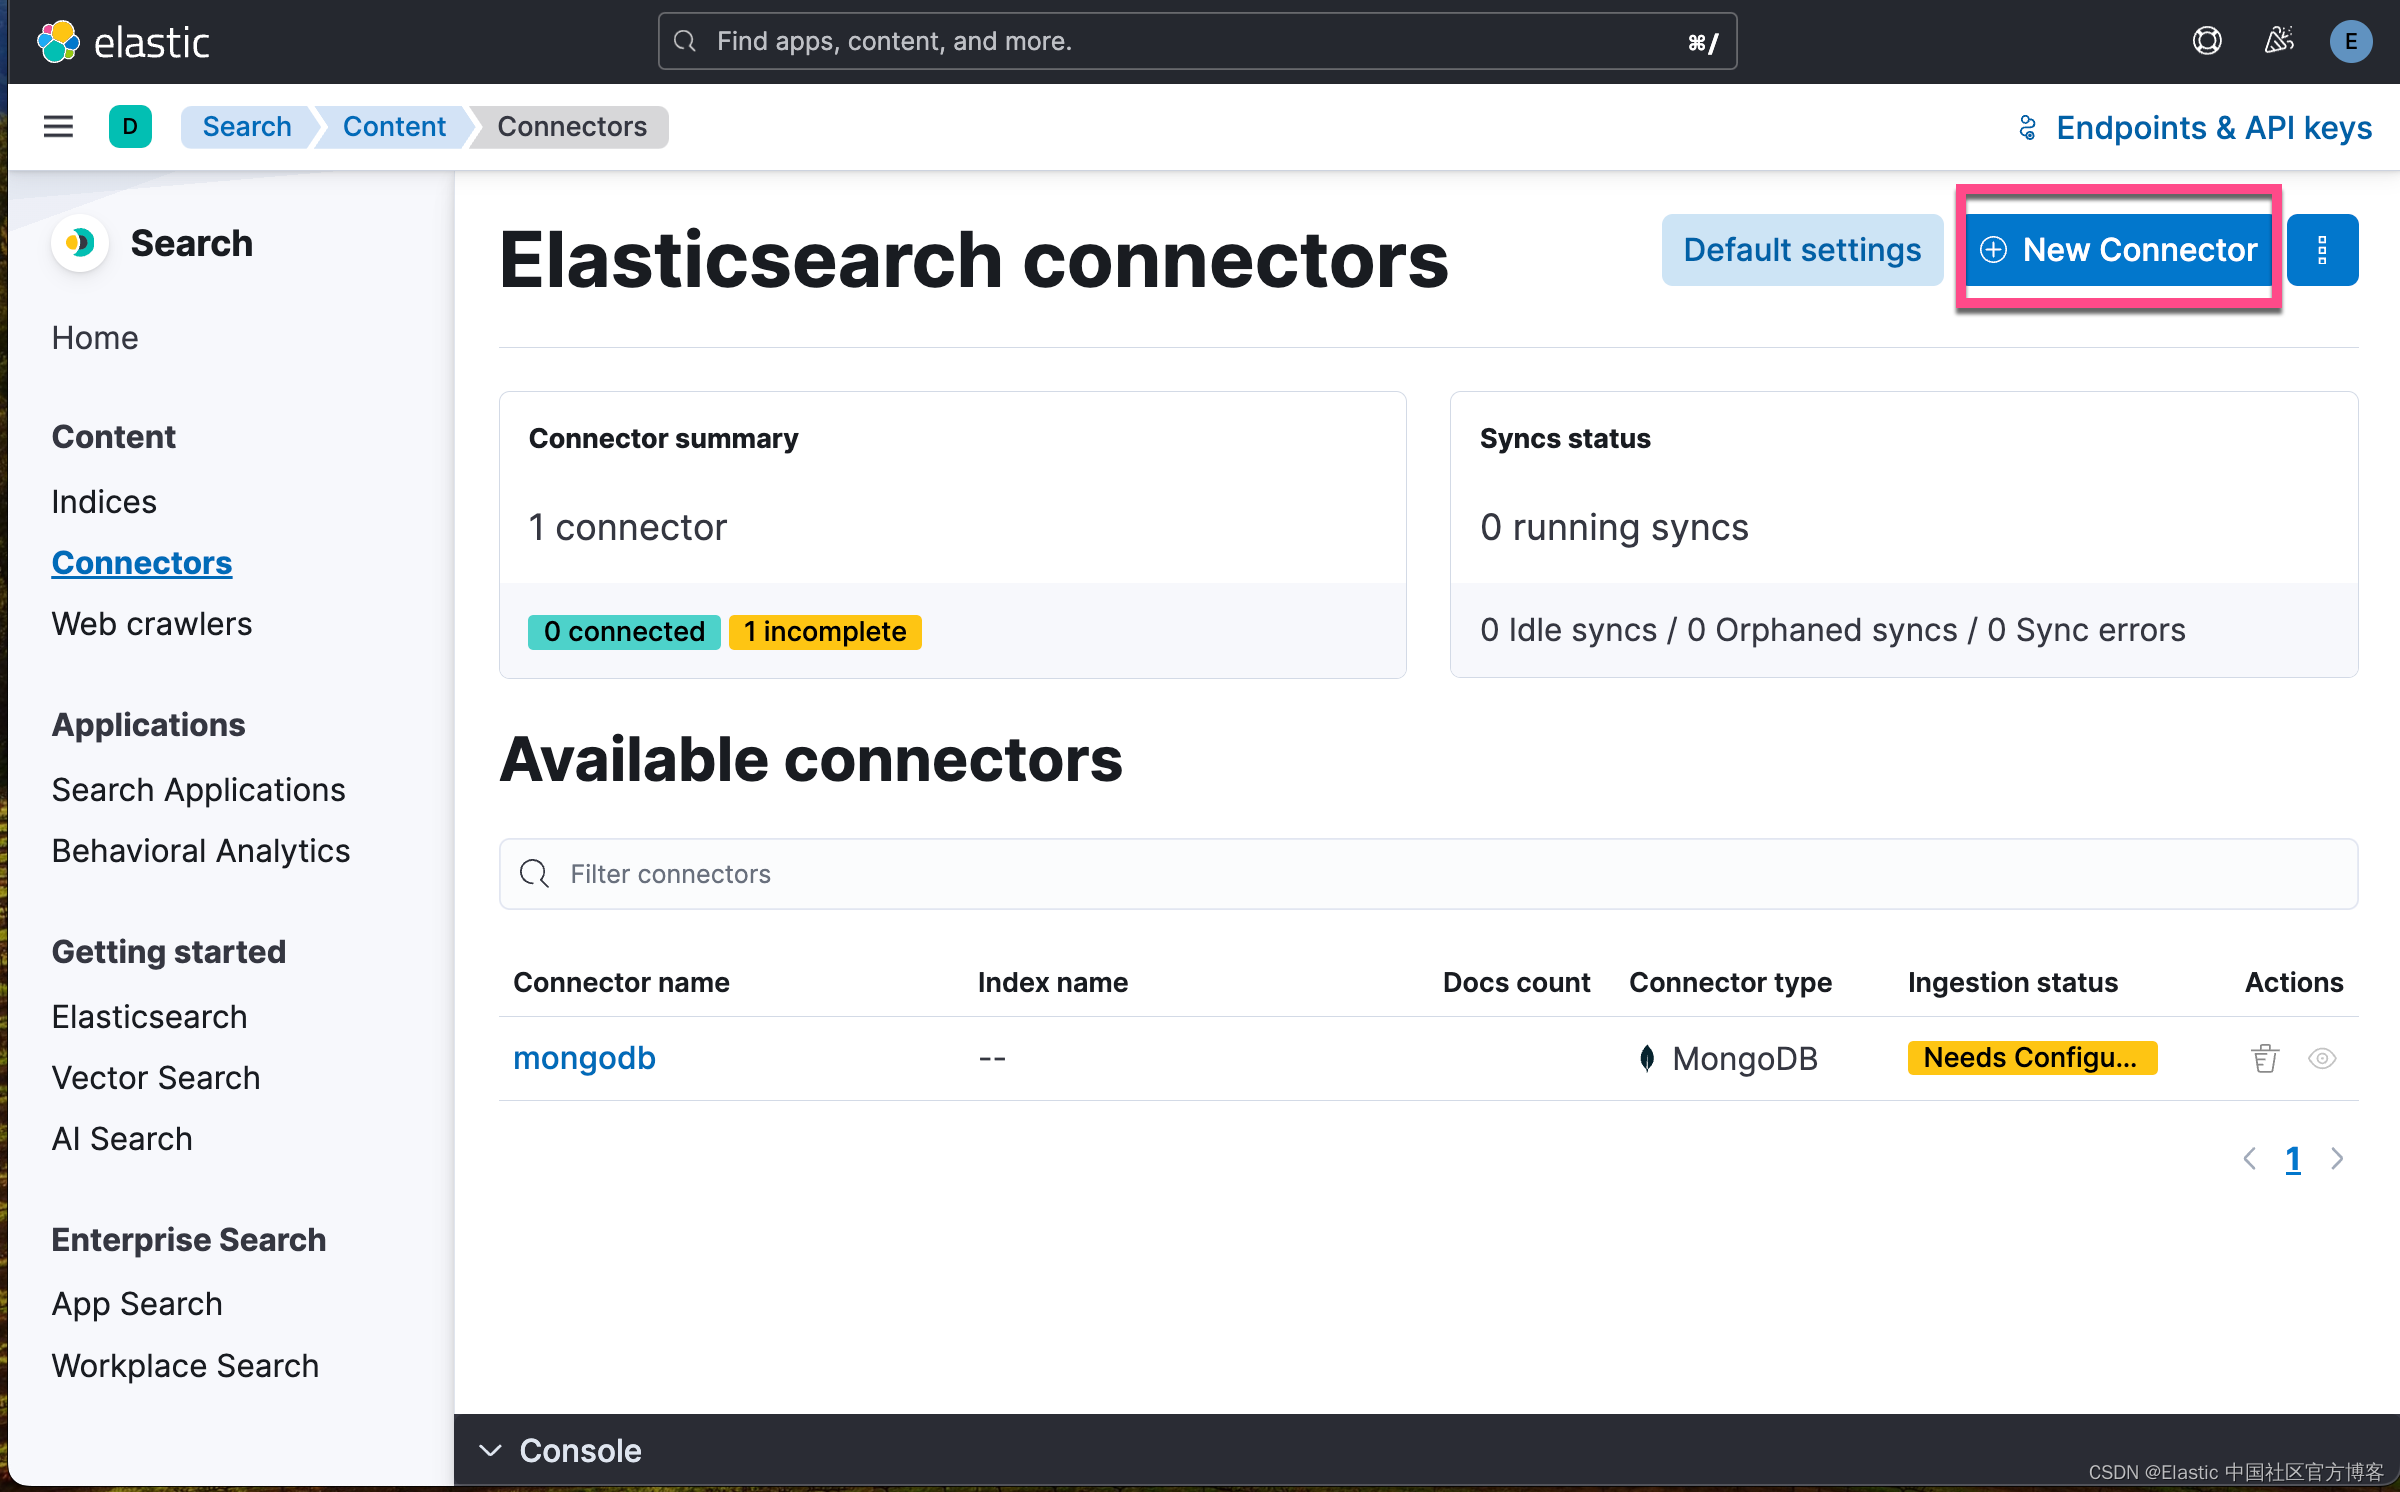
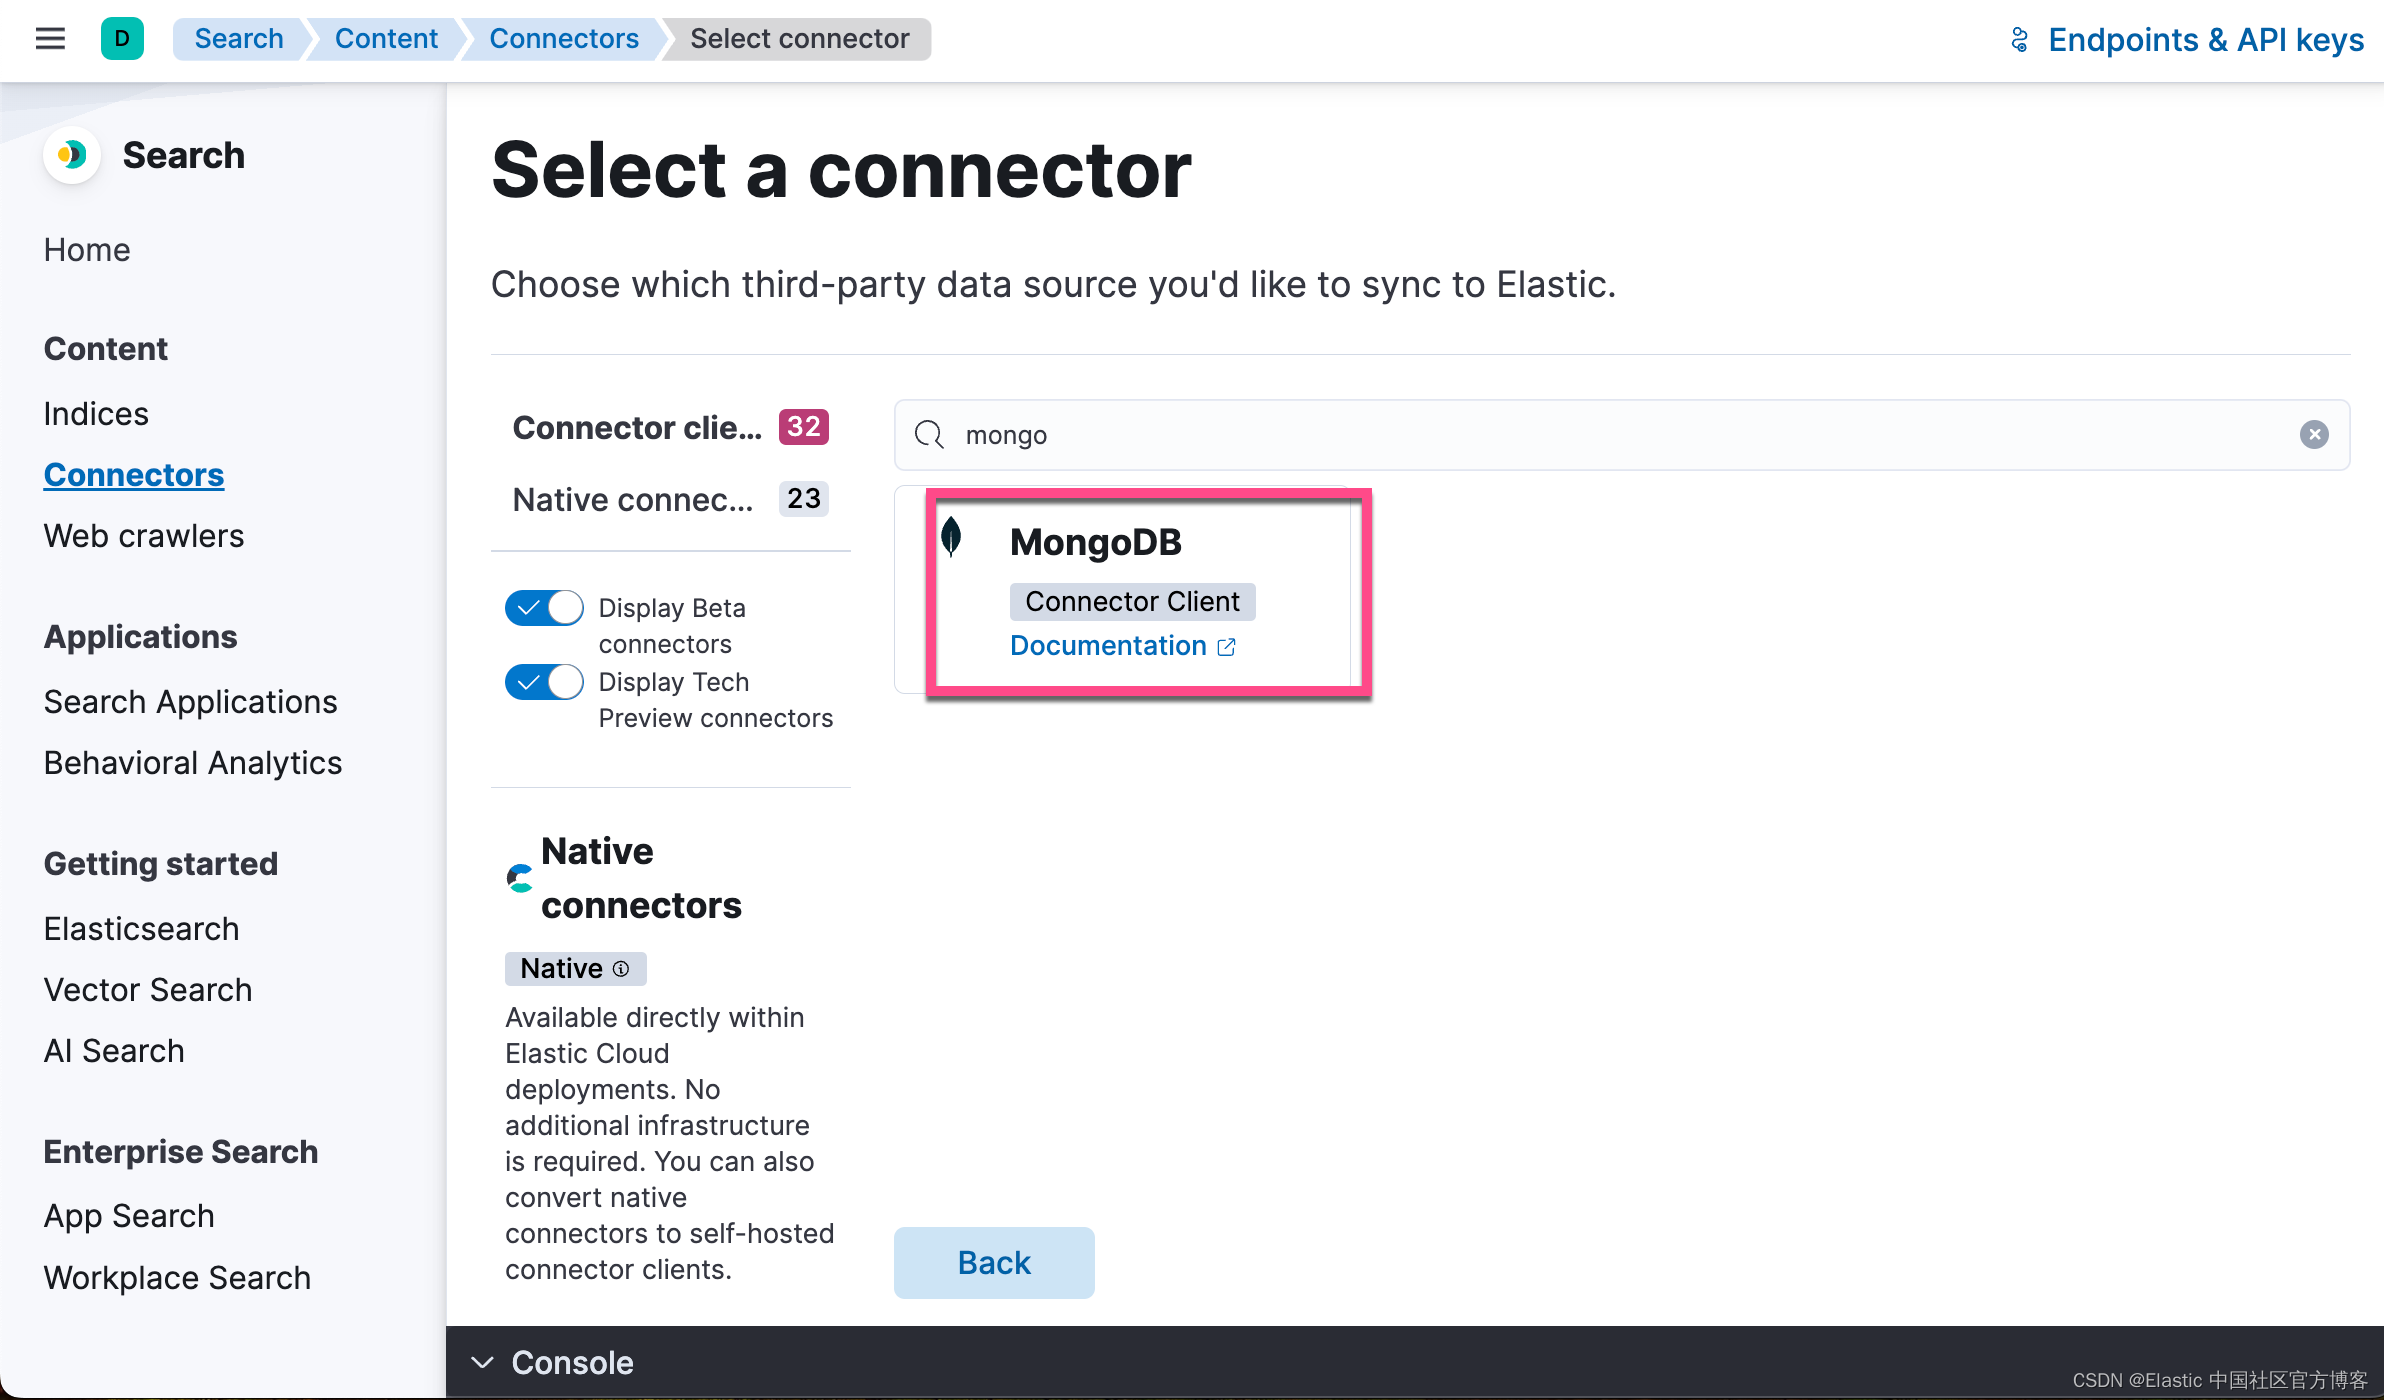
我们接下来创建一个 Connector:
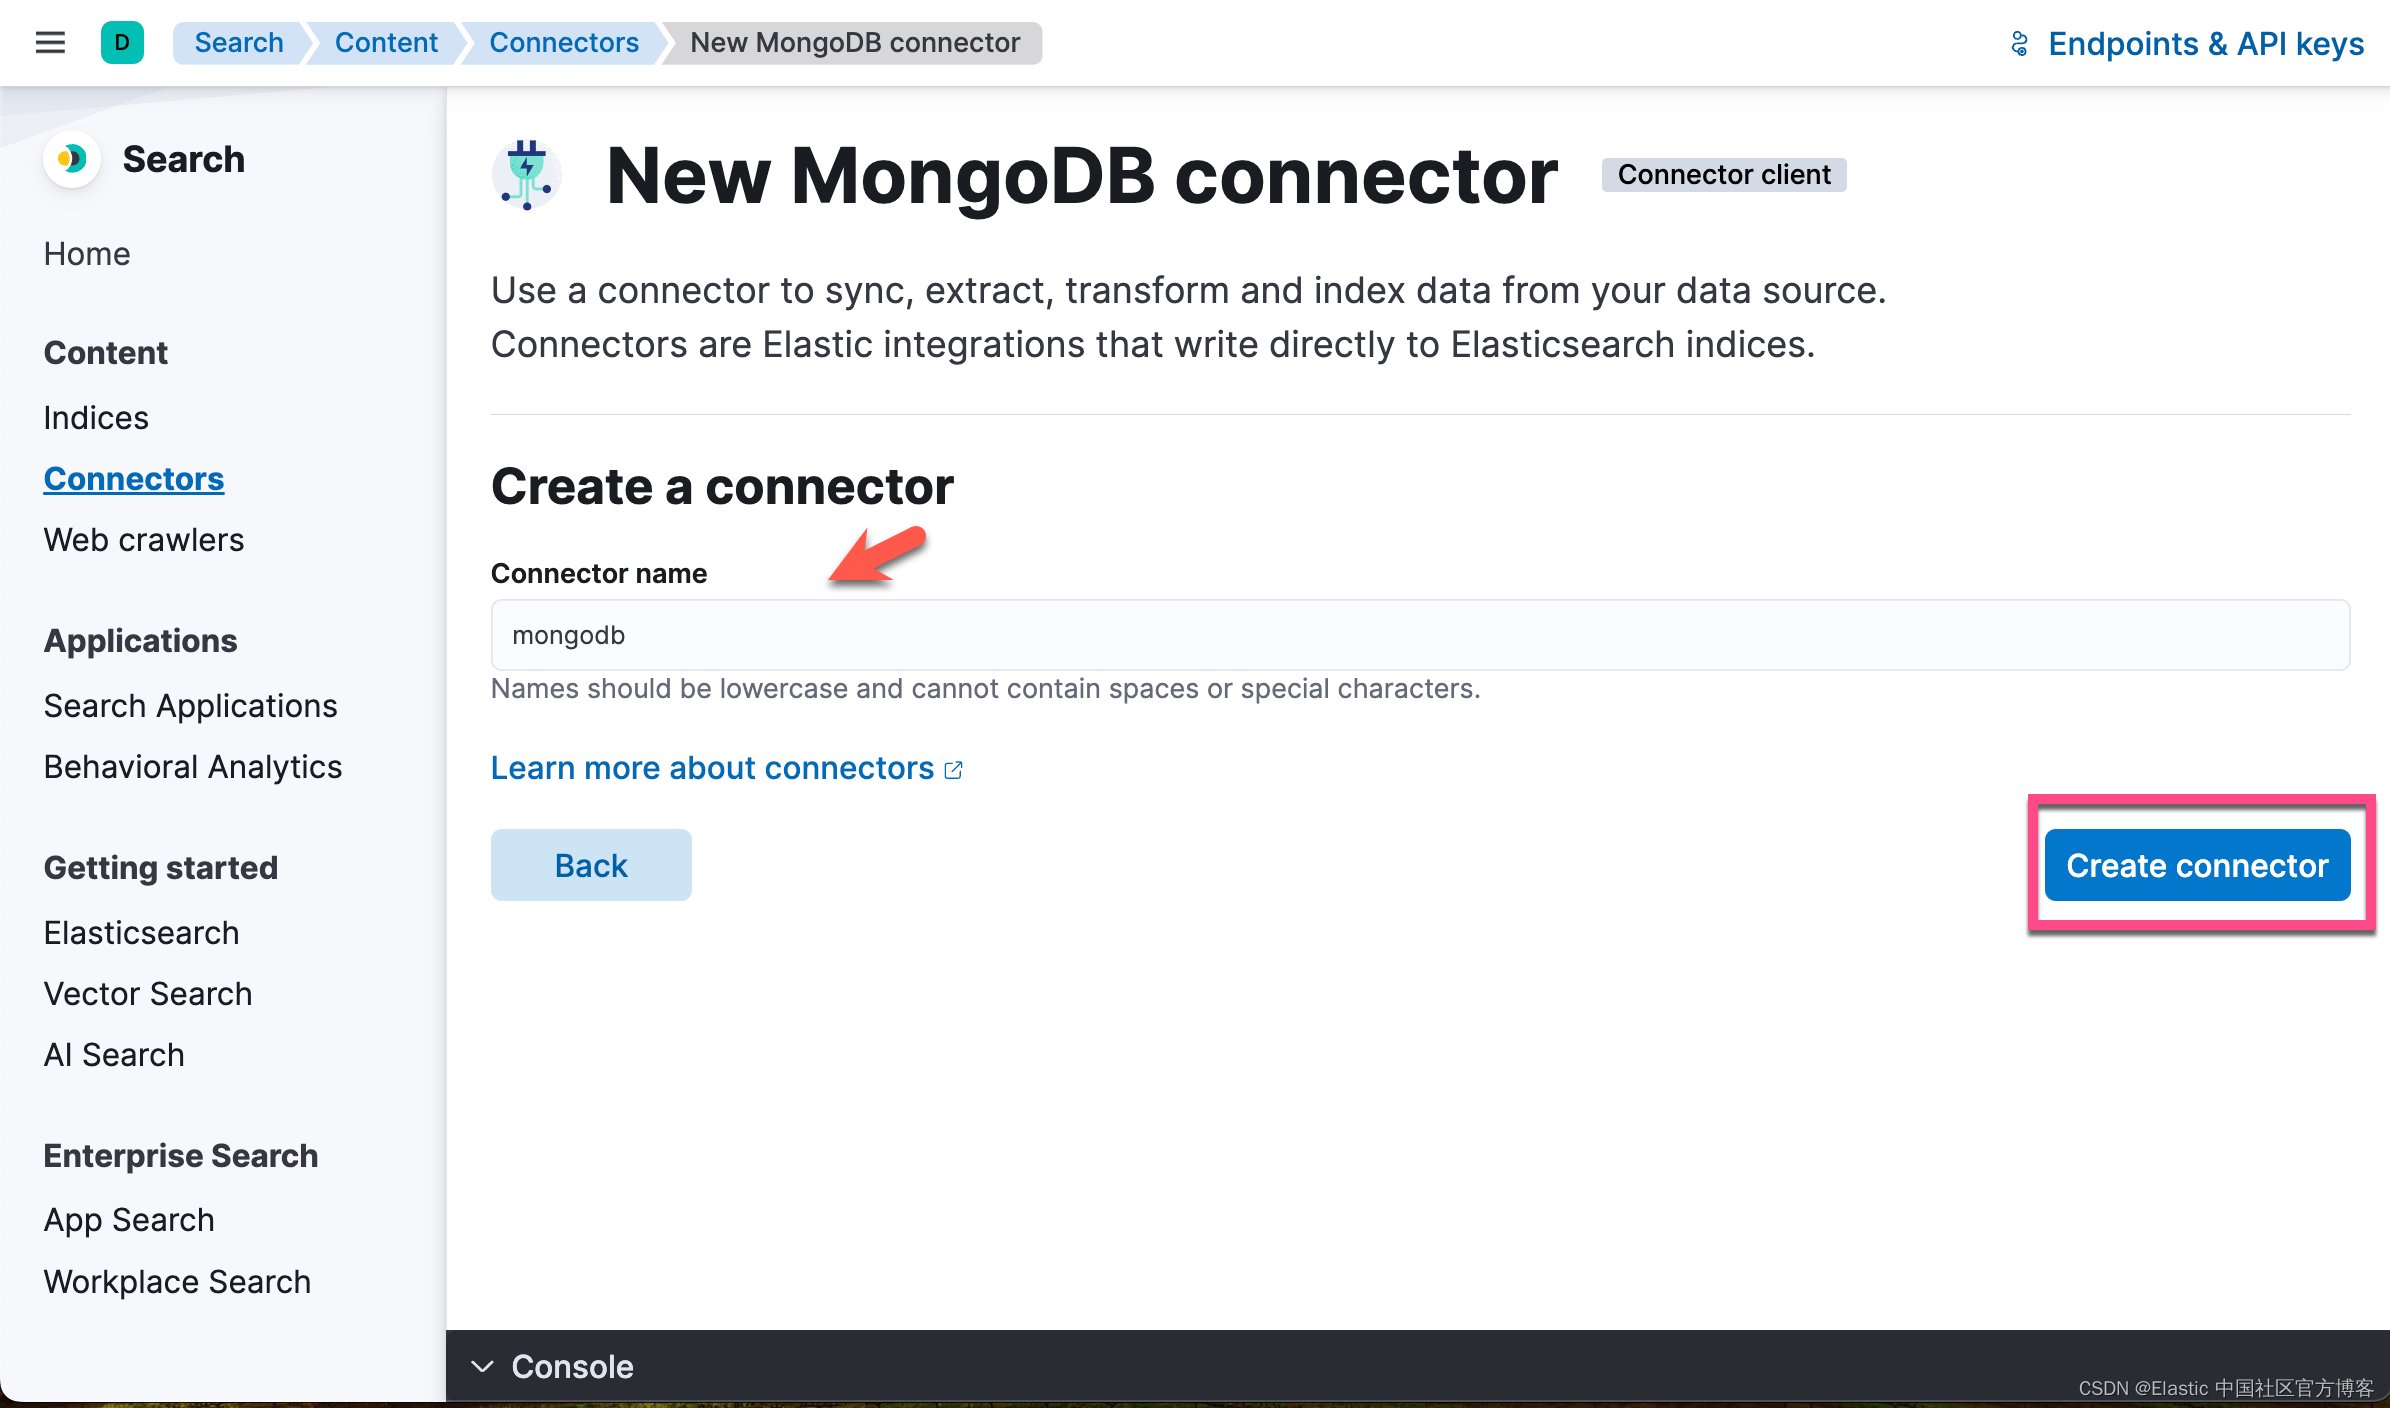
接下来,我们需要按照 Kibana 中的指示来进行操作:
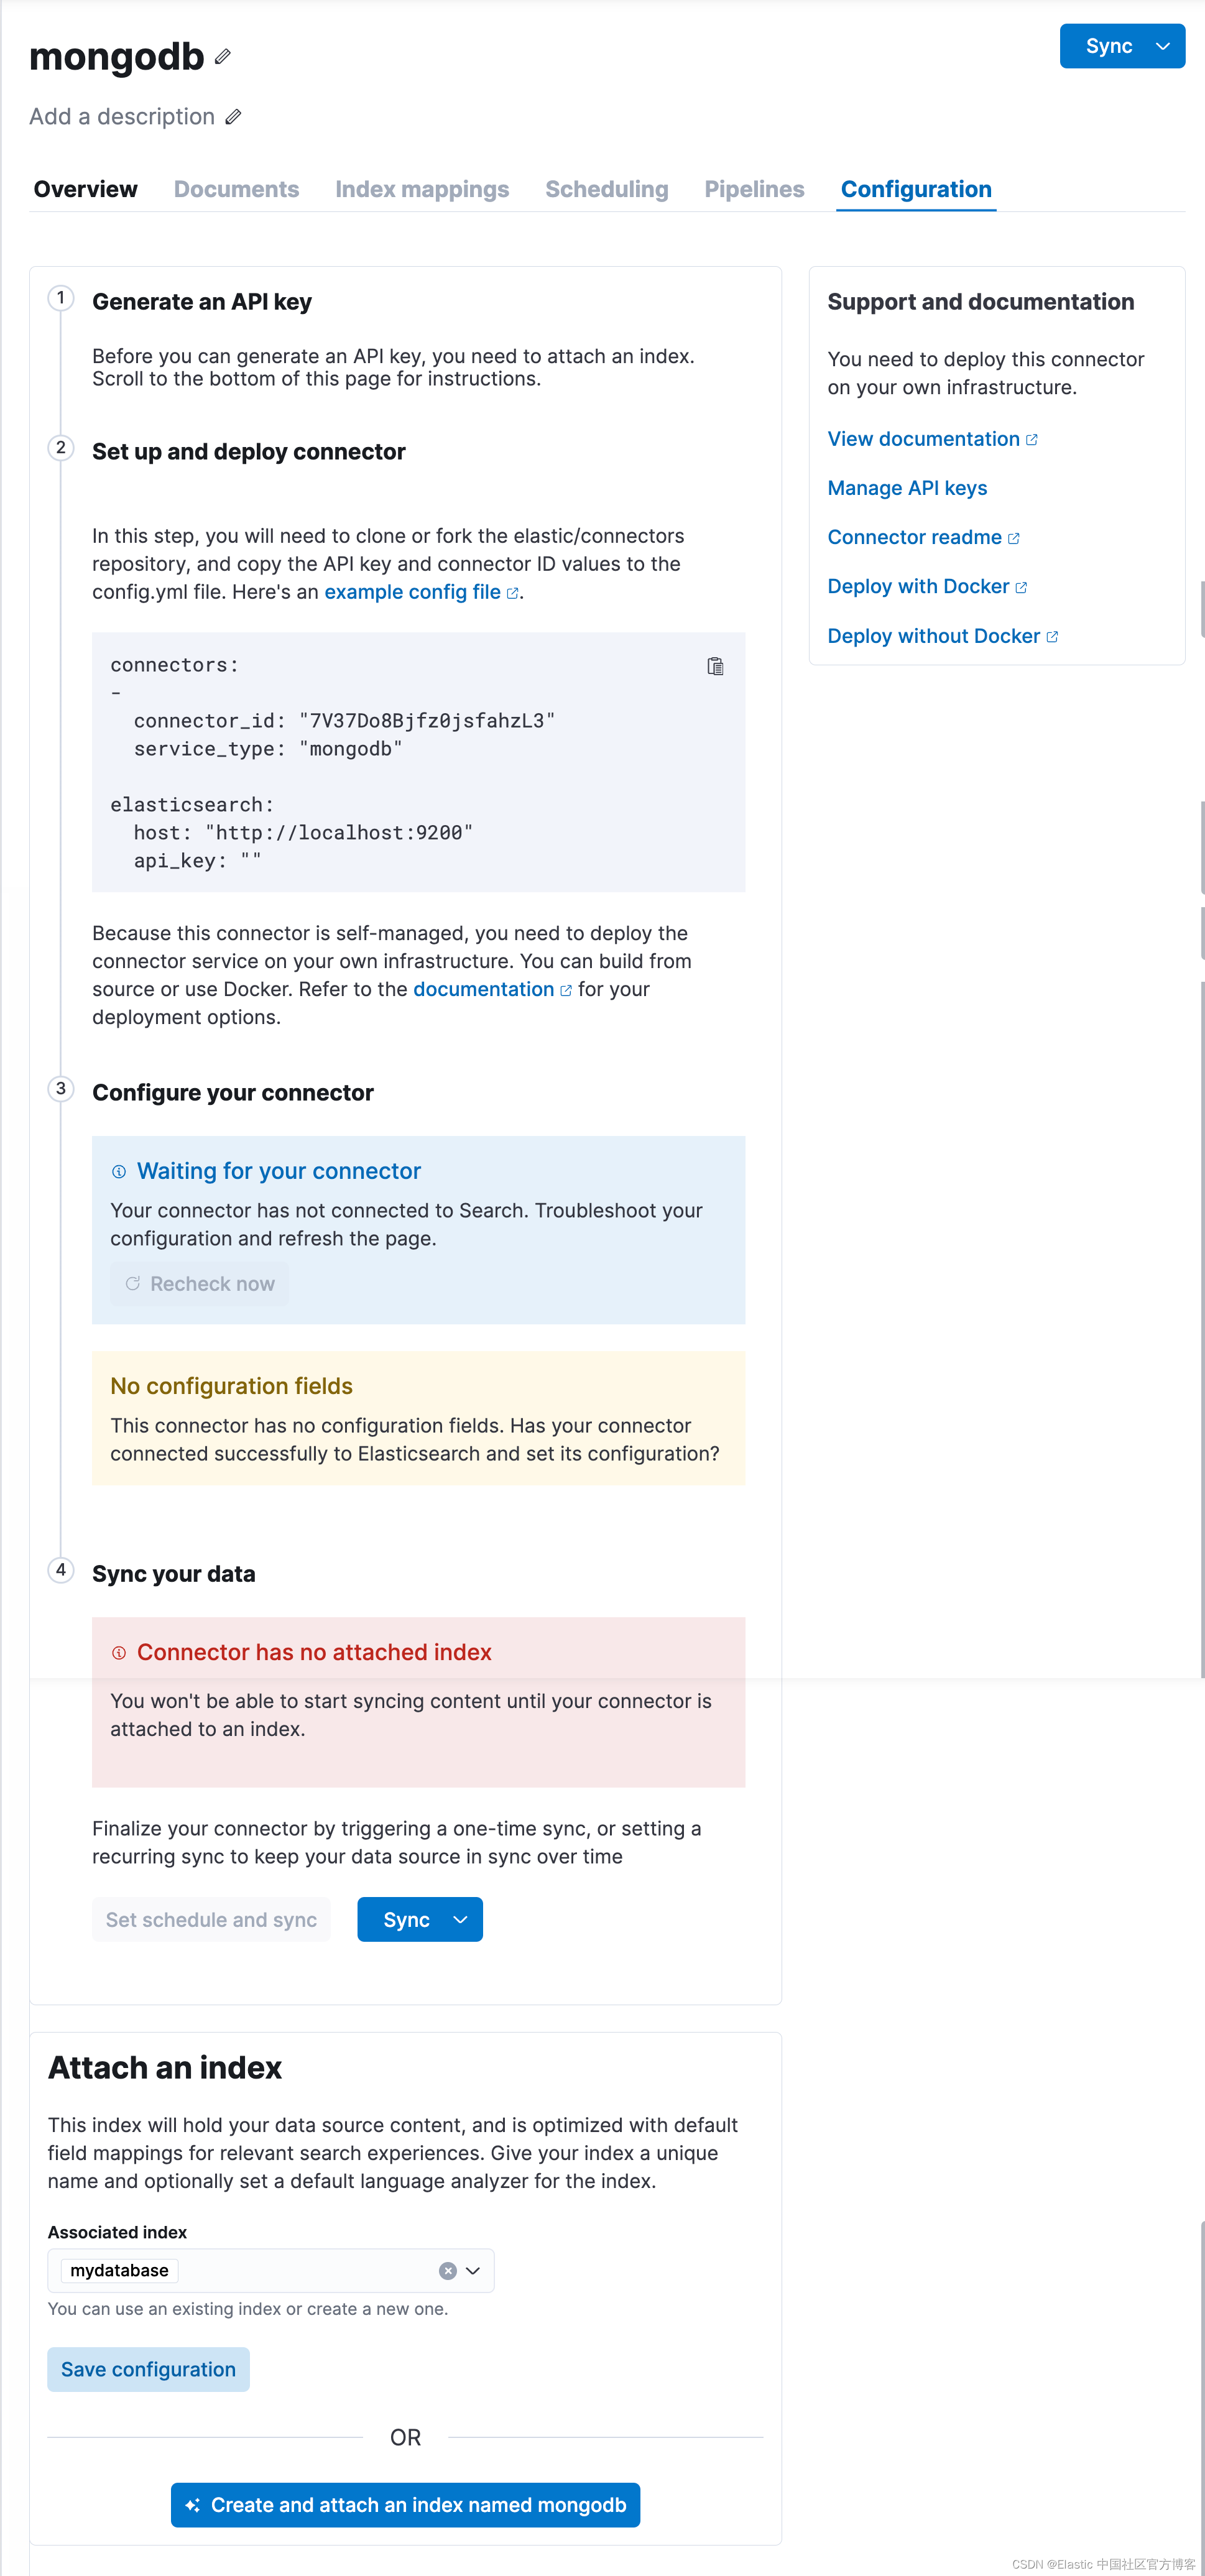
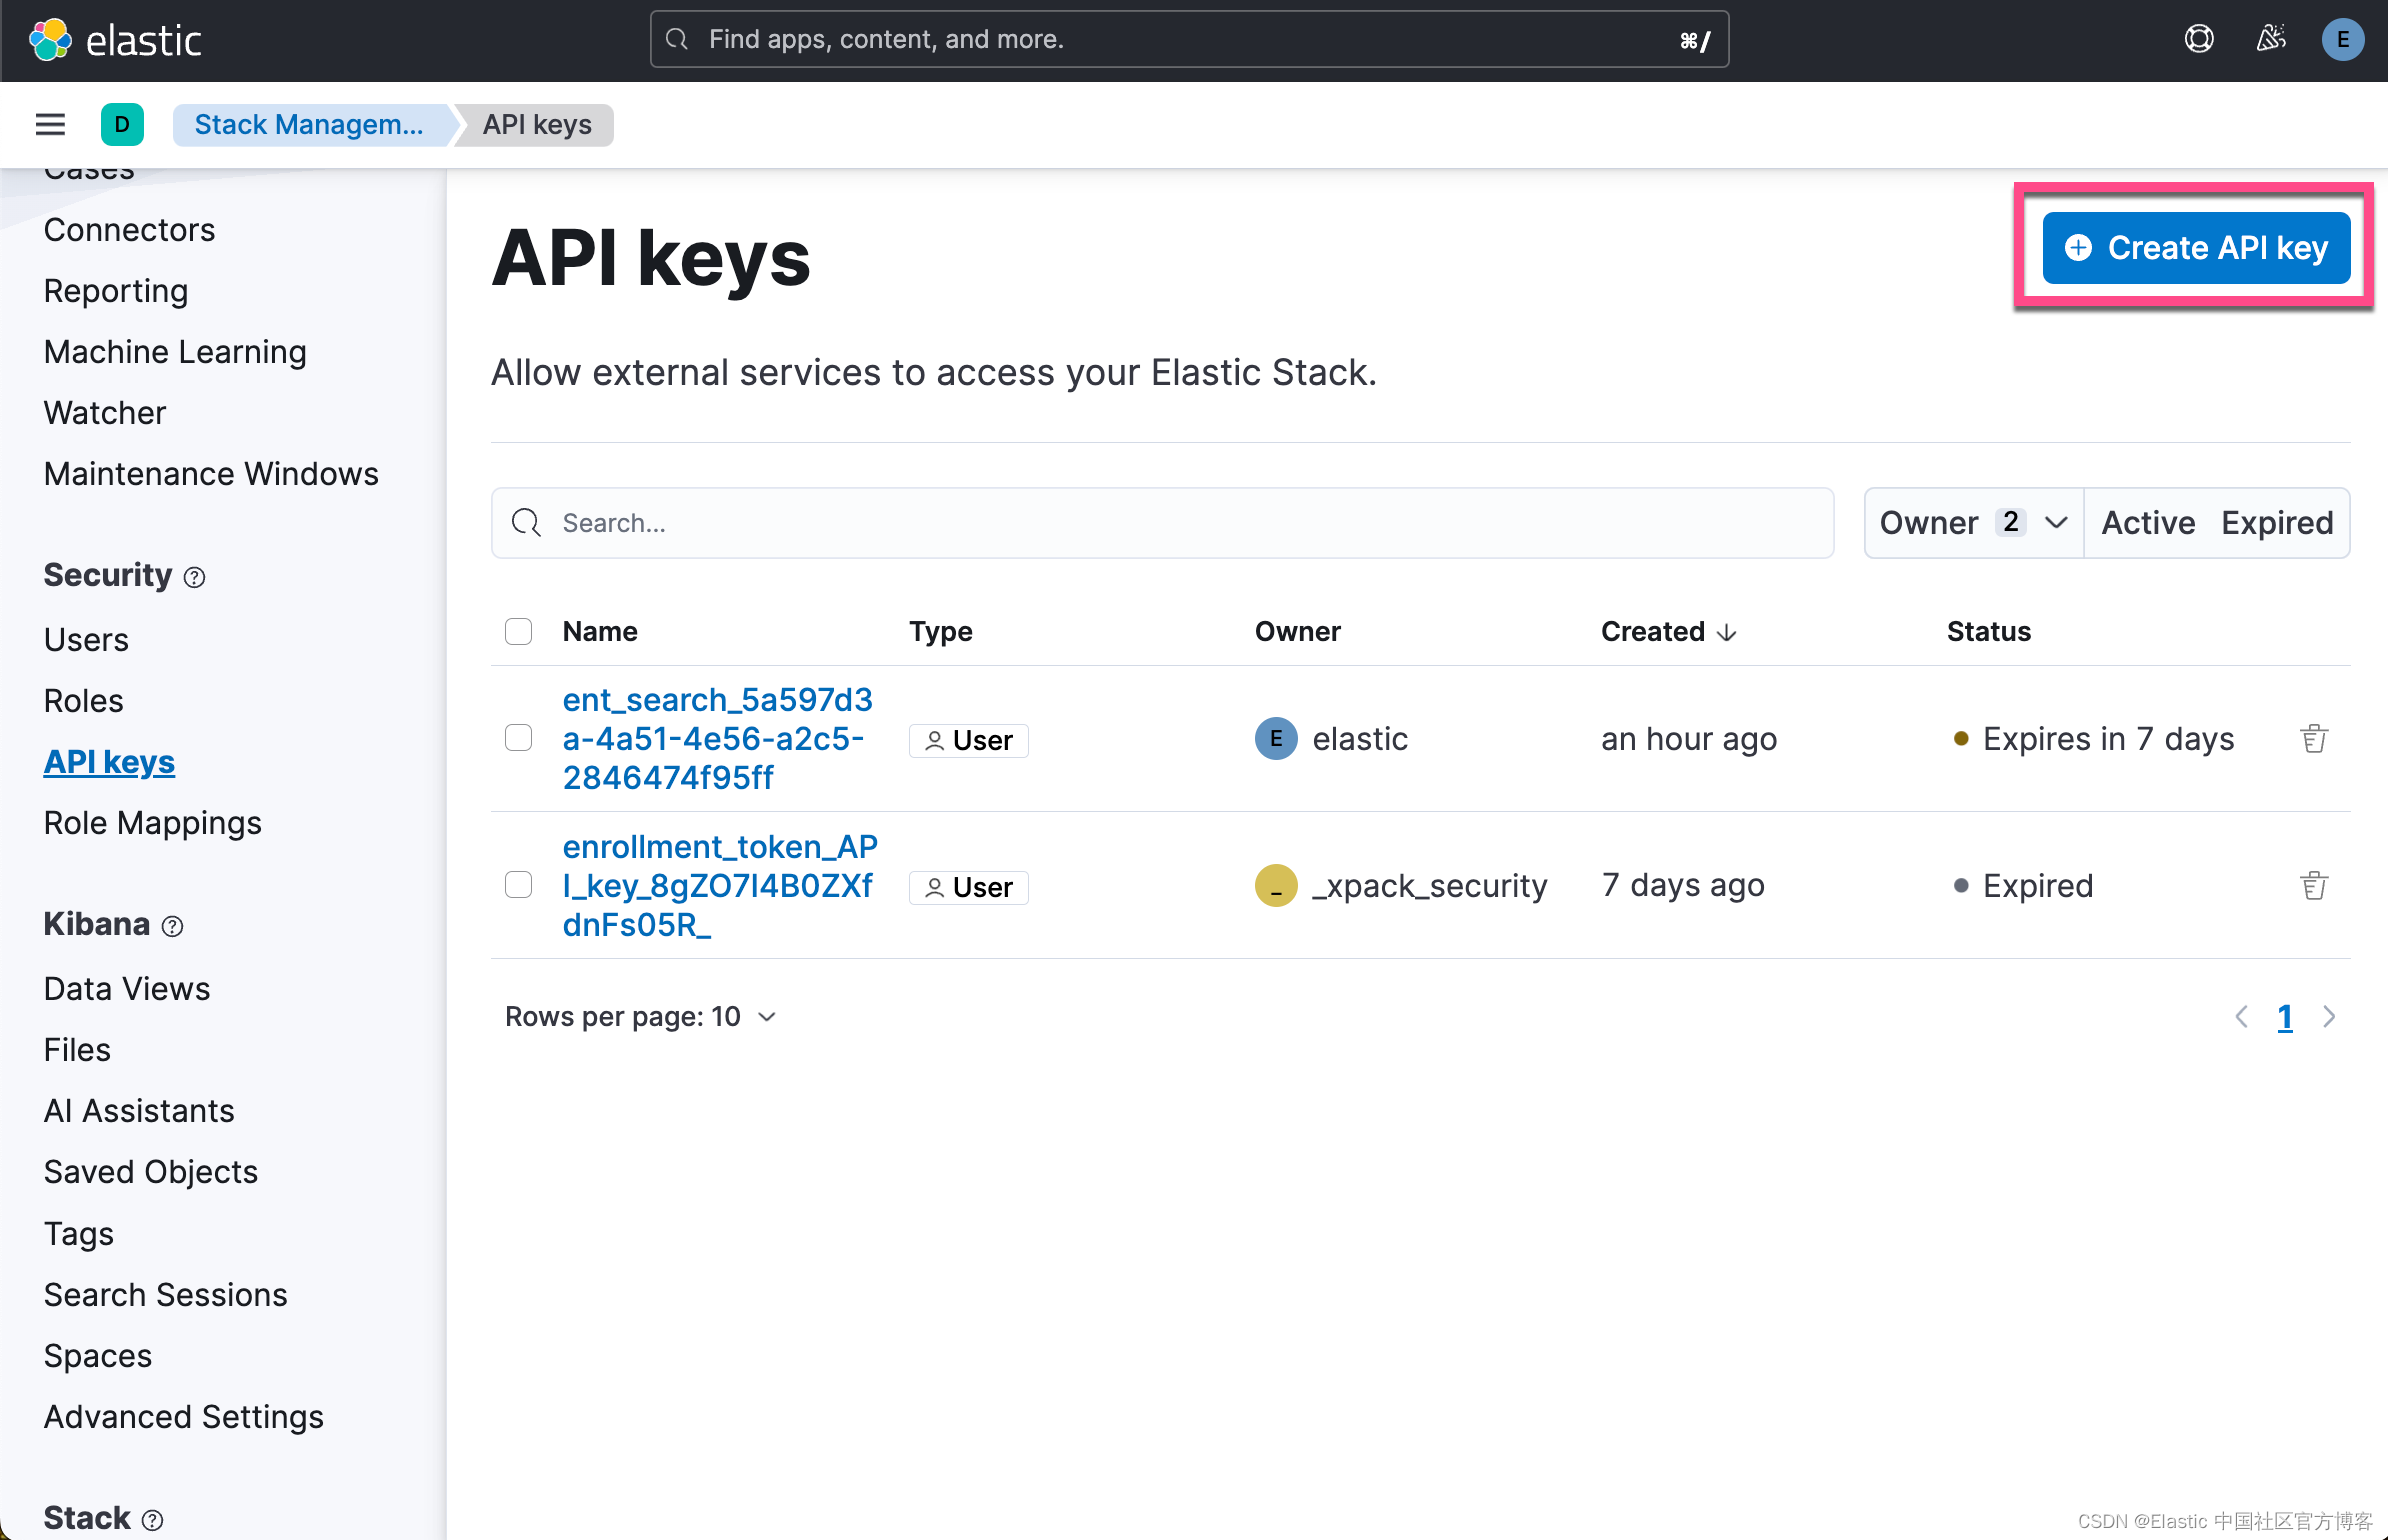
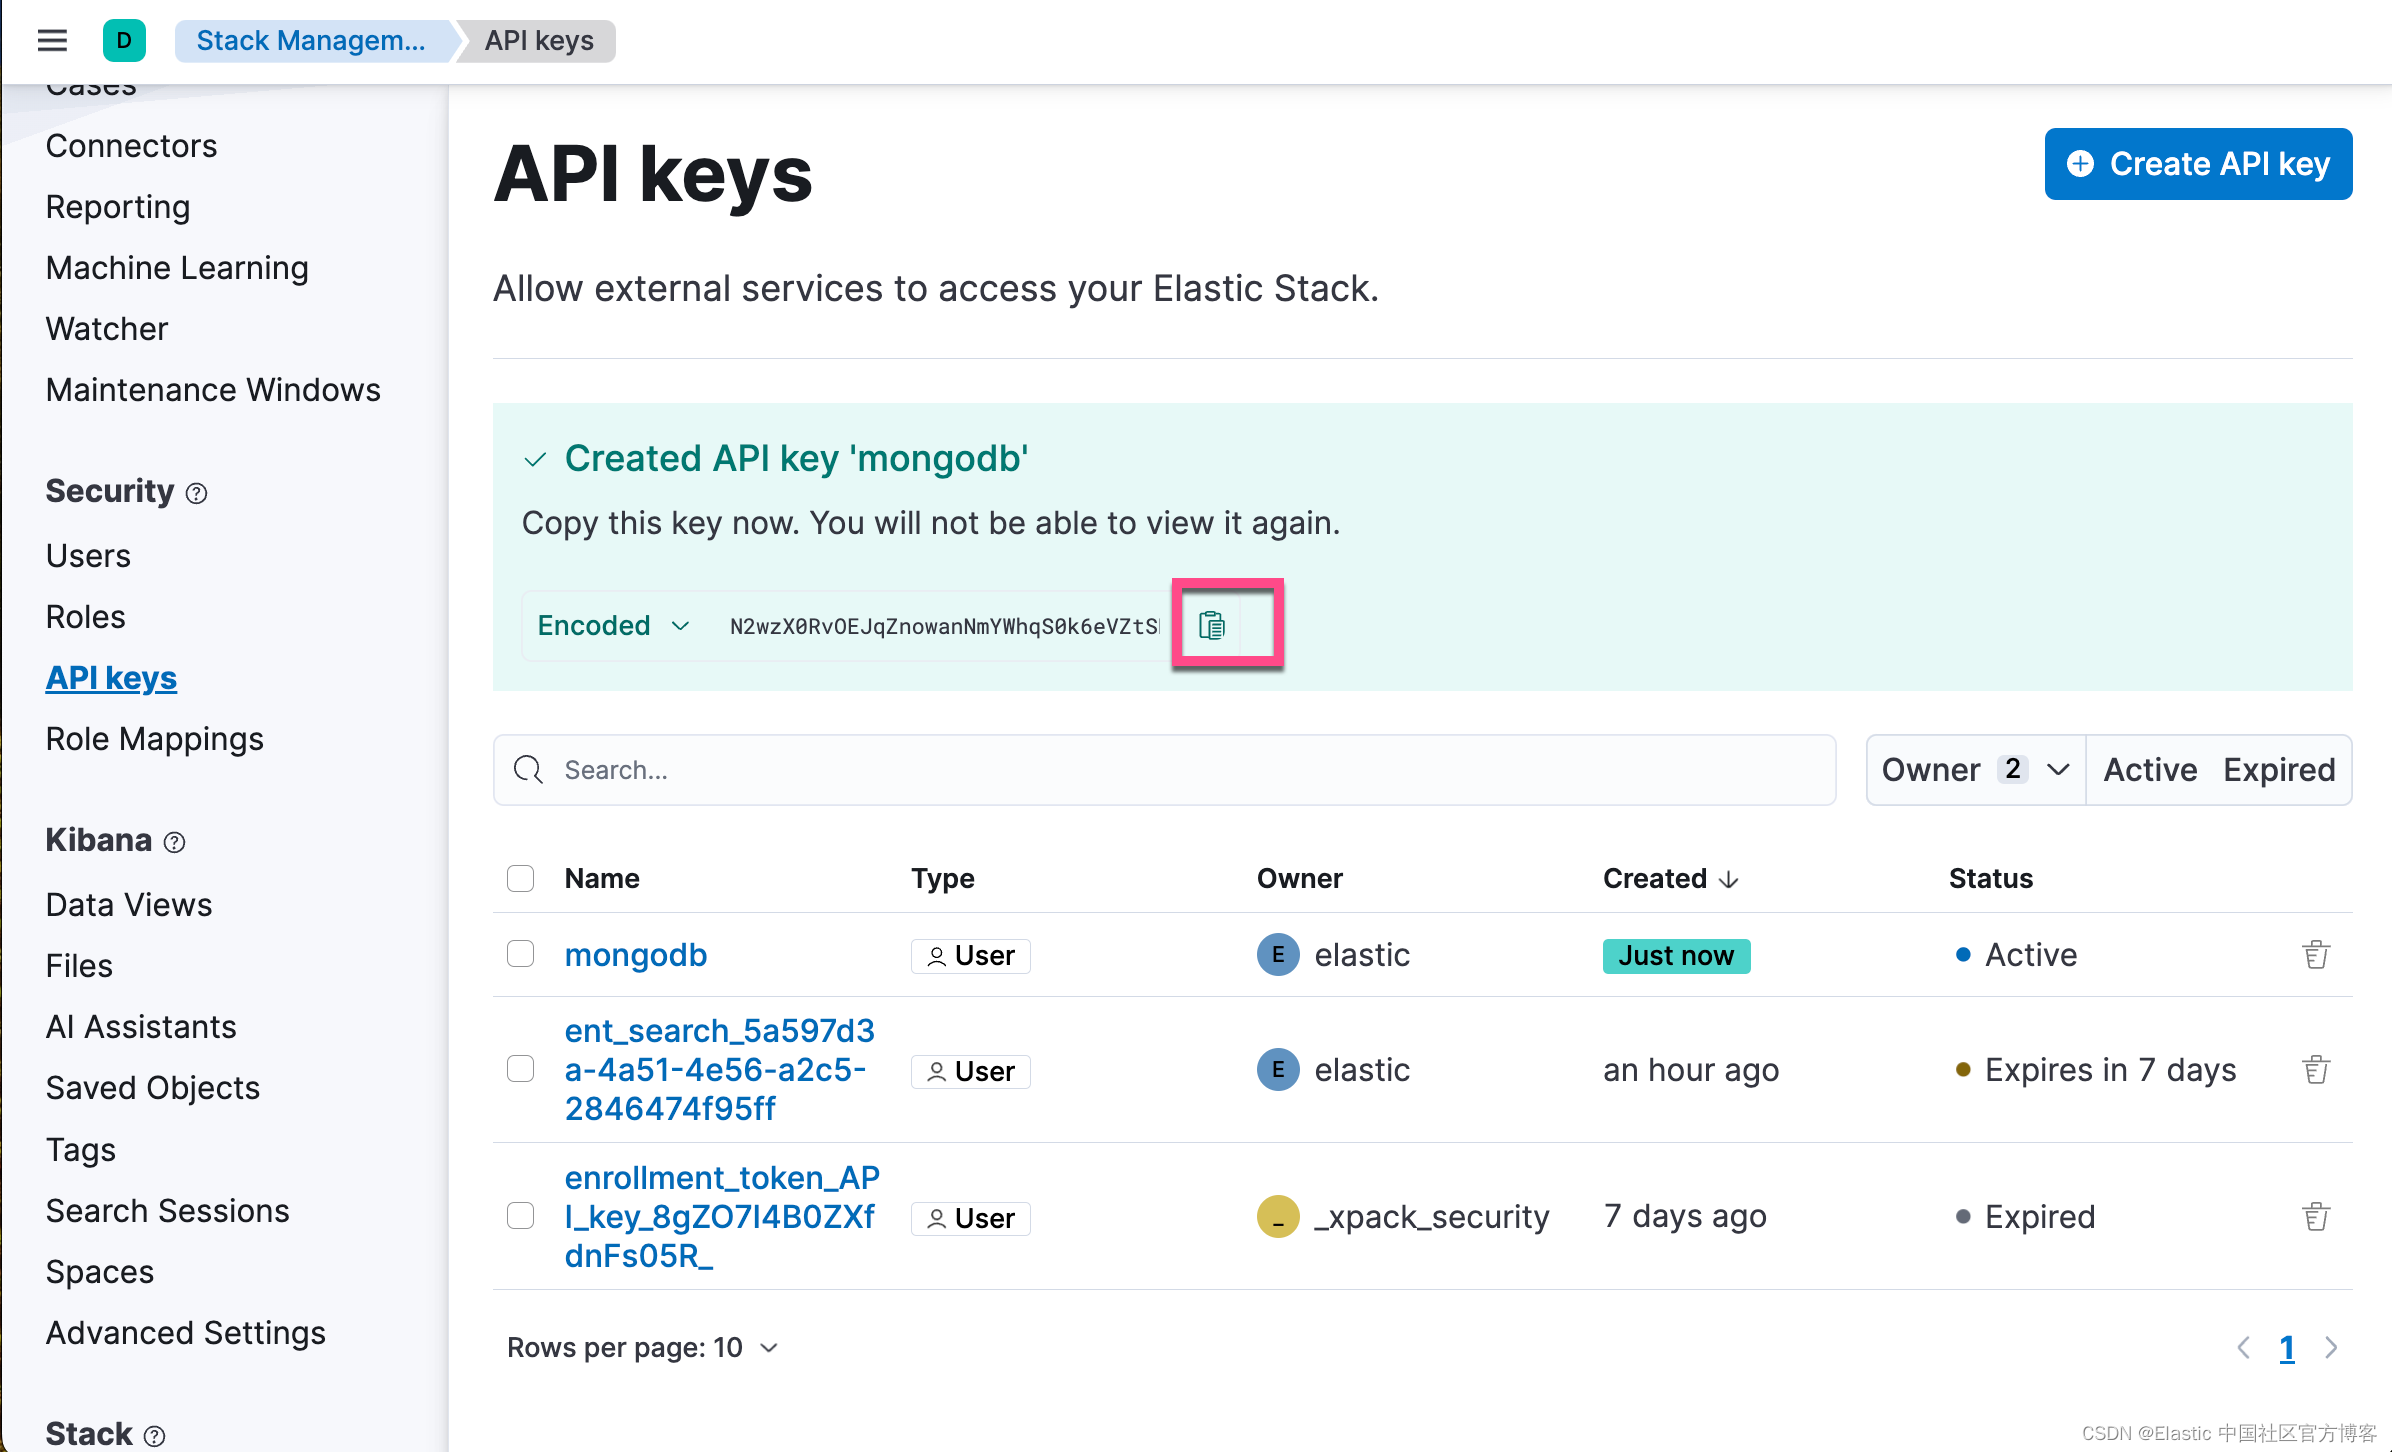
我们首先需要申请一个 API key:

我们需要克隆 elastic/connectors 仓库:
git clone https://github.com/elastic/connectors我们进入到该仓库代码的根目录下,并把 config.yml.example 文件拷贝到 config.yml 文件中。我们也同时拷贝 Elasticsearch 的证书到这个目录下:
$ pwd
/Users/liuxg/python/connectors
$ ls
Dockerfile                 catalog-info.yaml          requirements
Dockerfile.ftest           config.yml.example         resources
LICENSE                    connectors                 scripts
MANIFEST.in                docs                       setup.py
Makefile                   logo-enterprise-search.png tests
NOTICE.txt                 pyrightconfig.json
README.md                  pytest.ini
$ cp config.yml.example config.yml
$ cp ~/elastic/elasticsearch-8.13.2/config/certs/http_ca.crt .
config.yml
connectors:
-
  connector_id: "7V37Do8Bjfz0jsfahzL3"
  service_type: "mongodb"
elasticsearch:
  host: "https://192.168.0.3:9200"
  api_key: "N2wzX0RvOEJqZnowanNmYWhqS0k6eVZtSDJMVFFRRS1UZjFacWI2eUhPUQ=="
  ssl: true
  username: "elastic"
  password: "VDMlz5QnM_0g-349fFq7"
  ca_certs: "/usr/share/certs/http_ca.crt"

service:
  idling: 30
  heartbeat: 300
  max_errors: 20
  max_errors_span: 600
  max_concurrent_content_syncs: 1
  max_concurrent_access_control_syncs: 1
  job_cleanup_interval: 300
  log_level: INFO


sources:
  mongodb: connectors.sources.mongo:MongoDataSource
你需要根据自己的配置进行相应的修改。请注意上面的 connector_id 需要根据上面界面生成的值进行相应的修改。
根据链接的描述,我们有两种方法来进行部署。我们选择使用 docker 来进行部署。我们在刚才创建的 config.yml 目录下进行运行:
docker run \
-v ~/python/connectors:/config \
--volume="$PWD/http_ca.crt:/usr/share/certs/http_ca.crt:ro" \
--rm \
--tty -i \
--network host \
docker.elastic.co/enterprise-search/elastic-connectors:8.13.0.0-SNAPSHOT \
/app/bin/elastic-ingest \
-c /config/config.yml
运行完上面的命令后,我们可以在 Kibana 中看到:
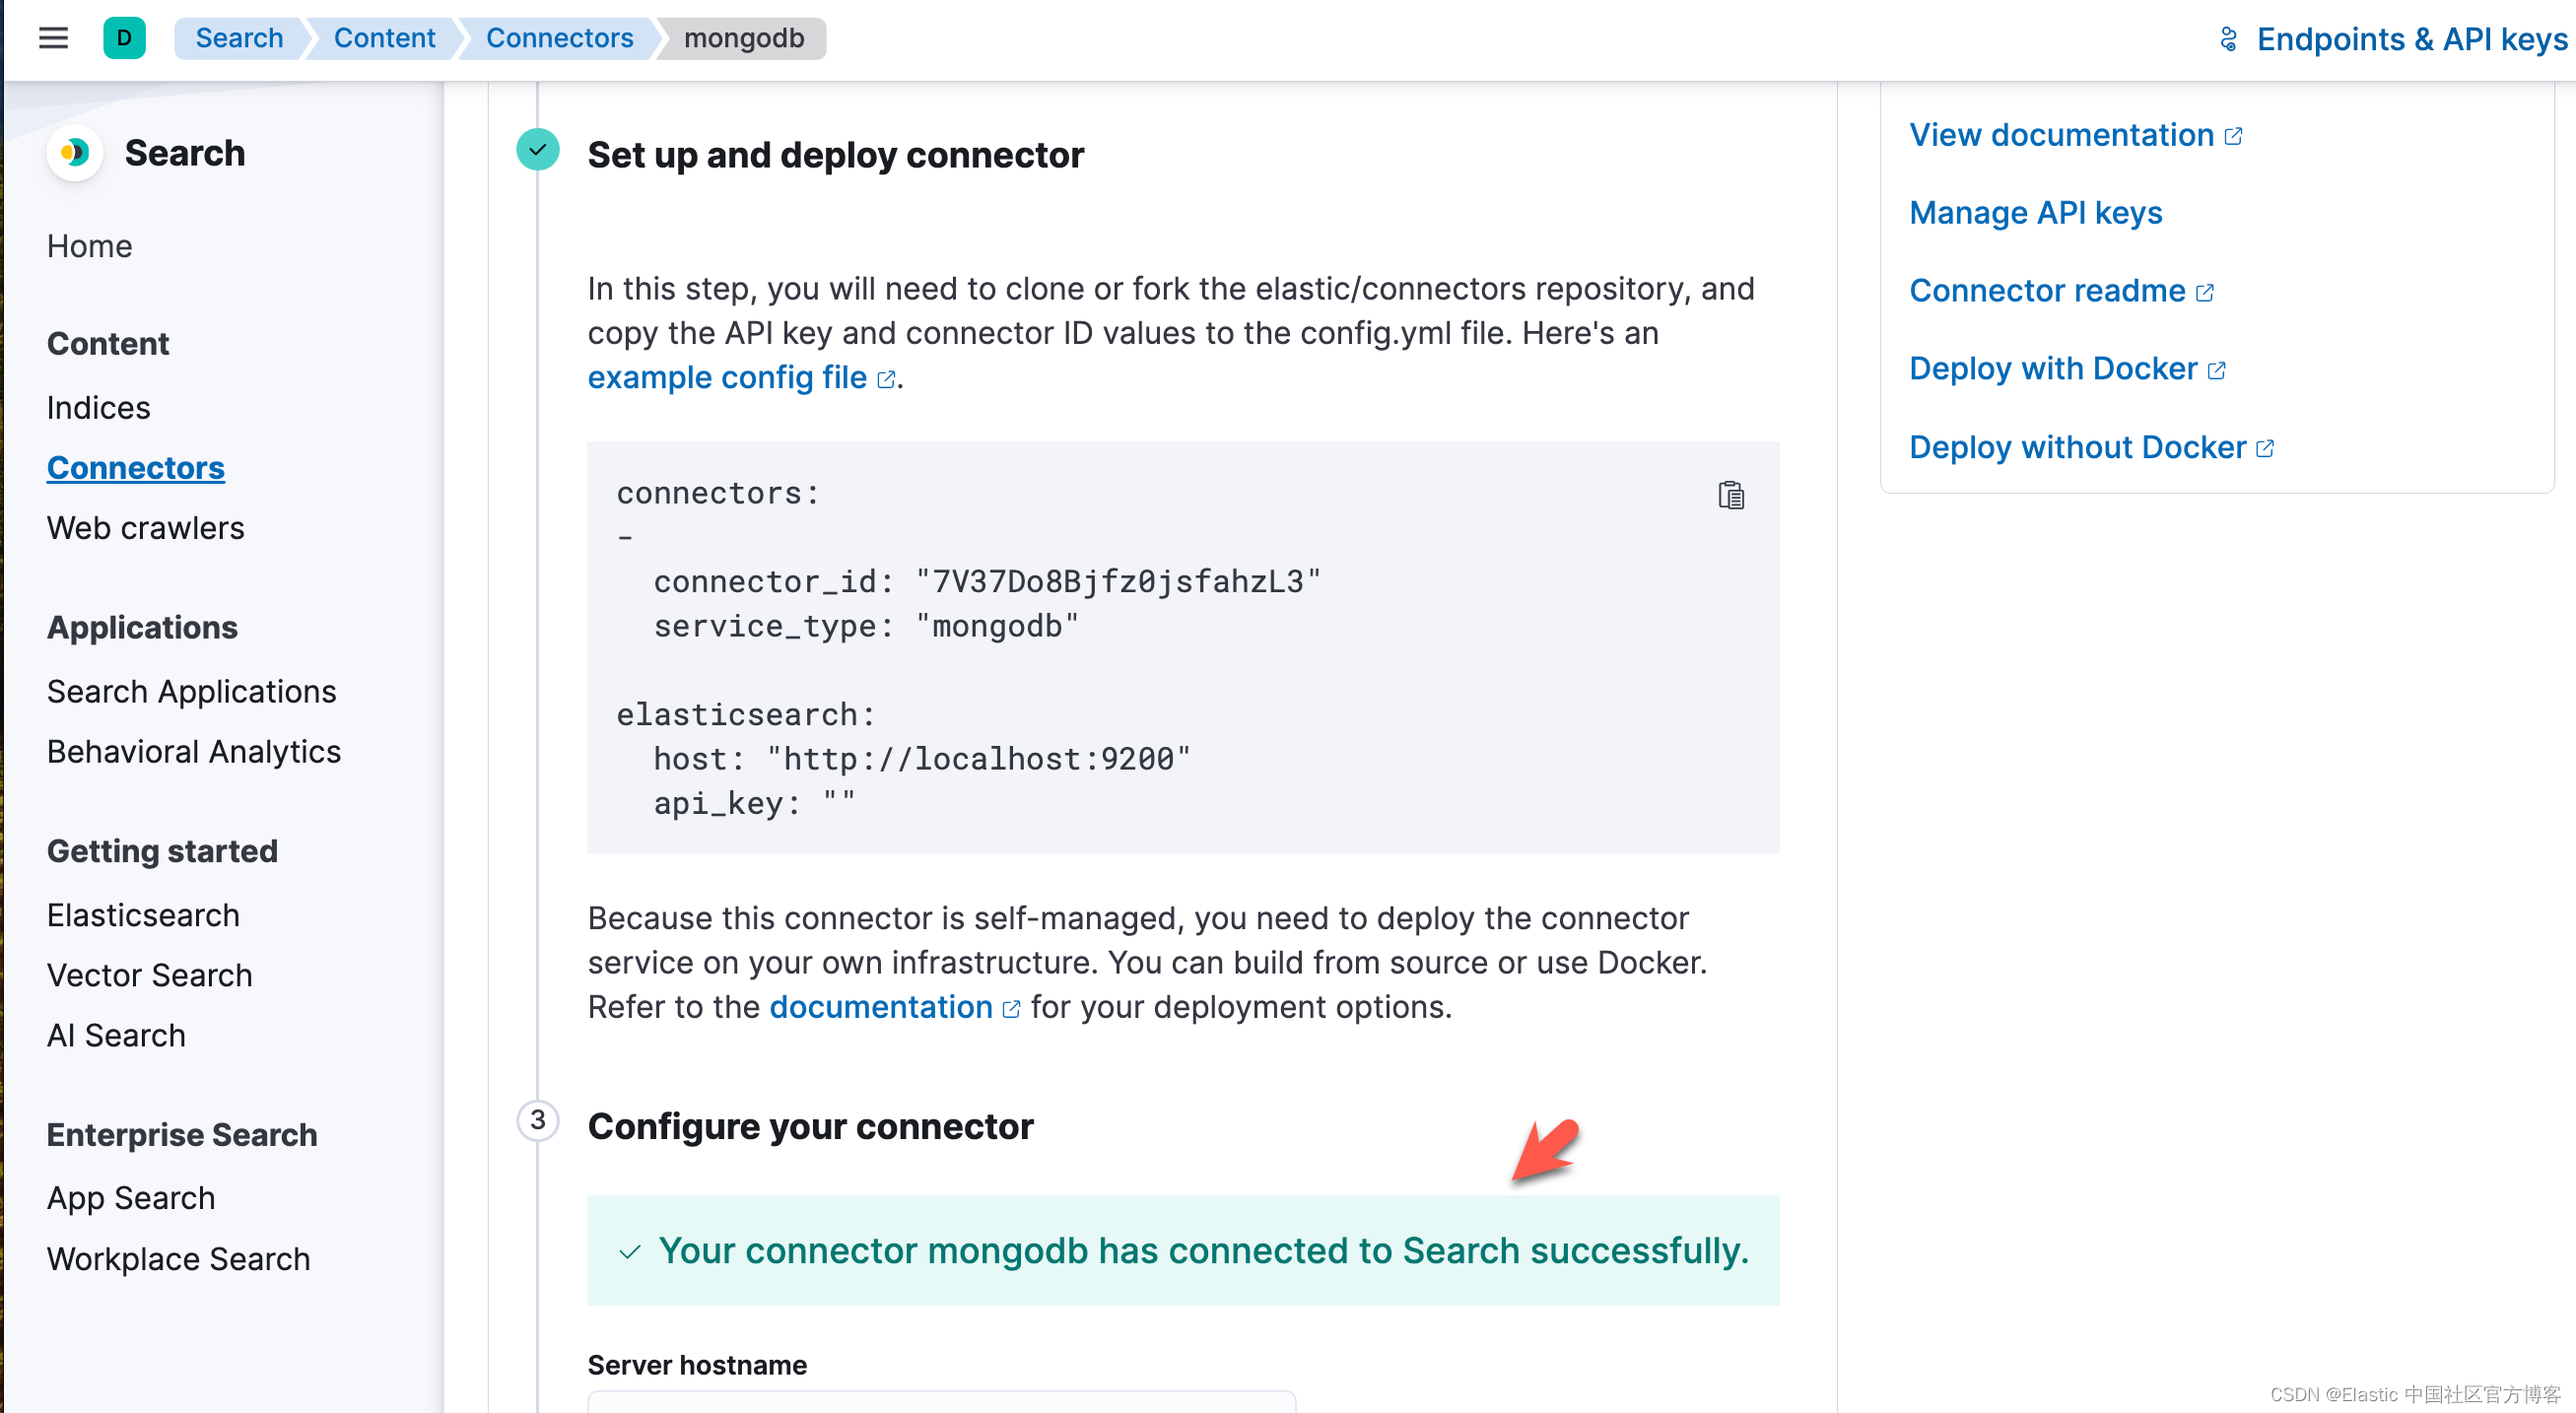
上面显示我们的 connector 已经成功地连接了。
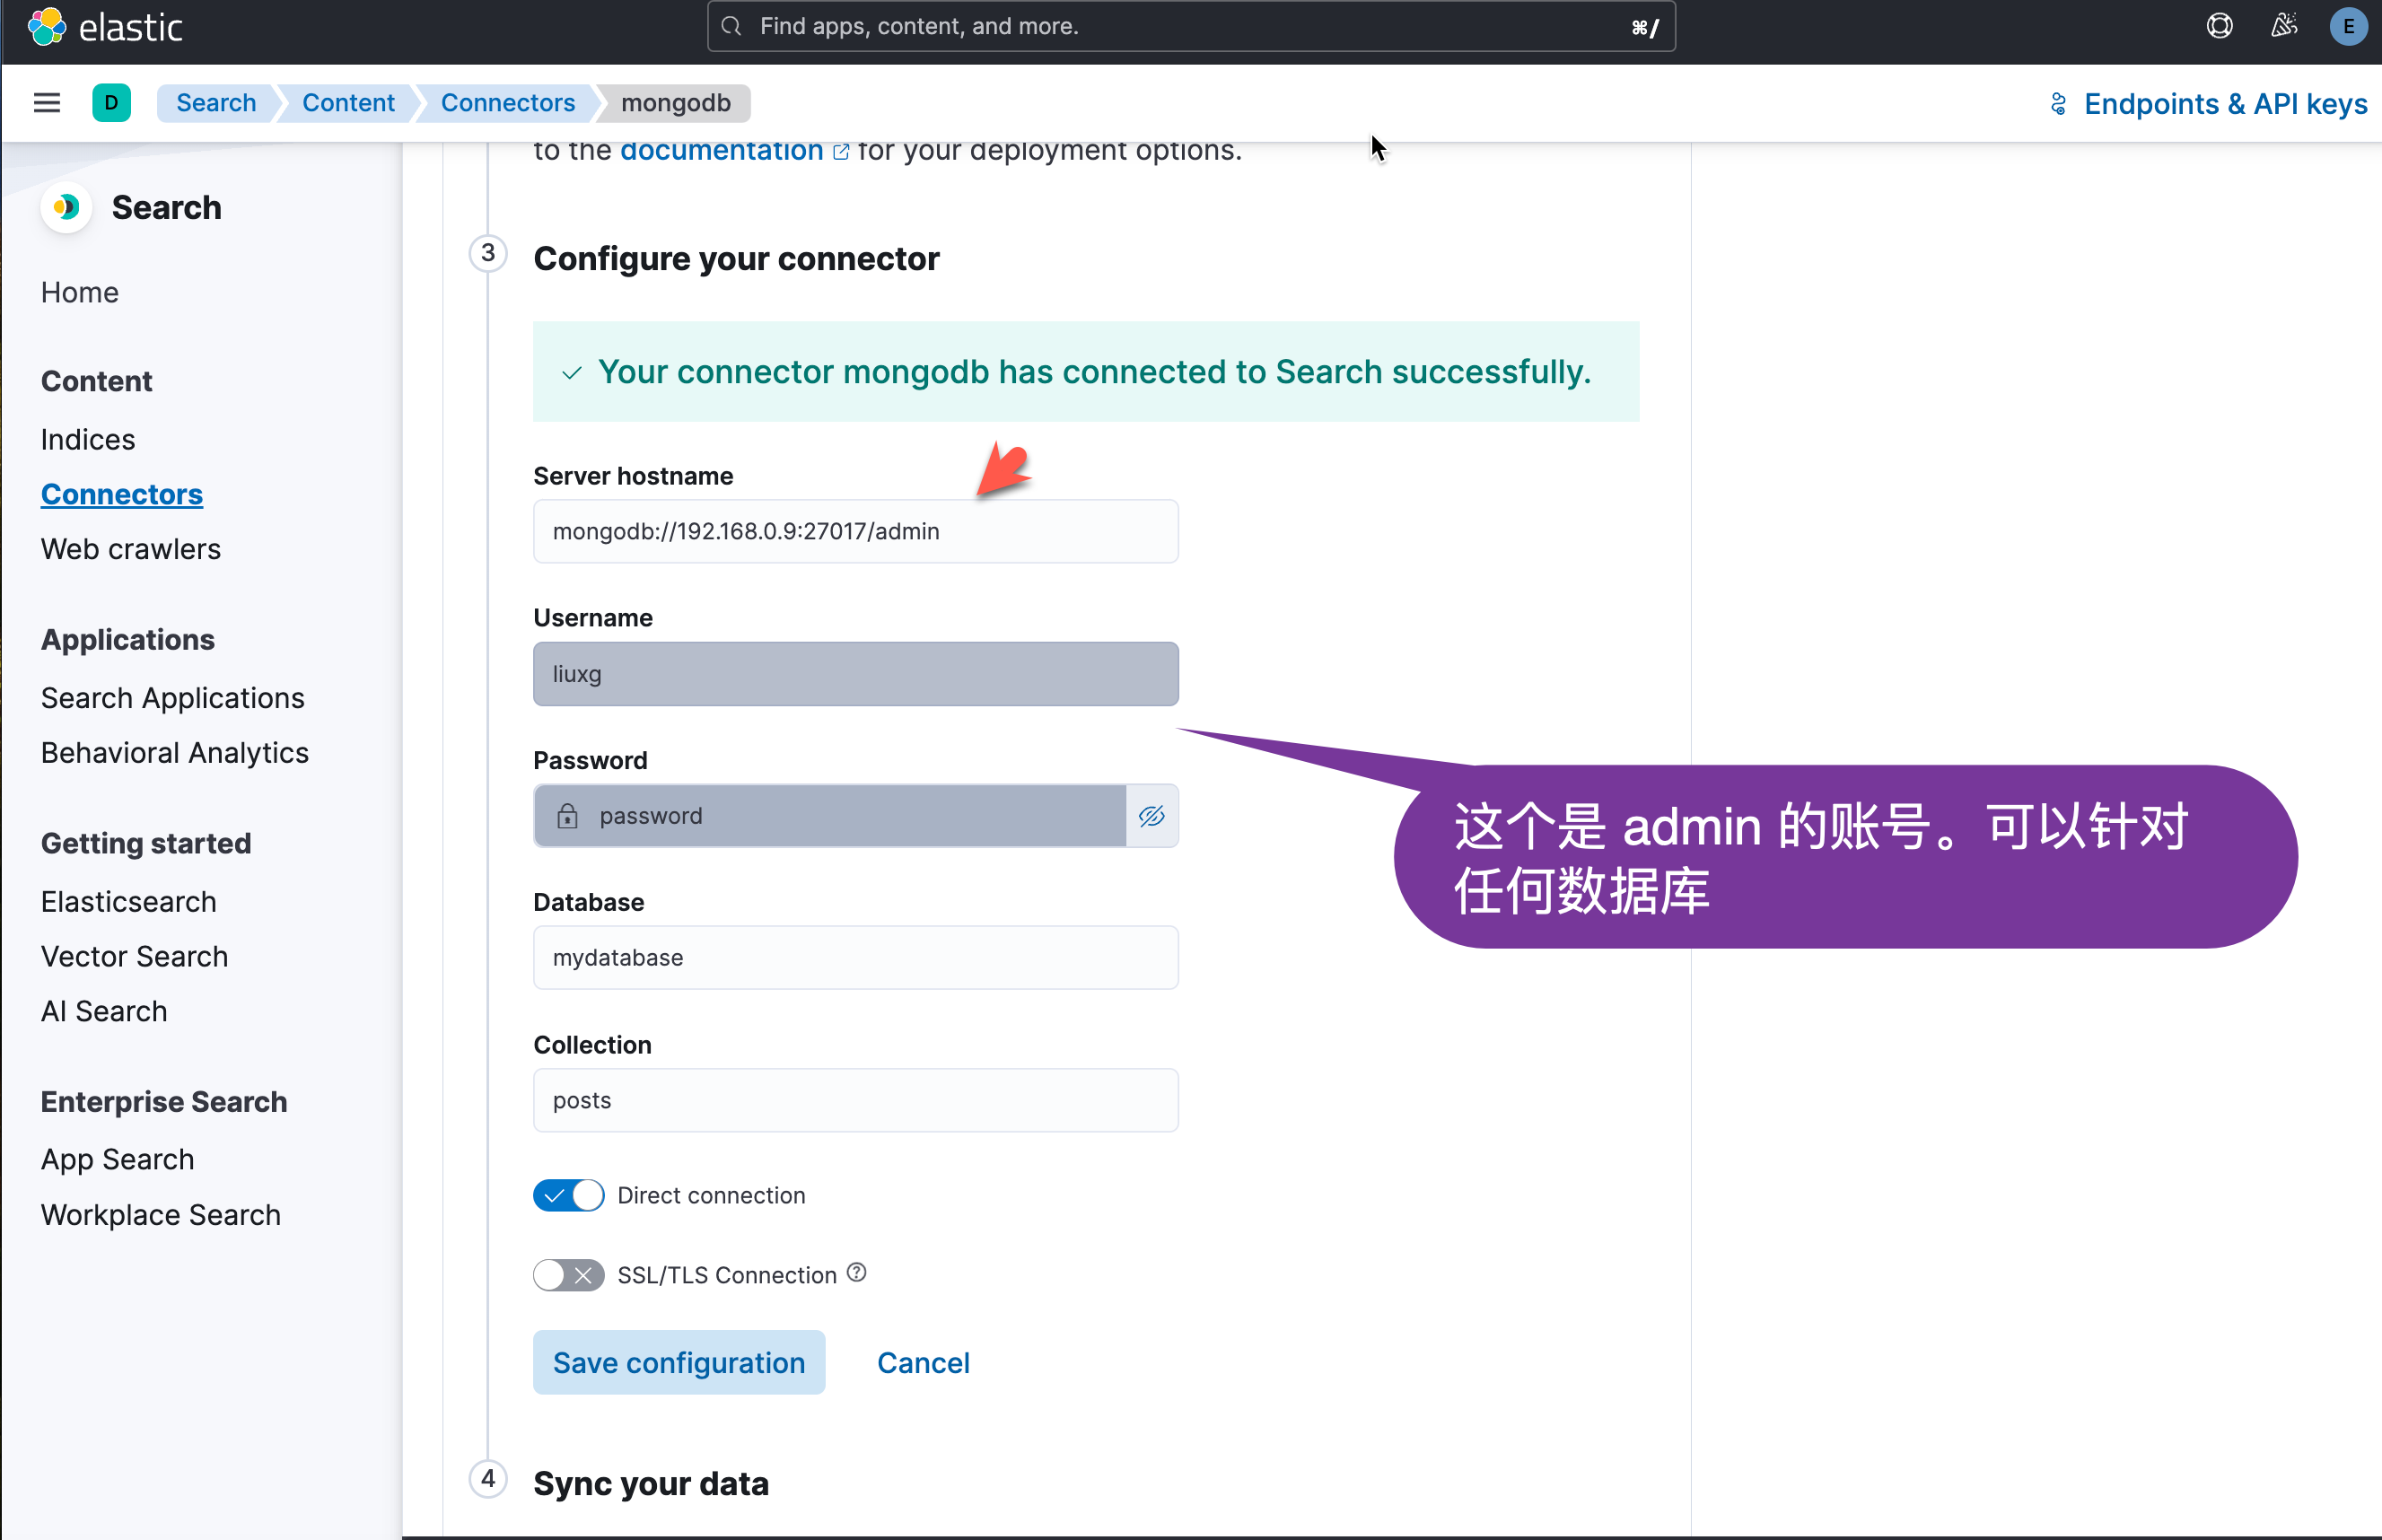
我们也可以使用自己数据库上的账号:
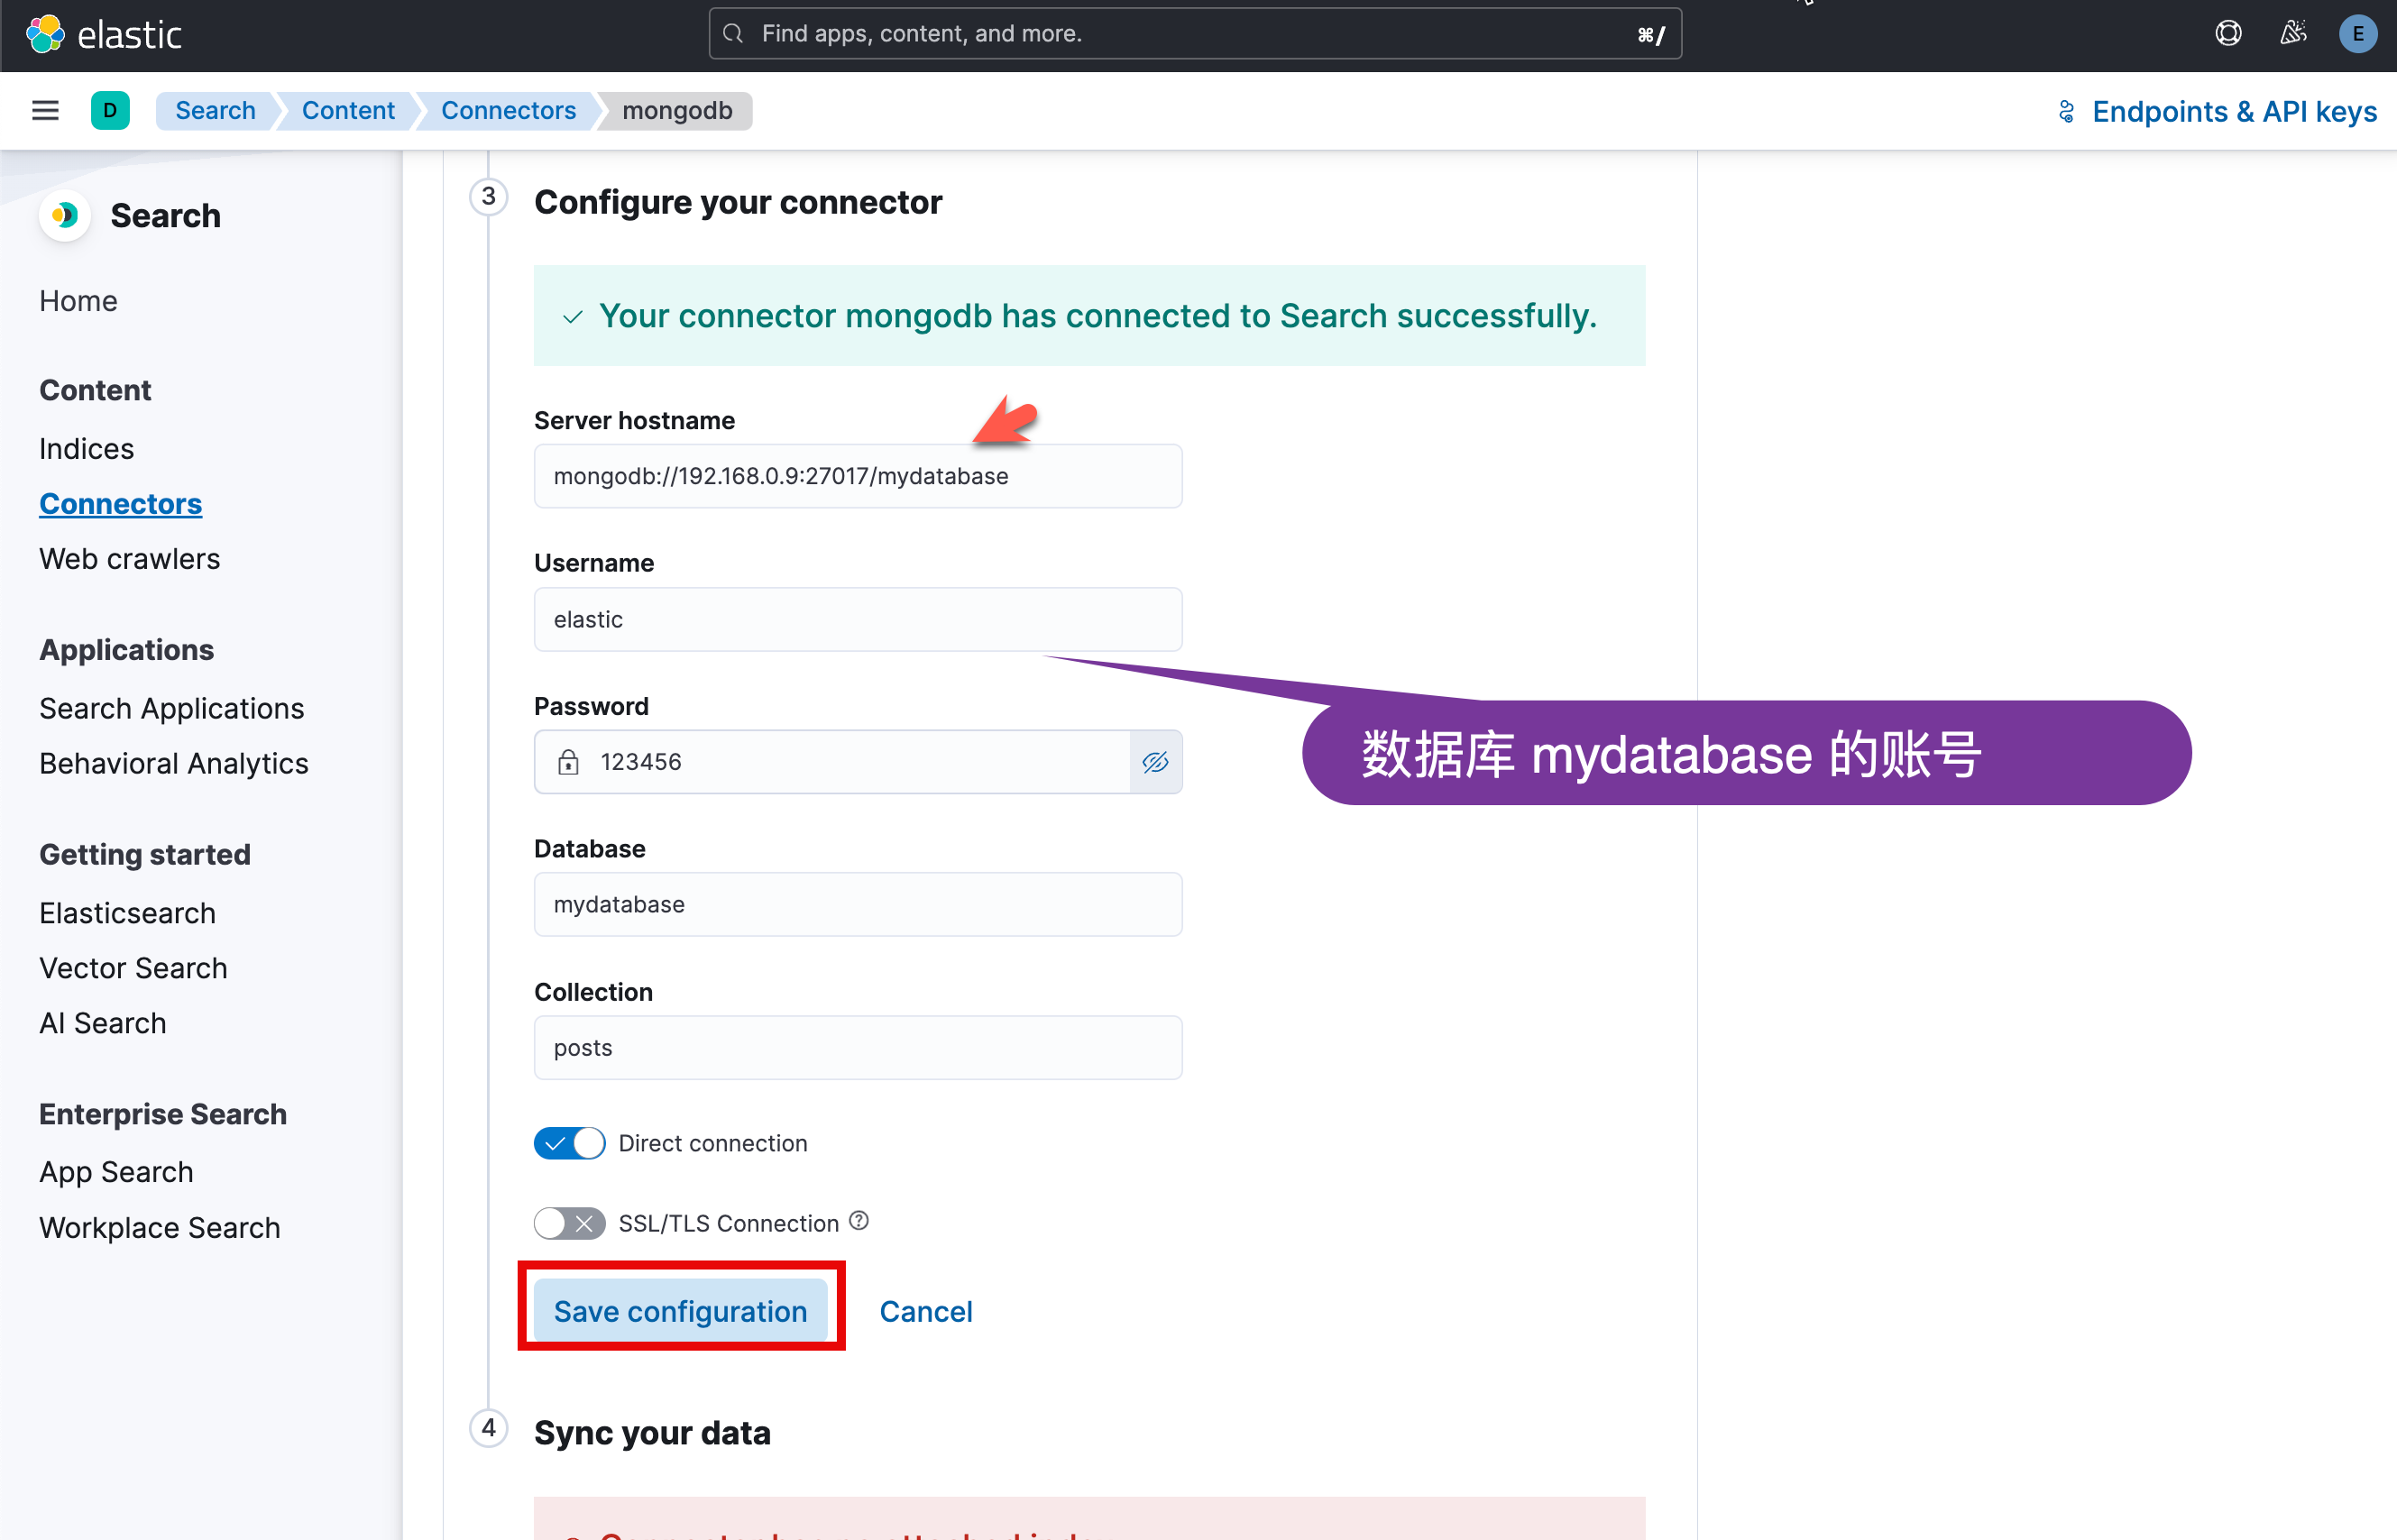
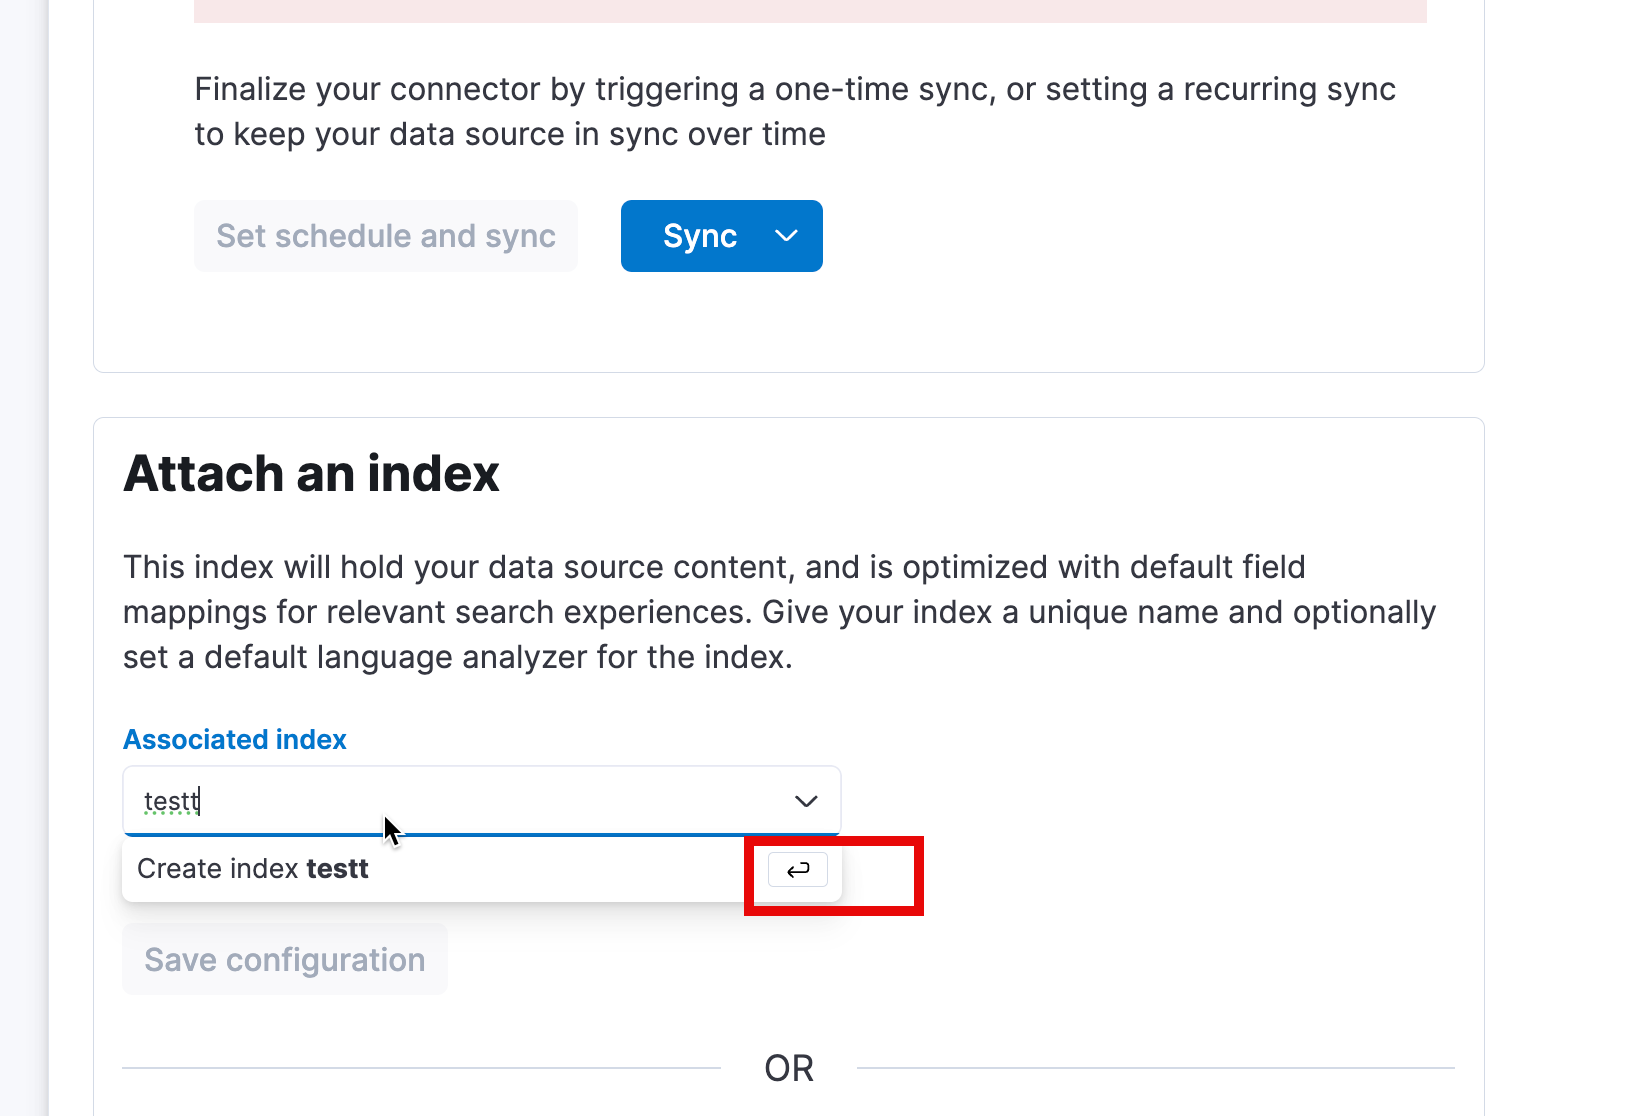
在进行下面的同步之前,我们可以先创建一个索引 test,当然也可以使用之前创建的 mydatabase:
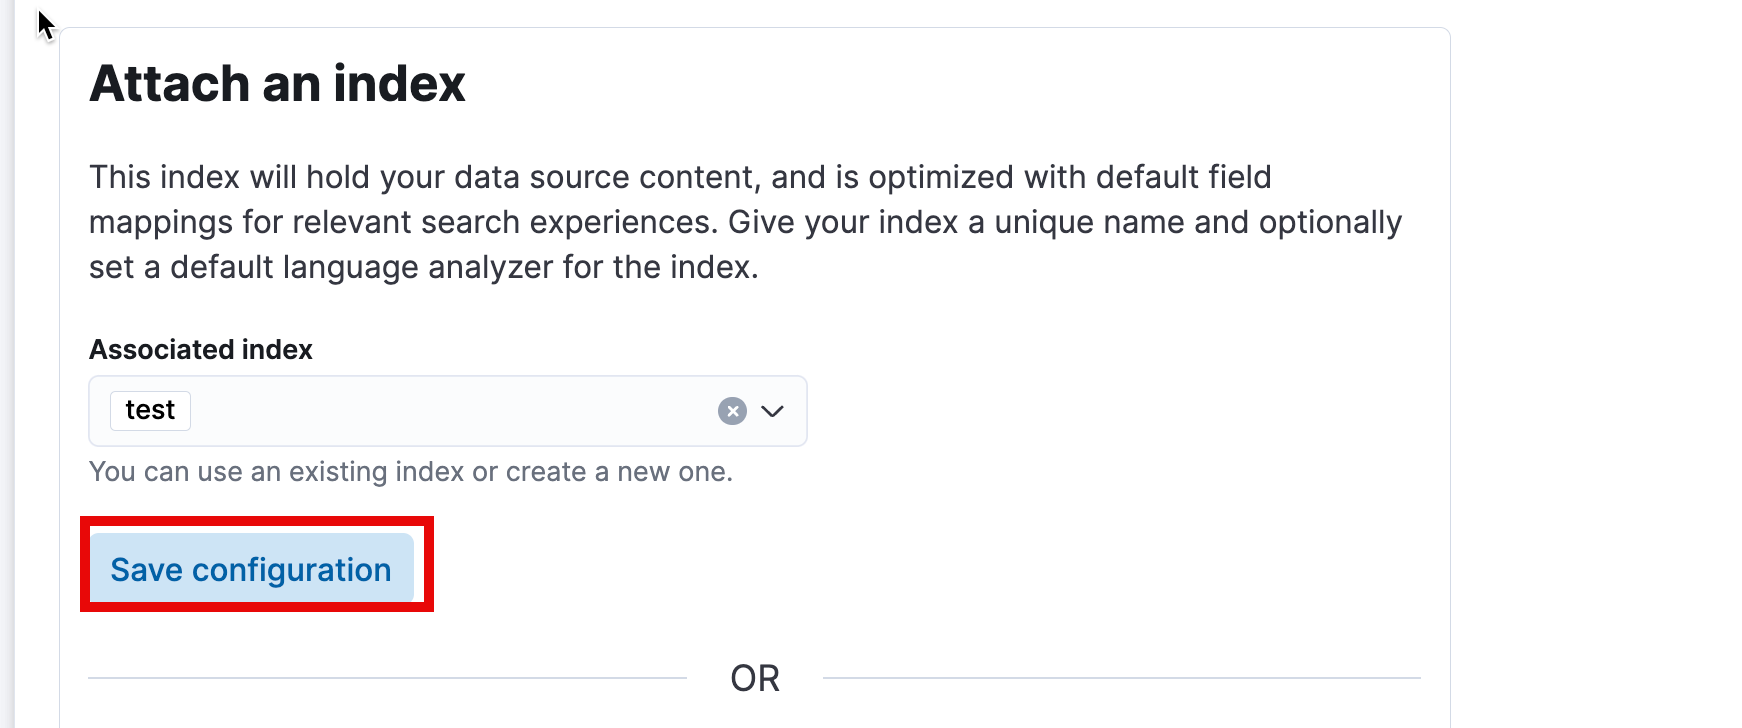
一旦配置完毕,我们可以看到如下的画面:

点击上面的 Sync 按钮:

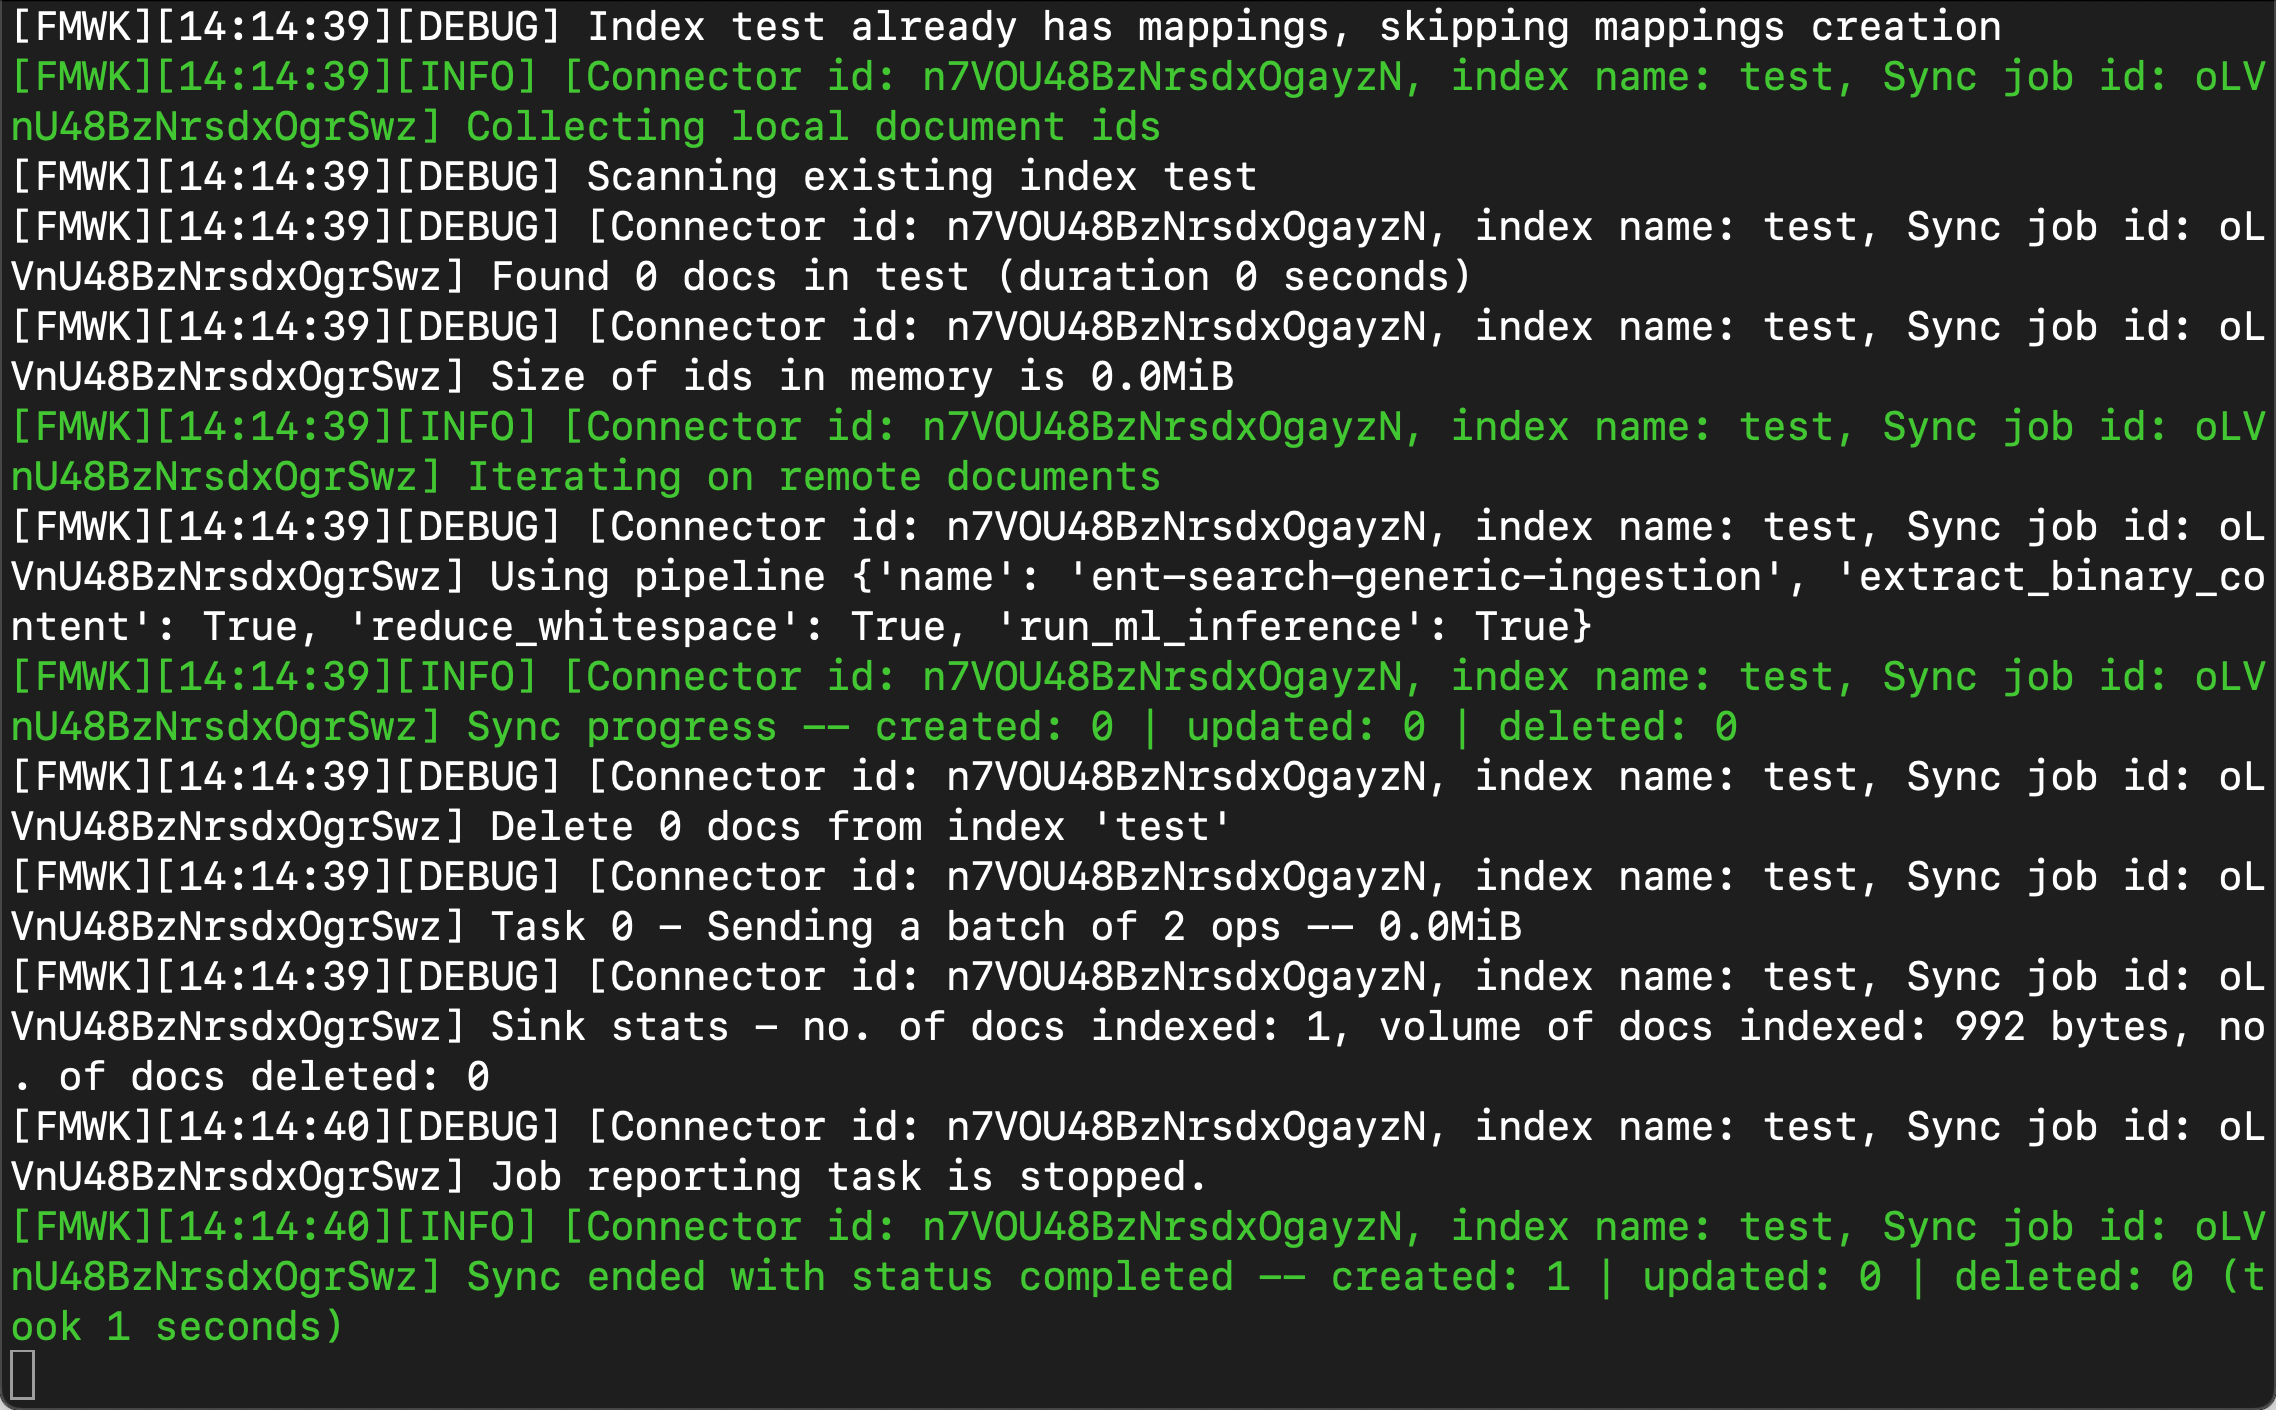
等 Sync 完毕后,我们可以在 Docker 的 terminal 中看到如下的画面:
我们可以到 Kibana 中进行查看文件:
GET test/_search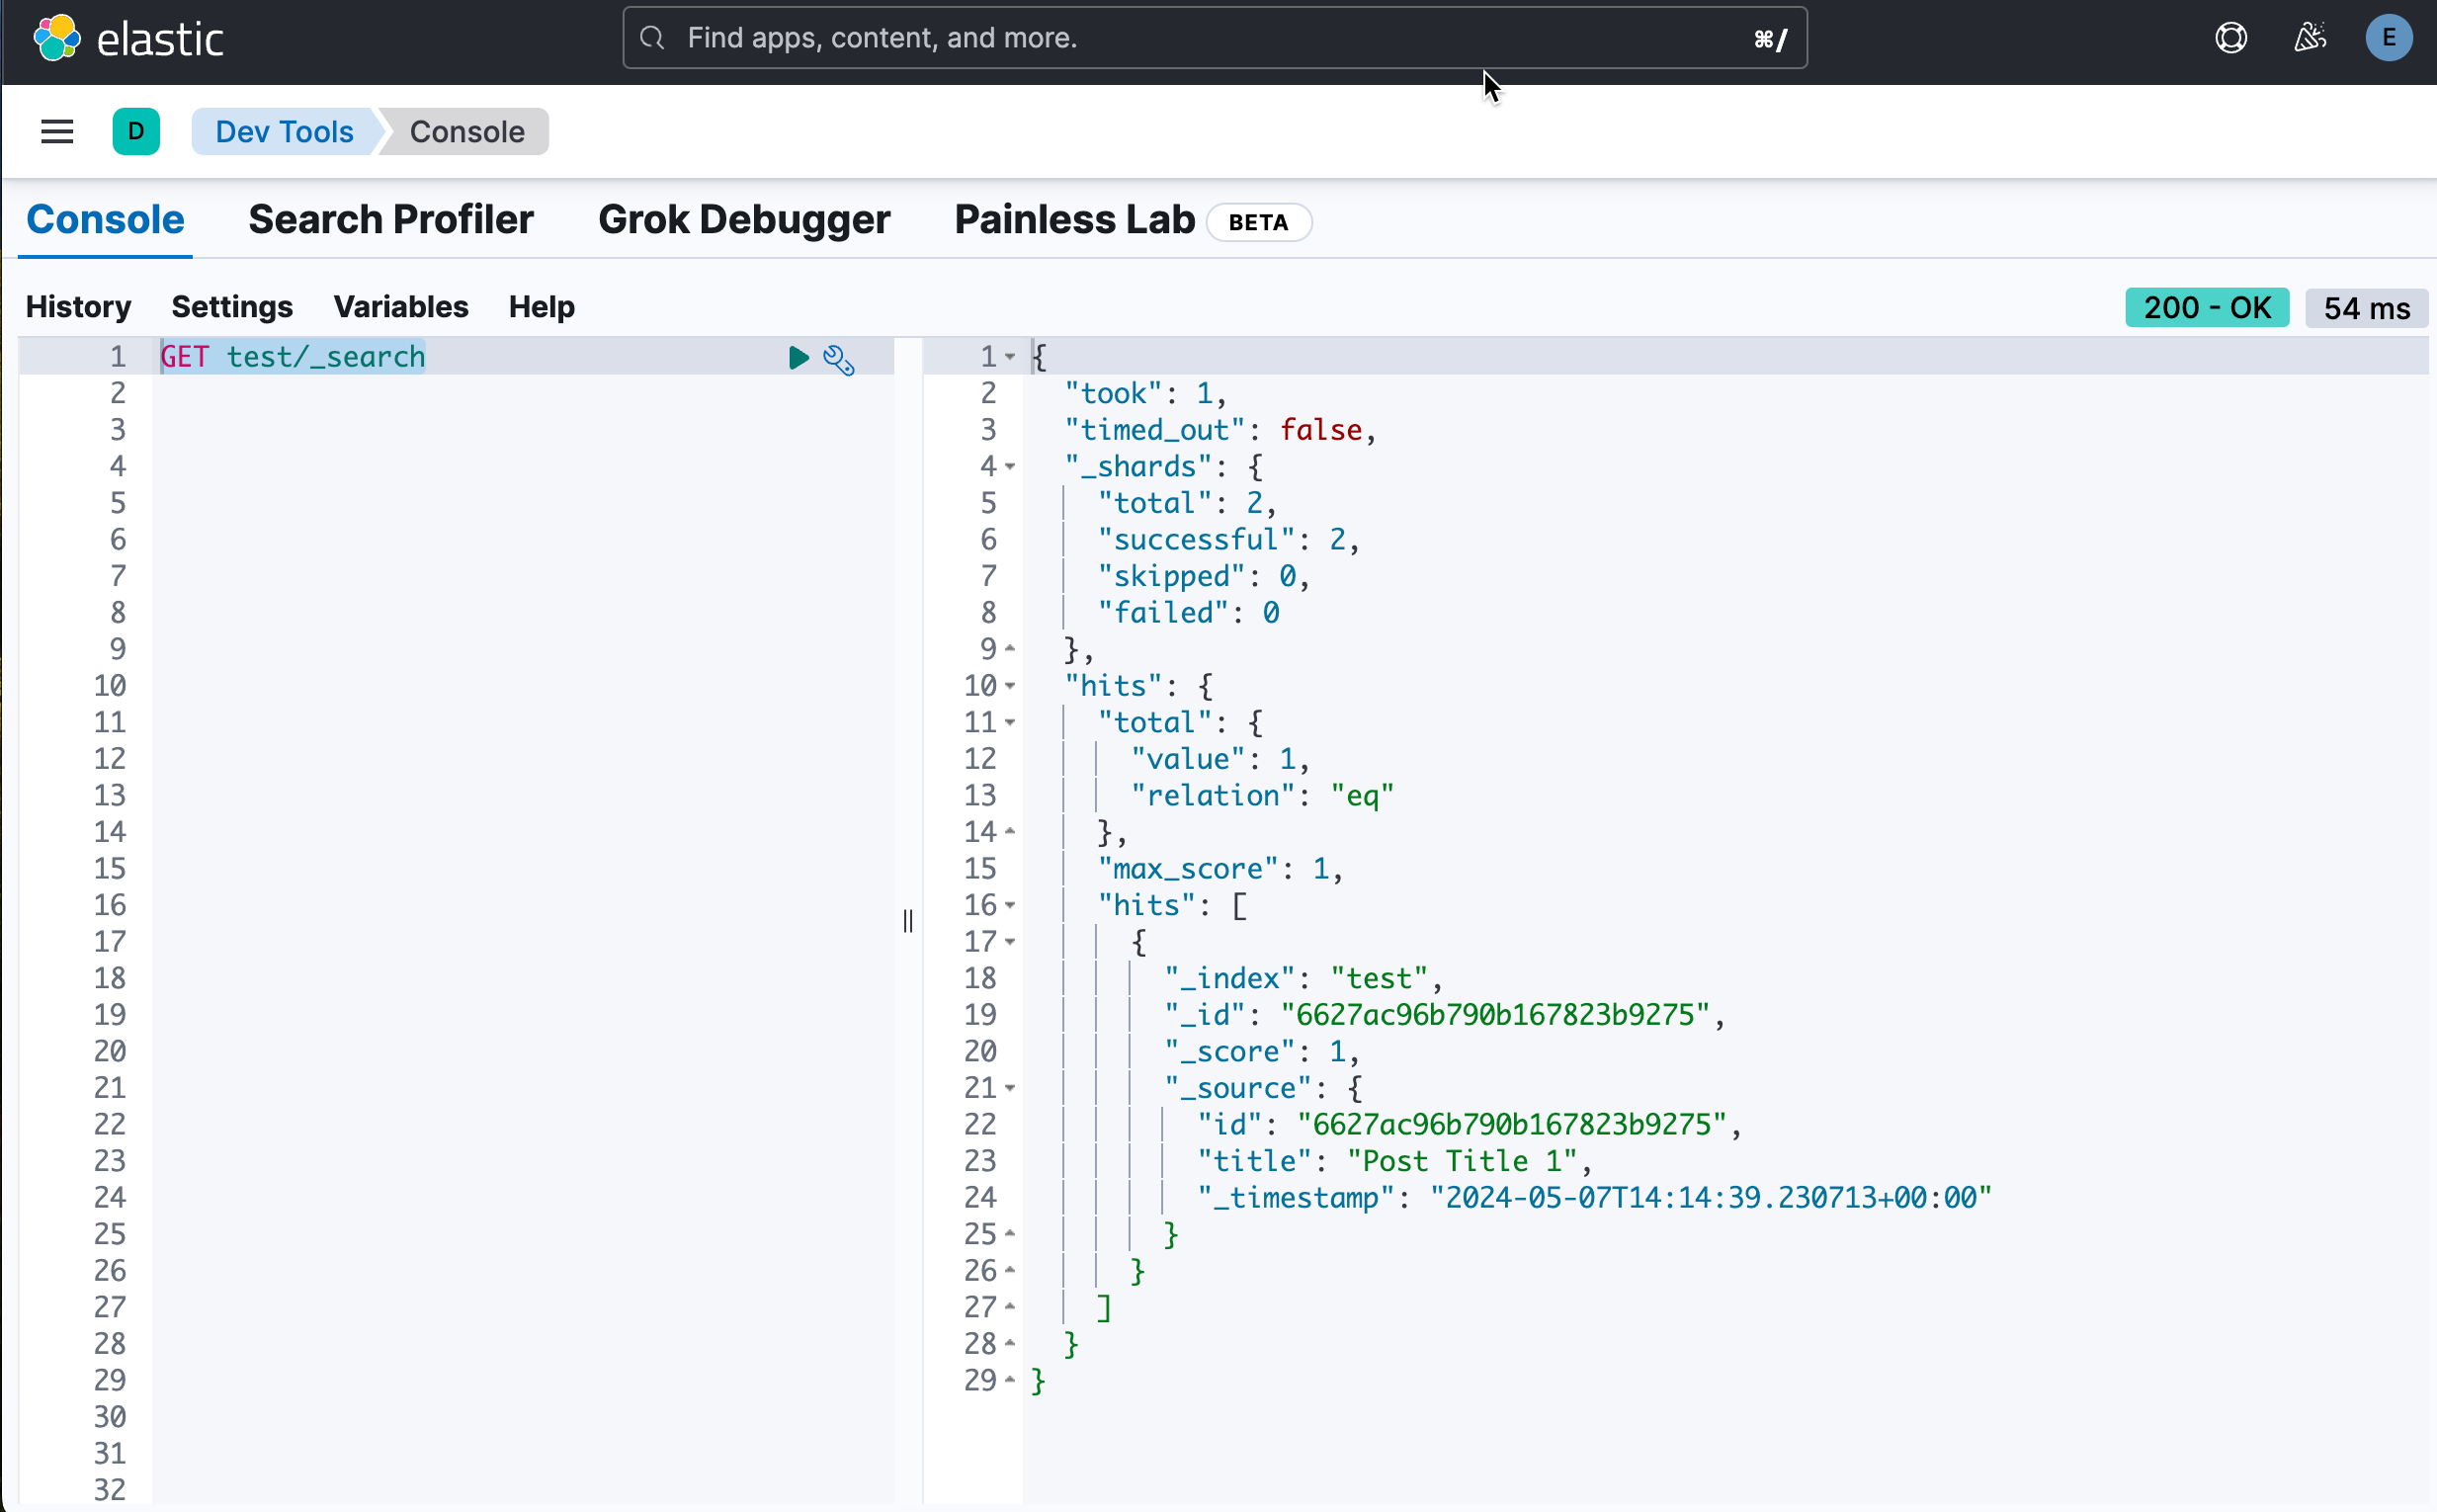
我们可以看到 test 现在含有通过过来的文档。
好了,现在我们已经完成了从 MongoDB 到 Elasticsearch 的同步了。我们可以很方便地把 MongoDB 的数据通过 Connector 同步到 Elasticsearch。希望这篇文章对大家的开发有所帮助。
![[CISCN2019 华北赛区 Day1 Web2]ikun](https://img-blog.csdnimg.cn/direct/360b911eb49941d1bc0fed2d48ec2756.png)


![[Maven]IDEA报错-xxx is referencing itself](https://img-blog.csdnimg.cn/direct/1c6ce326555b4c82888cdb6bab56914d.png)